
Installation Instructions

General Installation Instructions
Section 1.1 : Installing Wraptor Over Wood Sheathing
A. Align the bottom edge of the roll to the bottom portion of the wall. Wraptor
should extend at least 3” below the sill plate. If framing is 16” on center,
align the first layout line (located on the printed side of Wraptor) with the
middle of a stud to allow for easy stud location later.
B. Fasten securely and unroll Wraptor with foil side facing out. Wrap the
entire structure including rough openings for windows and doors.
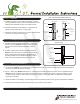
C. Cut Wraptor for window and door openings using a modified "I" pattern
(See Detail 2). Fold excess material to the inside of the rough opening.
Fasten all layers securely to the interior structural framing (See Detail 2).
TIPS
► Use scissors or sharp utility knife to cut Wraptor. If a utility knife is
used, lay Wraptor against a flat, solid surface to make a clean cut.
► Fold Wraptor several inches under itself when beginning to install.
This allows for extra holding power as the installer pulls the wrap
snug against the sheathing and around corners.
► Wraptor can be secured temporarily by placing fasteners every 4-5’
(vertically and horizontally). Once Wraptor is in place or the end of
the day is reached, fasteners should be placed as described in
Section 1.2 : Installing Wraptor Over Foam Sheathing
A. Follow steps in Section 1.1 making sure layout lines are aligned with studs.
B. Fasten Wraptor to wall system by placing fasteners along studs, sill
plates and top plates. Make sure fasteners penetrate structural framing
at least 1/2” (failing to attach Wraptor securely to framing leaves the
material vulnerable to wind damage).
Section 1.3 : Tilt-Up Walls
A. When building walls using the “tilt-up” method, Wraptor
may be installed before the wall section is raised.
B. Leave 6” of extra material (12” on corners) on one side of
the wall. Also leave enough material on the bottom of the
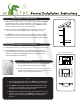
Detail 1: Exterior Wall Cross Section
Wraptor
Sheathing
Wraptor Tape
Detail 2: Modified "I" Cut at Window Opening
Inside View
Outside View
Make an "I" cut in Wraptor at window opening
Fasten Wraptor to sides and bottom of window opening
Top View
Wraptor installed around window jambs
wall for proper overlapping (See Section 3).
Section 2.