
User Guide


Changing Your Pod 3
48
3 Changing Your Pod
3. Conrm that the Pod is securely attached to your body, then tap CONFIRM.
4. If you are squeezing your skin, stop squeezing when the PDM asks if the
cannula is properly inserted.
Once the cannula is inserted, the Pod automatically lls the cannula with insulin.
e Pod then begins delivering the basal rate of insulin according to the active
Basal Program.
e cannula can be inserted only once with each Pod.
Caution: Be sure to check the alarm function at every Pod change (see "Check
alarms" on page 105).
Check the Infusion Site
Following insertion of the cannula, check the Pod and
infusion site:
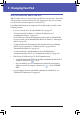
1. Look through the viewing window on the edge of
the Pod to verify that the cannula is inserted into
the skin. e cannula is tinted light blue.
2. Verify that there is a pink color in the area indicated
in the gure. is is an additional check that the
cannula was inserted.
3. Verify that there is no wetness or scent of insulin
at the infusion site. e presence of either may
indicate that the cannula has dislodged.
Warning: Check the infusion site aer insertion to ensure that the
cannula was properly inserted. If the cannula is not properly inserted,
hyperglycemia may result.
4. If the cannula is not properly inserted, tap NO. en tap DEACTIVATE POD.
Restart the process with a new Pod.
5. If the cannula is properly inserted, tap YES.
A green banner noties you that the Pod setup is complete. e screen shows
details about the Pod and a list of reminders.
6. Review the list of active reminders, then tap CLOSE.
Note: Ninety minutes aer Pod activation, a Check BG reminder prompts you
to check your blood glucose level and infusion site. is additional safety feature
helps ensure that the cannula was properly inserted.
Check
here
for pink
color
Check here
for light blue
cannula