
Installation Guide


14
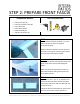
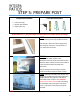
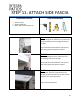
STEP 5: PREPARE POST
Components Needed
Front fascia (D)
Bottom post bracket
Square post (H)
Tools Recommended
A minimum of ½” per foot slope recommended for proper water drainage
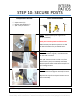
FIRST: Now fasten the square post to the top
post connector previously installed to fascia.
Drill two 3/8” diameter holes through both
post and post connector. Use two 3/8” x 3-
1/2” bolt & nuts to fasten.
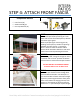
SECOND: Front fascia profile shown must be
“level” across width of patio cover.
Roof Panel must not touch front fascia wall to
allow for water to flow into front fascia drains.
Insert foam fascia dams at end & seal
generously.
Secure roof panel to front fascia rail with
screws from above center of panel “valley”.
THIRD: Raise the assembly into position and
temporarily stabilize the front fascia & post in
upright position by tying each end post to
each ladder with a rope or cord. DO NOT
attach post to patio surface until proceeding
to next STEPS and ensuring first roof panel
insert is “squared” to front fascia and post
assembly.
NOTE: Uneven patio surface will require varying lengths of each post across uneven surface.