
Installation Guide


Need help with installation? www.homedepot.com/services/pergola-installation/
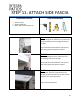
STEP 6: FIRST ROOF PANELS
Components Needed
13” wide “W” roof panels (J)
Sealant tube & gun
#10 x 3/8” sheet metal screw
Tools Recommended
FIRST: Begin this step on far RIGHT side of
hanging channel when facing the structure.
Begin with “female” lock edge (see Step #8) of
panel flush to hanging channel and front
fascia. Top of panel slides below ledge of
hanging channel to sit on groove for screw
location.
SECOND: Insert and press first panel firmly
into foam rubber gasket within the hanging
channel interior. Secure first roof panel with
#10 x 3/8” sheet metal screw through pre-
punched hole into groove location. Move
square post connected fascia assembly “side
to side” so that first roof panel is square to
fascia board or wall.
THIRD: Each individual roof panel is 12” wide
and need to align with 12” marked on hanging
channel and front fascia in STEP #2.
Each panel is designed with unique side edge
as “male” and a “female” to interlock with
next roof panel.
Edge should be flush with hanging channel.
NOTE: Single pre-drilled hole on 13” wide “W” roof panel end should be installed
toward hanging channel to help properly secure panel by aligning hole with below screw
channel. Opposite end of panel attaches to front fascia allowing installer to secure at
necessary location to keep installation square and level based on post variations.