
Installation Guide


Need help with installation? www.homedepot.com/services/pergola-installation/
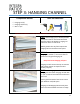
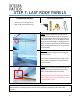
STEP 4: ATTACH FRONT FASCIA
Components Needed
Front fascia (D)
Sealant tube & gun
Post Top Brackets (G)
Tools Recommended
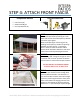
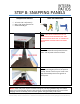
FIRST: Determine post spacing across entire
bottom of front fascia by marking 15” from
both ends of front fascia with post top bracket
connector (G) as guide.
Mark equal spacing for remaining post by
dividing entire space by number of openings
between the post (4 post = 3 openings).
Drill ¼” holes on marks in bottom side of
fascia. Attach with bolts & washers and caulk
inside fascia around protruding bolt heads.
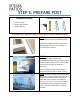
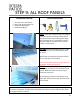
SECOND: Top post bracket must be installed
with drilling “wall” facing left to right or at the
“9 o’clock and 3 o’clock” position on bottom
of front fascia at each measured post location.
DO NOT INSTALL AS SHOWN IN IMAGE
as bracket walls are at 12 & 6 o’clock
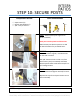
THIRD: Slide bottom post bracket up into
post, drill 3/8” diameter holes through both
post and bottom bracket. Use two 3/8” x 3-
1/2” bolt and but to fasten. Determine length
of post by measuring the distance from patio
floor to the bottom of hanging channel, then
deduct 4” for the back leg of fascia and also
deduct min. ½” per foot slope of panel length.