Contents Important Safety Instructions ............2 DVD Player DPS-5.4 Introduction .........................................7 Connecting the DPS-5.4 ...................17 Instruction Manual Getting Started ..................................23 Playing discs .....................................28 Viewing JPEG discs ..........................39 Audio Settings menu ........................41 Video Adjust menu............................42 Thank you for purchasing the Integra DPS-5.4 DVD Player.
WARNING: TO REDUCE THE RISK OF FIRE OR ELECTRIC SHOCK, DO NOT EXPOSE THIS APPARATUS TO RAIN OR MOISTURE. WARNING AVIS RISK OF ELECTRIC SHOCK DO NOT OPEN RISQUE DE CHOC ELECTRIQUE NE PAS OUVRIR The lightning flash with arrowhead symbol, within an equilateral triangle, is intended to alert the user to the presence of uninsulated “dangerous voltage” within the product’s enclosure that may be of sufficient magnitude to constitute a risk of electric shock to persons.
Precautions This unit contains a semiconductor laser system and is classified as a “CLASS 1 LASER PRODUCT”. So, to use this model properly, read this Instruction Manual carefully. In case of any trouble, please contact the store where you purchased the unit. To prevent being exposed to the laser beam, do not try to open the enclosure. DANGER: VISIBLE AND INVISIBLE LASER RADIATION WHEN OPEN AND INTERLOCK FAILED OR DEFEATED. DO NOT STARE INTO BEAM. CAUTION: THIS PRODUCT UTILIZES A LASER.
Precautions—Continued For Canadian model NOTE: This class B digital apparatus complies with Canadian ICES-003. For models having a power cord with a polarized plug: CAUTION: TO PREVENT ELECTRIC SHOCK, MATCH WIDE BLADE OF PLUG TO WIDE SLOT, FULLY INSERT. Modèle pour les Canadien REMARQUE: Cet appareil numérique de la classe B est conforme à la norme NMB-003 du Canada.
Precautions—Continued 5. Never Touch this Unit with Wet Hands 9. To Obtain a Clear Picture Never handle this unit or its power cord while your hands are wet or damp. If water or any other liquid gets inside this unit, have it checked by your Integra/Onkyo dealer. This unit is a high-tech, precision device. If the lens on the optical pickup, or the disc drive mechanism becomes dirty or worn, the picture quality may be affected.
Table of Contents Basic Operation Advanced Operation Overview Playback Techniques Important Safety Instructions...............................2 Precautions .........................................................3 Introduction..........................................................7 Supplied Accessories ......................................7 DPS-5.4 Features............................................7 Disc Notes .......................................................8 Before Using the DPS-5.4 .....
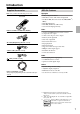
Introduction Supplied Accessories Make sure you have the following accessories: RC-536DV DPS-5.4 Features Highlights • Dolby*1 Digital and DTS*2 • DVD-Video / Video CD / Audio CD playback • CD-R, CD-RW (Video CD, audio CD, MP3/WMA*3/ JPEG) • DVD-R (DVD-Video) • DVD-RW (DVD-Video, VR format) • Vector Linear Shaping Circuitry Video Remote controller & 2 batteries (AA, R6) AV cable (RCA/phono) (59-1/16" / 1.5 m) S-Video cable (59-1/16" / 1.
Introduction—Continued • Don’t use discs with an unusual shape, such as those shown below, because you may damage the DPS-5.4. Disc Notes Supported Discs The DPS-5.4 supports the following discs. Disc DVD-Video Logo Format or file type See page 50 for region information. DVD-Video DVD-R DVD-RW DVD-Video, VR format • Don’t use discs that have residue from adhesive tape, rental discs with peeling labels, or discs with custommade labels or stickers. Doing so may damage the DPS-5.
Introduction—Continued MP3/WMA Compatibility JPEG Compatibility • This unit will play CD-R, and CD-RW discs containing files saved in the MPEG-1 Audio Layer 3 (MP3) or Windows Media Audio (WMA) format with a sampling rate of 32*, 44.1 or 48 kHz. Incompatible files will not play and the message “Can’t play this format” will be displayed (“NO PLAY” in the front panel display). * This unit will not play 32 kHz WMA files encoded at 20 kbps. • Fixed bit-rate MP3 files are recommended.
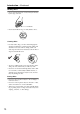
Introduction—Continued Handling Discs • Never touch the underside of a disc. Always hold discs by the edge, as shown. Underside • Never attach adhesive tape or sticky labels to discs. Cleaning Discs • For best results, keep your discs clean. Fingerprints and dust can affect the sound and picture quality and should be removed as follows. Using a clean soft cloth, wipe from the center outwards, as shown. Never wipe in a circular direction.
Before Using the DPS-5.4 Installing the Batteries 1 Open the battery compartment, as shown. Using the Remote Controller To use the remote controller, point it at the DPS-5.4’s remote control sensor, as shown below. Remote control sensor DPS-5.4 Standby/ On Standby Display Power Play Mode On Of f Dimmer Clear Open /Close Pause Stop Play DPS-5. 2 Insert the two supplied batteries (AA) in accordance with the polarity diagram inside the battery compartment. 30˚ 4 ) 5 30˚ . ox pr 16 ( ft.
Front & Rear Panels For detailed information, refer to the pages in brackets. Front Panel A B C D E F G H I J Standby/On K Open /Close Display Play Mode Dimmer Clear L Pause M N Stop Play Standby Power On Of f DPS-5.4 S R A Power switch [22] This is the main power switch. When set to Off, the DPS-5.4 is completely shutdown. When set to On, the DPS-5.4 can be set to On or Standby. Don’t turn on the power until you’ve completed, and double checked all connections (pages 17–21).
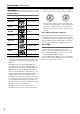
Front & Rear Panels—Continued Display 1 2 DVD D 3 V CD TITLE 456 7 8 9 0 GUI TRACK CHP TOTAL REMAIN PROGRESSIVE A B C D 1 D indicator This indicator appears when playing Dolby Digital material. 2 Disc type indicators These indicators show the type of disc loaded. 3 TITLE indicator This indicator appears while title numbers are being displayed. While stopped, the total number of titles on the current DVD-Video disc is displayed here.
Front & Rear Panels—Continued Rear Panel 1 2 34 5 6 A IR IN/OUT (21) The IR IN connector can be used to connect a commercially available IR receiver, which can be used to pickup signals from the remote controller when the DPS-5.4 is located in another room, installed in a rack, or is out of range of the remote controller The IR OUT connector can be used to connect a commercially available IR emitter, which can be used to pass remote controller signals received by the IR IN along to other AV components.
Front & Rear Panels—Continued Remote Controller 1 2 3 4 On N Standby Repeat Open/ Close Random A-B O Play Mode 1 2 3 Display 5 4 5 6 7 8 9 0 Clear Dimmer Menu Top Menu 6 7 8 9 J K L M P Q R S T U Enter Return Setup Audio Angle Subtitle Zoom Stop Play Pause Down Up T V Control T V/Video Channel On/ Standby V W X Y Z a b Volume RC-536DV A Standby button [22] This button is used to set the DPS-5.4 to Standby. B On button [22] This button is used to turn on the DPS-5.4.
Front & Rear Panels—Continued M Fast Forward /( ) button [26, 29, 30] This button is used for fast forward, slow motion, and frame-by-frame playback. N Open/Close button [25] This button is used to open and close the disc tray. O Random button [32] This button is used with the Random Playback function. P Play Mode button [30] This button is used to open and close the Play Mode menu.
Connecting the DPS-5.4 RCA/phono AV Connection Color Coding Before Making Any Connections RCA/phono AV connections are usually color coded: red, white, and yellow. Use red plugs to connect rightchannel audio inputs and outputs (typically labeled “R”). Use white plugs to connect left-channel audio inputs and outputs (typically labeled “L”). And use yellow plugs to connect composite video inputs and outputs. • Read the manuals supplied with your AV components.
Connecting the DPS-5.4—Continued Basic Setup The setup described here is a basic setup that allows you to play discs using just the AV cable supplied with the player. In this setup, stereo audio is played through the speakers in your TV. VIDEO IN TV L R ANALOG INPUT To power outlet • This player is equipped with copy protection technology. Do not connect this player to your TV via a VCR using AV cables, as the picture from this player will not appear properly on your TV.
Connecting the DPS-5.4—Continued Connecting Your TV • Connect the DVD Player to the TV directly. If you connect the DVD Player to a VCR, TV/VCR combination, or video selector, the playback picture may be distorted as DVD videos are copy protected. Using S-Video If your TV (or other equipment) has an S-Video input, you can use this instead of the standard (composite) output for a better quality picture.
Connecting the DPS-5.4—Continued 1. Connect one of DIGITAL AUDIO OUTPUT jacks on this player to a digital input on your AV receiver. OPTICAL 3. Connect the AV receiver’s video output to a video input on your TV. Tip: • The DPS-5.4 has two composite video output connectors and two pairs of stereo analog audio output connectors. They output the same video and audio signals respectively.
Connecting the DPS-5.4—Continued Controlling AV Components that are Out of Range You can use the following multi-room kits to control the DPS-5.4 when it’s out of range of the remote controller: • Integra Multi-Room System (IR Remote Controller Extension System) • Multiroom AV distribution and control systems such as those made by Niles® and Xantech®.
Connecting the Power/Turning on the DPS-5.4 Before connecting • The DPS-5.4 is shipped with the Power switch in the on position ( On). When the power cord is plugged in for the first time, the DPS-5.4 will automatically enter the standby state and the Standby indicator will light (same condition after step 2 below). • Make sure that all the connections on pages 17 – 21 are complete (the connection to a TV is required).
Getting Started Using the on-screen displays Setting up with the Setup Navigator For ease of use, this player makes extensive use of graphical on-screen displays (OSDs). Make sure that you select the input on the TV (by using the TV remote) to view the on-screen displays. You should get used to the way these work as you’ll need to use them when setting up the player, using some of the playback features, such as program play, and when making more advanced settings for audio and video.
Getting Started—Continued The available languages vary between models. 9 • North American model: English, French, Spanish, German, Italian, Other Language. • Australian model: English, French, Spanish, Chinese (traditional), Other Language. Setup Navigator Language Settings Audio Out Settings • Note that the language you choose here may not be available on all discs. • If you want to select a language other than those listed, select “Other Language.
Getting Started—Continued Playing discs 3 Load a disc. Load a disc with the label side facing up, using the disc tray guide to align the disc (if you’re loading a double-sided DVD disc, load it with the side you want to play face down). The basic playback controls for playing DVD, CD, Video CD and WMA/MP3/JEPG discs are covered here. Standby/On Open/Close Standby/On Open /Close Display Play Mode Dimmer Clear Pause Play Stop Play Standby Power On Of f DPS-5.
Getting Started—Continued Front panel controls Basic playback controls The table below shows the basic controls on the remote controller for playing discs. Pause Standby/On Open /Close Display Play Mode Dimmer Clear Pause Play Stop Play Standby Power On On Standby Repeat A-B 1 2 3 4 5 6 7 8 9 0 Clear Of f DPS-5.
Getting Started—Continued DVD-Video disc menus On Standby Repeat A-B 2 3 Video CD PBC menus On Open/ Close Random Standby Repeat A-B 1 2 3 4 5 6 Play Mode 1 Play Mode Display Numbers 4 5 Display Numbers 6 Dimmer 7 8 9 0 Clear / / Menu Top Menu Dimmer 7 / Top Menu Open/ Close Random 8 9 0 Clear Menu Top Menu Menu Enter Enter Return Setup Audio Angle Subtitle Zoom Return Stop Play Enter Setup Audio Angle Subtitle Zoom Return Pause Down Return Stop U
Playing discs Introduction Most of the features described in this chapter make use of on-screen displays. For an explanation of how to navigate these, see “Using the on-screen displays” on page 23. Many of the functions covered in this chapter apply to DVD discs, Video CDs, CDs and WMA/MP3/JPEG discs, although the exact operation of some varies slightly with the kind of disc loaded. Some DVD discs restrict the use of some functions (random or repeat, for example). This is not a malfunction.
Playing discs—Continued Scanning discs Playing in slow motion You can fast-scan discs forward or backward at various different speeds. On Standby Repeat A-B 1 2 3 4 5 6 Open/ Close Random You can play DVDs and Video CDs at four different forward slow motion speeds. DVD-Video discs can also be played at two reverse speeds. (With Video CDs and VR format DVD-RWs, you can only use forward slow motion playback.
Playing discs—Continued Frame advance/frame reverse Looping a section of a disc You can advance or back up a DVD disc frame-byframe. With Video CDs and VR format DVD-RWs, you can only use frame advance. 4 5 6 7 8 9 0 Clear Dimmer Menu Top Menu Enter Return Setup Audio Angle Subtitle Zoom Stop Play Down / Pause Up The A-B Repeat function allows you to specify two points (A and B) within a track (CD and Video CD) or title (DVD) that form a loop which is played over and over.
Playing discs—Continued 3 Press Enter on “B (End Point)” to set the loop end point. 1 Play Mode Play Mode Enter Play Mode A-B Repeat Repeat A(Start Point) B(End Point) Random Program Off Search Mode After pressing Enter, playback jumps back to the start point and plays the loop. • The minimum loop time is 2 seconds. 4 During playback, press Play Mode and select “Repeat” from the list of functions on the left. To resume normal playback, select “Off” from the menu.
Playing discs—Continued Using random play Use the random play function to play titles or chapters (DVD-Video) or tracks (CD, Video CD and WMA/MP3 discs) in a random order. You can set the random play option when a disc is playing or stopped. • You can’t use random play with VR format DVD-RW discs, Video CDs playing in PBC mode, or while a DVD disc menu is being displayed. For WMA/MP3 discs, select “Random All” (all folders) or “Random Track” (current folder only), (or “Random Off”).
Playing discs—Continued Creating a program list This feature lets you program the play order of titles/ chapters/folders/tracks on a disc. • You can’t use Program play with VR format DVD-RW discs, Video CDs playing in PBC mode, or while a DVD disc menu is being displayed. On Standby Repeat A-B 1 2 3 4 5 6 Open/ Close Random For a DVD disc, you can add a whole title, or a chapter within a title to the program list. • To add a title, select the title.
Playing discs—Continued 4 Repeat step 3 to build up a program list. A program list can contain up to 24 titles/ chapters/folders/tracks. 5 Play Editing a program list After creating a program list, you can add, delete and change steps. To play the program list, press (play). Program play remains active until you turn off program play (see below), erase the program list (see below), eject the disc or switch off the player.
Playing discs—Continued Other functions available from the program menu As well as creating and editing a program list, you can start program play, cancel program play, erase the program list, and memorize a program list from the Play Mode menu. Searching a disc You can search DVD discs by title or chapter number, or by time. CDs can be searched by track number, and Video CDs by track number or time. WMA/MP3 discs can be searched by folder or track number.
Playing discs—Continued Notes: • The disc must be playing in order to use time search. • Search functions are not available with Video CDs in PBC mode, or unfinalized CD-R/RW discs. Switching subtitles Switching VR format DVD-RW audio channel When playing a VR format DVD-RW disc recorded with dual-mono audio, you can switch between the main, sub, and mixed channels during playback.
Playing discs—Continued Zooming the screen Switching camera angles Using the zoom feature you can magnify a part of the screen by a factor of 2 or 4, while watching a DVD or Video CD. Menu Top Menu Enter Return Setup Audio Angle Subtitle Zoom Stop Play Some DVD discs feature scenes shot from two or more angles—check the disc box for details.
Playing discs—Continued Displaying disc information Various track, chapter and title information, as well as the video transmission rate for DVD discs, can be displayed on-screen while a disc is playing. On Standby Repeat A-B 1 2 3 4 5 6 Open/ Close Random Play Mode Display Display Dimmer 7 8 9 0 Clear Menu Top Menu Display To show/switch the information displayed, press Display. When a disc is playing, the information appears at the top of the screen.
Viewing JPEG discs Viewing JPEG discs After loading a CD/CD-R/RW containing JPEG pictures, press Play ( ) to start a slideshow from the first folder/picture on the disc. The player displays the pictures in each folder in alphabetical order. Pictures are automatically adjusted so that they fill as much of the screen as possible (if the aspect ratio of the picture is different to your TV screen you may notice black bars at the sides, or at the top and bottom of the screen).
Viewing JPEG discs—Continued Using the Photo Browser Zooming the screen The Photo Browser displays nine thumbnail images at a time from the current folder. On Standby Repeat A-B Using the zoom feature you can magnify a part of the screen by a factor of 2 or 4, while viewing pictures from a JPEG disc.
Audio Settings menu Audio DRC ■ Default setting: Off When watching Dolby Digital DVDs at low volume, it’s easy to lose the quieter sounds completely—including some of the dialog. Switching Audio DRC (Dynamic Range Control) to On can help by bringing up the quieter sounds, while controlling loud peaks. How much of a difference you hear depends on the material you’re listening to. If the material doesn’t have wide variations in volume, you may not notice much change.
Video Adjust menu Video Adjust 4 Adjust the picture quality settings. ■ Default setting: Standard Memory1 From the Video Adjust screen you can select the standard video presentation or define presets of your own. Recall Settings min max Brightness min min max max Chroma Level On Standby Repeat A-B 2 3 Open/ Close Random • Use the / (cursor up/down) buttons to select a setting. • Use the / (cursor left/right) buttons to adjust the current setting.
Initial Settings menu Using the Initial Settings menu The Initial Settings menu gives you complete control in setting up your DVD player, including audio, and video output settings, audience limitation settings, among others. If an option is grayed out it means that it cannot be changed at the current time. This is usually because a disc is playing. Stop the disc, then change the setting. 1 While playback is stopped, press Setup and select “Initial Settings” from the on-screen display.
Initial Settings menu—Continued ■ Default setting: Interlace MPEG Out You only need to make this setting if you connected this player to an AV receiver (or other component) using one of the digital outputs.
Initial Settings menu—Continued Compatibility of this unit with progressive-scan TVs. This player is compatible with progressive video Macro Vision System Copy Guard. CONSUMERS SHOULD NOTE THAT NOT ALL HIGH DEFINITION TELEVISION SETS ARE FULLY COMPATIBLE WITH THIS PRODUCT AND MAY CAUSE ARTIFACTS TO BE DISPLAYED IN THE PICTURE. IN CASE OF 525 PROGRESSIVE SCAN PICTURE PROBLEMS, IT IS RECOMMENDED THAT THE USER SWITCH THE CONNECTION TO THE “STANDARD DEFINITION” OUTPUT.
Initial Settings menu—Continued The available languages vary between models. • North American model: English, French, Spanish, German, Italian, Other Language. • Australian model: English, French, Spanish, Chinese (traditional), Other Language. Tips: • You can change or switch off the subtitles on a DVD disc during playback using the Subtitle button. (This does not affect this setting.) See “Switching subtitles” on page 36.
Initial Settings menu—Continued Options 3 Parental Lock ■ Default level: Off ■ Default password: none ■ Default Country code: us (2119) Some DVD-Video discs feature a Parental Lock level. If your player is set to a lower level than the disc, the disc won’t play. This gives you some control about what your children watch on your DVD player. Some discs also support the Country code feature. The player does not play certain scenes on these discs, depending on the Country code you set.
Initial Settings menu—Continued Setting/changing the Parental Lock level 1 3 Select “Level Change”. Initial Settings Digital Audio Out Parental Lock Password Change Video Output Language PhotoViewer Level Change Country Code Select a Country code. There are two ways you can do this. • Select by code letter: Use / (cursor up/ down) to change the Country code.
Additional information Screen sizes and disc formats DVD-Video discs come in several different screen aspect ratios, ranging from TV programs, which are generally 4:3, to Cinema- Scope widescreen movies, with an aspect ratio of up to about 7:3. Televisions, too, come in different aspect ratios; “standard” 4:3 and widescreen 16:9. Resetting the player Use this procedure to reset all the player’s settings to the factory default.
Additional information—Continued Disc Player setting Type Format NTSC PAL AUTO DVD NTSC NTSC MOD.PAL NTSC Video CD NTSC NTSC MOD.PAL NTSC PAL NTSC PAL PAL – NTSC PAL NTSC or PAL CD/no disc Selecting languages using the language code list Some of the language options (such as “DVD Language” in the Setup Navigator) allow you to set your prefered language from any of the 136 languages listed in the language code list on page 52.
Additional information—Continued Country code list Country Country code Country code letter Argentina 0118 ar Australia 0121 au Austria 0120 at Belgium 0205 be Brazil 0218 br Canada 0301 ca Chile 0312 cl China 0314 cn Denmark 0411 dk Finland 0609 fi France 0618 fr Germany 0405 de Hong Kong 0811 hk India 0914 in Indonesia 0904 id Italy 0920 it Japan 1016 jp Korea, Republic of 1118 kr Malaysia 1325 my Mexico 1324 mx Netherlands 1412 nl New Zeal
Additional information—Continued Language code list Language Language code Language Language code letter Language code Language Language code letter Language code Japanese ja 1001 Croatian hr 0818 Sindhi sd 1904 English en 0514 Hungarian hu 0821 Sangho sg 1907 French fr 0618 Armenian hy 0825 sh 1908 German de 0405 Interlingua ia 0901 SerboCroatian Italian it 0920 Interlingue ie 0905 Sinhalese si 1909 Spanish es 0519 Inupiak ik 0911 Slovak sk 1911 Ch
Using the Remote controller with Other Brand’s TVs Learning a pre-programming code On Standby Repeat A-B 1 2 3 4 5 6 5 Press some operation buttons for the component that you want to operate to check if the system operates properly. If the system operates properly, the code is correct. If the component does not operate properly, return to step 2.
Using the Remote controller with Other Brand’s TVs—Continued Pre-programming Code List Brand 54 Brand Code Code SAMSUNG 202, 203, 204, 205, 206, 207, 208 209, 210, 211, 212 AIWA 100.
Glossary Analog audio JPEG An electrical signal that directly represents sound. Compare this to digital audio which can be an electrical signal, but is an indirect representation of sound. See also “Digital audio”. A file format used for still images, such as photographs and illustrations. JPEG files are identified by the file extension “.jpg” or “.JPG”. Most digital cameras use this format. Aspect ratio MP3 The width of a TV screen relative to its height.
Troubleshooting If you have any trouble using your DPS-5.4, check the following table for possible causes and remedies. If you still can’t resolve the issue yourself, please contact your Integra/Onkyo dealer. Symptoms Causes The power cord is not connected. The [Power] switch is set to Off. Set the [Power] switch to On (page 22). External interference is affecting the DPS5.4’s digital circuitry. Turn off the DPS-5.4, wait five seconds, then try turning it on again.
Troubleshooting—Continued Buttons on the DPS-5.4 and remote controller don’t work? DVD Player No sound? The picture appears stretched or the wrong shape? Power supply voltage fluctuations and other anomalies, such as static electricity, can interfere with normal operation. Turn off the DPS-5.4, wait five seconds, then turn it on again. If that doesn’t resolve the issue, disconnect the power cord from the wall outlet, wait five seconds, reconnect it, then try again.
Troubleshooting—Continued DVD Player Can’t play MP3/WMA/ JPEG discs? Can’t select MP3 files? Can’t play WMA files? Remote Controller Can’t view JPEG files? Buttons on the DPS-5.4 work OK but those on the remote controller don’t? The disc is not ISO9660 Level 1 or 2 format. Correct format should be used when recording is ISO 9660 and closed session(page 9). The disc has not been finalized. Finalize the disc (page 9). MP3 files without a “.mp3” or “.MP3” filename extension are not recognized.
Specifications Video system North American model: Standard NTSC, Australian model: PAL/AUTO Region code North American model: 1, Australian model: 4, Laser Semiconductor laser, wavelength 650 nm (DVD), 780 nm (CD) Frequency response DVD linear audio 4 Hz–20 kHz @ 48 kHz sampling rate 4 Hz–44 kHz @ 96 kHz sampling rate CD audio 4 Hz–20 kHz Signal-to-noise ratio (digital audio) 106 dB Audio dynamic range (digital audio) 96 dB Harmonic distortion (digital audio) 0.
Integra Division of ONKYO U.S.A. CORPORATION 18 park Way, Upper Saddle River, N.J. 07458, U.S.A. Tel: 201-785-2600 Fax: 201-785-2650 http://www.integrahometheater.com Integra Division of ONKYO CORPORATION Sales & Product Planning Div. : 2-1, Nisshin-cho, Neyagawa-shi, OSAKA 572-8540, JAPAN Tel: 072-831-8111 Fax: 072-831-8124 SN29343491 (C) Copyright 2003 ONKYO CORPORATION Japan. All rights reserved.