
Owner's Manual


66
En
Adjusting the Volume for Zone 2
■ Operating on the remote controller
■ Operating on the AV receiver
Muting Zone 2
■ Operating on the remote controller
Tip
• To unmute, press Zone2 followed by Muting again.
Adjusting the Tone and Balance of Zone 2
Note
• Only analog input sources are output from the ZONE 2
PRE/LINE OUT L/R jacks and FRONT WIDE/ZONE 2 L/R
terminals. Digital input sources are not output. If no sound is
heard when an input source is selected, verify that the source is
connected to an analog input.
• While Zone 2 is on, u functions will not work.
• You cannot select different AM or FM radio stations for your
main room and Zone 2. The same AM/FM radio station will be
heard in each room. Namely, if you have selected an FM station
for the main room, that station will also be output in Zone 2.
• When you have selected NET or USB as the input selector, the
last selector selected will be set for both Main room and Zone 2.
• Zone 2 can also be unmuted by adjusting the volume.
• When Zone 2 is activated and its input selector is selected, the
power consumption of standby mode slightly increases.
• When setting the AV receiver to standby mode while Zone 2 is
active, the Z2 indicator is dimly lit.
• The Zone 2 level, balance, and tone functions have no effect on
the ZONE 2 PRE/LINE OUT jacks when the “Zone 2 Out”
setting is set to “Fixed” (➔ page 58).
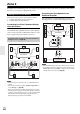
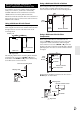
The 12V triggers A, B, and C can be used to turn on 12V
trigger-capable components automatically when they are
selected as the input source. The triggers can be set so that
they activate when a connected component is selected as
the input source for the main room, Zone 2 or any
combination of rooms. When triggered, the output from a
12V TRIGGER OUT goes high (+12 volts and 150
milliamperes max. at 12V TRIGGER OUT A; +12 volts
and 25 milliamperes max. at 12V TRIGGER OUT B and
C).
• See also “12V Trigger A/B/C Setup” (➔ page 57).
Hookup
• Use a miniplug cable to connect the AV receiver’s 12V
TRIGGER OUT A, B, or C jack to the 12 V trigger
input on a connected component.
When several components are turned on simultaneously
by using triggers A, B, and C, depending on the type of
components, a large amount of current may be drawn
momentarily. To prevent this, you can delay trigger
signals A, B, and C individually. Another application of
trigger delay is eliminating the “thump” noise that’s
sometimes heard when a source component is turned on.
You can accomplish this by delaying the trigger signal for
your power amplifier, so that it's the last component to be
turned on.
3
To turn off Zone 2, press Zone2 followed by
8Receiver.
Tip
• The corresponding trigger output goes low (0 volts).
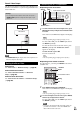
1
Press Zone2.
2
Use VOL q/w to adjust the volume.
1
Use Zone 2 Level q/w.
1
Press Zone2 followed by Muting.
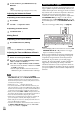
1
On the AV receiver, press Zone 2.
2
Press the AV receiver’s Tone repeatedly to select
“Bass”, “Treble” or “Balance”.
3
Use + and – to adjust the Bass, Treble or Balance.
• You can boost or cut the Bass or Treble from –10dB
to +10dB in 2 dB steps.
• You can adjust the balance from 0 in the center to
+10dB to the right or +10dB to the left in 2 dB steps.
Using the 12V Triggers