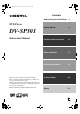
00_DV-SP301.book Page 1 Friday, April 18, 2003 4:18 PM Contents Before Using Your DVD Player 2 Getting Started 6 DVD Player DV-SP301 Instruction Manual Thank you for purchasing the Onkyo DVD Player. Please read this manual thoroughly before making connections and turning on the power. Following the instructions in this manual will enable you to obtain optimum performance and listening enjoyment from your new DVD Player. Please retain this manual for future reference.
00_DV-SP301.book Page 2 Friday, April 18, 2003 4:18 PM WARNING: TO REDUCE THE RISK OF FIRE OR ELECTRIC SHOCK, DO NOT EXPOSE THIS APPLIANCE TO RAIN OR MOISTURE.
00_DV-SP301.book Page 3 Friday, April 18, 2003 4:18 PM Precautions This unit contains a semiconductor laser system and is classified as a “CLASS 1 LASER PRODUCT”. So, to use this model properly, read this Instruction Manual carefully. In case of any trouble, please contact the store where you purchased the unit. To prevent being exposed to the laser beam, do not try to open the enclosure. The label below is applied on the rear panel except for USA and Canadian models.
00_DV-SP301.book Page 4 Friday, April 18, 2003 4:18 PM Precautions 1. Regional Restriction Codes (Region Number) Regional restriction codes are built into DVD Players and DVD-Video media for each sales region. If the regional code of the DVD Player does not match one of the regional codes on the DVD-Video, playback is not possible. The regional number can be found on the rear panel of the DVD Player. (e.g. 1 for Region 1) 2.
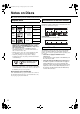
00_DV-SP301.book Page 5 Friday, April 18, 2003 4:18 PM Table of Contents Important Safeguards / Precautions / Table of Contents ..................................................... 2 Getting Started Notes on Discs .........................................................................................................................
00_DV-SP301.book Page 6 Friday, April 18, 2003 4:18 PM Notes on Discs This section shows you how to handle, clean, and store discs. Playable Discs The Structure of the Disc Content This DVD Player can playback the following discs.
00_DV-SP301.book Page 7 Friday, April 18, 2003 4:18 PM CD-R/RW Compatibility Information • • This system is not compatible with multi-session discs. If you try a multi-session disc, only the first session will be played. Use CD-R or CD-RW media for recording your CD audio files, MP3/WMA files or JPEG image files. • The discs must be in ISO9660 Level 2 format (folders can be up to eight levels deep).
00_DV-SP301.
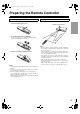
00_DV-SP301.book Page 9 Friday, April 18, 2003 4:18 PM Preparing the Remote Controller Point the remote controller toward the remote control sensor. the tab and lifting up the cover. 30° ) Remote control sensor m 1 Remove the battery compartment cover by pressing Using the Remote Controller 30° (5 Inserting the Batteries fe et 2 Insert the two batteries (size AAA/R3). A pp ro x. 16 Be sure to match the + and – ends of the batteries with the diagram inside the battery compartment.
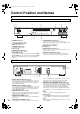
00_DV-SP301.book Page 10 Friday, April 18, 2003 4:18 PM Control Position and Names Front Panel For operational instructions, see the page indicated in brackets [ ]. 12 3 4 8 5 9 6 0 7 - 1 POWER button [17] 7 PLAY/PAUSE £/8 button [18] Turns on the main power supply. 2 STANDBY/ON button [17] Toggle for standby and on. 3 STANDBY indicator [17] Lights in the standby mode. 4 Disc tray [18] 5 OPEN/CLOSE 0 button [18] Press to open or close the disc tray. 6 STOP 7 button [18] Stops playing a disc.
00_DV-SP301.book Page 11 Friday, April 18, 2003 4:18 PM Display 1 2 4 5 3 PROGRESSIVE PBC TITLE 6 7 CHAPTER TRACK 8 9 HOUR MIN MEM. 0 SEC DVD CD VCD MP3 ~ INTRO REPEAT 1ALLA-B RESUME RANDOM @ ! 1 Disc indicators - = 8 Time indicator Indicate the type of disc currently loaded. 2 Play/Pause indicators Illuminate in play or pause mode. 3 PROGRESSIVE indicator Illuminates when the DVD player is set to progressive mode. 4 PBC indicator Illuminates when PBC is on for Video CD.
00_DV-SP301.book Page 12 Friday, April 18, 2003 4:18 PM Control Position and Names Remote Controller For operational instructions, see the page indicated in brackets [ ]. 1 @ 2 # 3 $ 4 % 5 ^ 6 7 8 & * ( ) 9 0 = _ + ~ ! ¡ 1 STANDBY/ON button [17] Toggle for standby on and off. 2 DIMMER button [19] Toggle to control the lightness of the display (3 steps). 3 RANDOM button [22] Press to do random playback. 4 REPEAT button [22] Press to repeat playback.
00_DV-SP301.book Page 13 Friday, April 18, 2003 4:18 PM Making Connections To accommodate a wide range of home entertainment systems, this player features numerous connection types for both audio and video. Please refer to the instructions on this and the following pages to determine the best possible type of connections for your system. Before Connecting • Refer to the instruction manuals supplied with any and all components that you plan to connect the DVD Player to.
00_DV-SP301.book Page 14 Friday, April 18, 2003 4:18 PM Making Connections ■ If your TV has S-Video Input connector If the TV or monitor has an S-video input, making this type of video connection will produce improved picture quality. Using an S-video cable (sold separately), connect the VIDEO OUTPUT S VIDEO jack to the corresponding S-video input jack on the TV. In the same manner, make audio connections from the ANALOG OUTPUT L and R jacks to the corresponding audio input jacks on the TV.
00_DV-SP301.book Page 15 Friday, April 18, 2003 4:18 PM ■ If your TV has Component Input connector Notes If the TV or monitor has component video inputs, making this type of video connection will produce ideal picture quality for the presentation of DVD-Video. Using a component video cable (sold separately), connect the VIDEO OUTPUT COMPONENT jacks to the corresponding component video input jacks on the TV. Actual labels for component video inputs may vary depending on the TV manufacturer. (e.g.
00_DV-SP301.book Page 16 Friday, April 18, 2003 4:18 PM Making Connections Connecting to an Amplifier (To enjoy the sound advantage of the DVD Player) Although you can reproduce the DVD Player’s sound from the TV speakers with the connections on pages 13, 14, and 15, connecting with an amplifier provides you high quality dynamic sounds. To reproduce Dolby Digital surround and DTS surround sound, you need to connect to an amplifier with a Dolby Digital and DTS decoder respectively.
00_DV-SP301.book Page 17 Friday, April 18, 2003 4:18 PM Turning on Connecting the POWER The DV-SP301 is shipped with the main power (POWER) switch in the on position (_ON). When the power cord is plugged in for the first time, the DV-SP301 will automatically enter the standby mode and the STANDBY indicator will light (same condition after step 2 below). POWER STANDBY/ON Notes • Make sure that all appropriate connections have been completed as described on page 13 to 16.
00_DV-SP301.book Page 18 Friday, April 18, 2003 4:18 PM Basic Playback Before playing • Turn on the TV and set the TV to the DVD Player's input. • Turn on the audio system and set it to the DVD Player’s input, if an audio system is connected to the DVD Player. • DVD-Video, Video CD, CD, MP3, WMA, JPEG can be played with the DVD Player (see “Notes on Discs” on page 6 and 7). Do not play anything else.
00_DV-SP301.book Page 19 Friday, April 18, 2003 4:18 PM Various Playback DVD VCD CD OPEN/CLOSE 0 MP3 ■ To play in fast reverse (FR) or fast forward (FF) DIMMER SLOW Press FR/FF 1/¡ during playback. Each press of the same button changes the playback speed. To resume normal playback, press PLAY £. STEP e/E Note FR/FF 1/¡ The DVD Player mutes sounds and omits subtitles during fast reverse and fast forward of DVD-Video and Video CD.
00_DV-SP301.book Page 20 Friday, April 18, 2003 4:18 PM Basic Playback Playing back CDs When CD playback is started, this display appears on the screen. 1 1 Displays the track number and the total playing time. Press 5/a to highlight the track you desire. Press ENTER to start playing the track. 2 Displays the currently playing track number. 3 Displays the time elapsed information of currently playing track. You can use the On-screen display to change the information.
00_DV-SP301.book Page 21 Friday, April 18, 2003 4:18 PM Playing back JPEGs You can play JPEG images on a CD-R or CD-RW which you recorded the images from digital camera using a PC, etc. Various Playback ■ Slide show 1 Press PLAY in the thumbnail display. The slide show starts. The images change every 10 seconds. 2 Press PAUSE to stop the slide show at the image you want to see is displayed. If you want to see the images one by one, press DOWN/UP 4/¢ to select the image.
00_DV-SP301.book Page 22 Friday, April 18, 2003 4:18 PM Other Operations The following operations can be performed directly from the remote controller. • Random Play • Repeat Play • A-B Repeat Play • Memory Edit Play DVD VCD CD MP3 Repeat Play Desired disc or title can be played back repeatedly. There are four repeat options: • Disc Repeat the disc that is playing. • Title Repeat the title that is playing. • Chapter Repeat the chapter that is playing. • Track Repeat the track that is playing.
00_DV-SP301.book Page 23 Friday, April 18, 2003 4:18 PM DVD VCD CD MP3 CD A-B Repeat Play MP3 JPEG Memory Edit Play The DVD Player automatically plays tracks in the order you program. A B The A-B repeat function lets you mark a segment to repeat between the beginning “A” and the end “B” of the segment you want to replay. 1 Press A-B when you want to choose a scene (sound) as the beginning point. Display 1 Press MEMORY to display “Create Playlist” on the top left.
00_DV-SP301.book Page 24 Friday, April 18, 2003 4:18 PM DVD settings The following operations can be performed directly from the remote controller. • Selecting a Playback Audio Setting • Changing the Subtitle Language • Changing the Camera Angle DVD Selecting a Playback Audio Setting Good morning! Bon jour! ¡Buenos días! You can select the preferred audio language and sound system as a set from those included on the disc.
00_DV-SP301.book Page 25 Friday, April 18, 2003 4:18 PM DVD DVD Changing the Subtitle Language Changing the Camera Angle Angle : 1 Good evening! Bon soir! Angle : 2 Angle : 3 ¡Buenas tardes! You can display subtitles on the TV screen and select a subtitle language from those included on the DVD-Video. 1 Press SUBTITLE on the remote controller during playback. 2 Press SUBTITLE repeatedly to select the subtitle language. 3 Press SUBTITLE ON/OFF to select subtitle on or off.
06_DV-SP301E.ADV.fm Page 26 Friday, April 18, 2003 7:05 PM Using On-Screen Display The On-screen display contains many playback features. The On-screen display is available for DVD, video CD, CD and MP3. Using On-Screen Display 1 3 ON SCREEN ENTER 2 4 Press ON SCREEN. The contents of On-screen display depend on the type of disc being played. For example, when playing CDs, the On-screen display appears as above: 1 Playback Statement Displays the current playback information.
00_DV-SP301.book Page 27 Friday, April 18, 2003 4:18 PM VCD CD MP3 Selecting a Track To play from a specific Track. DVD VCD CD MP3 Selecting a Time to Playback To play from your preferred Time. 1 Press ON SCREEN. 1 Press ON SCREEN. 2 Press 5/a to select Track. 2 Press 5/a to select Time Search. 3 Press ENTER. 3 Press ENTER. “__/12” appears. The number after “/” means the number of Track in total. 4 “__:__” appears. 4 Press the number buttons to enter the Track number.
00_DV-SP301.book Page 28 Friday, April 18, 2003 4:18 PM Using On-Screen Display VCD CD MP3 Selecting the Play Mode You can select normal play mode, random play mode or Intro scan play mode. In random play mode, you can listen to the tracks in random order. In intro scan play mode, you can listen only the first 10 seconds of each track. 1 Press ON SCREEN. 2 Press 5/a to select PlayMode and press ENTER.
00_DV-SP301.book Page 29 Friday, April 18, 2003 4:18 PM DVD VCD CD MP3 Selecting the Repeat Mode Desired disc, title, chapter, track or playlist can be played back repeatedly. 1 Press ON SCREEN. 2 Press 5/a to select Repeat Mode and press ENTER. Repeat Mode submenu appears and the available repeat modes are listed. DVD VCD CD MP3 Changing the Time Display You can change the time on the On-screen display and the Front display.
00_DV-SP301.book Page 30 Friday, April 18, 2003 4:18 PM Customizing the Settings You can customize this setting menu according to your preferences. Making Adjustments to Setting 1 ■ How to use RETURN When RETURN is pressed, the display returns to the previous screen. Press MENU during stop mode. The setup menu display appears. 2 Press 5/a/2/3 to select the item you want to change, then press ENTER. Some settings will change when you press ENTER. 3 Press 5/a to change the setting, then press ENTER.
00_DV-SP301.book Page 31 Friday, April 18, 2003 4:18 PM Language Setup Selectable languages English French German Spanish Turkish Japanese Italian Portuguese Chinese Korean Danish Player Menus This sets the initial setup of language as well as the language used in On-screen messages such as “PLAY”. English: To display setup menus in English. Français: To display setup menus in French. Español: To display setup menus in Spanish. : To display setup menus in Chinese.
00_DV-SP301.book Page 32 Friday, April 18, 2003 4:18 PM Customizing the Settings Table of Languages and Their Code No. Code No.
00_DV-SP301.book Page 33 Friday, April 18, 2003 4:18 PM Audio Setup Dynamic Range Maximum ⇔ Compressed When the setting is [Compressed], soft sounds such as dialog can be heard more clearly without making loud sounds even louder. When the setting is set to [Maximum], there is no effect on the audio source. Notes • Dynamic Range is only effective with Dolby Digital audio sources. • The level may differ depending on the DVD. • The effect depends on your speakers and AV amplifier settings.
00_DV-SP301.book Page 34 Friday, April 18, 2003 4:18 PM Customizing the Settings Display Setup Notes • The displayable picture size is preset on each DVD-Video. Therefore, the playback picture of some DVD-Video may not conform to the picture size you select. • When you play a DVD-Video recorded in the 4:3 picture size only, the playback picture always appears in the 4:3 picture size regardless of the TV shape setting.
00_DV-SP301.book Page 35 Friday, April 18, 2003 4:18 PM Progressive Scan Disc Setup You can enjoy the progressive video images when component video connection is used to connect this player and TV compatible with progressive. Compared to a standard interlaced TV picture, a progressive scan TV is capable of stable, flicker-free images. On ⇔ Off Press ENTER, if your TVs and monitors have component video inputs and are compatible with Progressive scan.
00_DV-SP301.book Page 36 Friday, April 18, 2003 4:18 PM Customizing the Settings If the parental level of the disc to be played back exceeds the parental level setting, you have to enter the password to play the disc. Parental Setup Note Be sure not to forget your password. If you forget it, open the disc tray, and press STANDBY/ON while holding down SEARCH 1 on the unit. Next, press POWER to turn the system off. Press POWER again to turn the system back on and the password is cleard.
00_DV-SP301.book Page 37 Friday, April 18, 2003 4:18 PM Troubleshooting Check the following guide for the possible cause of a problem before contacting service. Refer also to the respective instruction manuals of the connected components and TV. DVD Player Symptoms Causes Remedies Pages • Check the connection of the power cord. • Turn on the main power. • Switch off the main power, then switch it on again. If not recovered, disconnect the power cord, then connect it again.
00_DV-SP301.book Page 38 Friday, April 18, 2003 4:18 PM Troubleshooting Remote Controller Symptoms Causes The buttons on the DVD • No batteries are inserted in the remote Player operate but the controller. buttons on the remote • The batteries are worn out. controller do not operate. • The remote controller is not pointed at the remote sensor of the DVD Player. • The remote controller is too far from the DVD Player. Remedies Pages • Insert new batteries. 9 • Replace with new batteries.
08_DV-SP301E.OTH.fm Page 39 Friday, April 18, 2003 7:05 PM Specifications ■ DVD Player Power supply Power consumption Weight External dimensions (W × H × D) Signal system Frequency response Digital output DVD linear sound Signal-to-noise ratio (digital output) Audio dynamic range (digital output) Harmonic distortion (digital output) Wow and flutter AC 120 V, 60 Hz (North America models) AC 110-240 V, 50/60 Hz (Other models) 16 W 6.6 lbs, 3.0 kg 17-1/8" x 3-3/16" × 11-1/8" 435 × 81.
00_DV-SP301.book Page 40 Friday, April 18, 2003 4:18 PM Sales & Product Planning Div. : 2-1, Nisshin-cho, Neyagawa-shi, OSAKA 572-8540, JAPAN Tel: 072-831-8111 Fax: 072-831-8124 ONKYO U.S.A. CORPORATION 18 Park Way, Upper Saddle River, N.J. 07458, U.S.A. Tel: 201-785-2600 Fax: 201-785-2650 http://www.onkyousa.com ONKYO EUROPE ELECTRONICS GmbH Liegnitzerstrasse 6, 82194 Groebenzell, GERMANY Tel: +49-8142-4401-0 Fax: +49-8142-4401-555 http://www.onkyo.