Contents Important Safety Instructions............3 DVD Changer DPC-7.4 Instruction Manual Precautions .......................................4 Introduction .......................................6 Controls & Connectors ...................10 Before Using the DPC-7.4 ...............15 Connecting the DPC-7.4 ................16 Powering Up & Setting Up the DPC-7.4 .........................................21 Basic Playback ...............................22 Thank you for purchasing the Integra DPC-7.
Contents Important Safety Instructions ............................3 Precautions .........................................................4 Introduction .........................................................6 Supplied Accessories.........................................6 DPC-7.4 Features ..............................................6 Disc Notes..........................................................7 DPC-7.4-related Terminology ............................9 Controls & Connectors.......................
WARNING: TO REDUCE THE RISK OF FIRE OR ELECTRIC SHOCK, DO NOT EXPOSE THIS APPLIANCE TO RAIN OR MOISTURE. CAUTION: TO REDUCE THE RISK OF ELECTRIC SHOCK, DO NOT REMOVE COVER (OR BACK). NO USER-SERVICEABLE PARTS INSIDE. REFER SERVICING TO QUALIFIED SERVICE PERSONNEL.
Precautions DANGER: FCC INFORMATION FOR USER VISIBLE AND INVISIBLE LASER RADIATION WHEN OPEN AND INTERLOCK FAILED OR DEFEATED. DO NOT STARE INTO BEAM. CAUTION: The user changes or modifications not expressly approved by the party responsible for compliance could void the user’s authority to operate the equipment. CAUTION: THIS PRODUCT UTILIZES A LASER. USE OF CONTROLS OR ADJUSTMENTS OR PERFORMANCE OF PROCEDURES OTHER THAN THOSE SPECIFIED HEREIN MAY RESULT IN HAZARDOUS RADIATION EXPOSURE.
Precautions—Continued 1. Region Numbers 7. Care The DVD standard uses region numbers to control how discs can be played around the world, the world being divided into six regions. This unit will only play DVD discs that match its region number, which can be found on its rear panel (e.g., ). Occasionally, you should dust this unit all over with a soft cloth. For stubborn stains, use a soft cloth dampened with a weak solution of mild detergent and water.
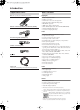
Introduction Supplied Accessories Make sure you have the following accessories: Remote controller (RC-543DV) & 2 batteries (AA/R6) DPC-7.
Introduction—Continued DVD Region Numbers Disc Notes Supported Discs The DPC-7.4 supports the following discs. Disc Logo 1 The North American DPC-7.4 supports only Region 1 DVD-Videos bearing this logo. 4 The Australian DPC-7.4 supports only Region 4 DVD-Videos bearing this logo. Format or file type DVD-Video *1 If you attempt to play a disc intended for another region, the message “Cannot play discs with this region code” appears onscreen.
Introduction—Continued ■ Audio CD Format ■ MP3 Audio CDs contain tracks. Track 1 Track 2 Track 3 Track 4 Track 5 Audio CD ■ WMA ■ MP3/WMA Files MP3 and WMA files are typically organized into folders. The DPC-7.4 handles MP3 and WMA files as tracks. Folder 1 Track 1 Track 2 Folder 2 Track 3 Track 1 Track 2 ■ JPEG Files JPEG picture files are typically organized into folders. The DPC-7.4 handles JPEG files as tracks.
Introduction—Continued Storing Discs • Don’t store discs in places subject to direct sunlight, or near heat sources. • Don’t store discs in places subject to moisture or dust, such as in a bathroom or near a humidifier. • Always store discs in their cases and vertically. Stacking, or putting objects on unprotected discs may cause warping, scratches, or other damage.
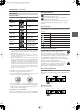
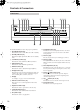
Controls & Connectors Front Panel A B C456 7 8 9 JKL Open /Close Standby/On Last Memory Repeat Dimmer Disc Skip Display Pause Chain Mode Standby Stop Play Enter DPC-7.4 M For detailed information, refer to the pages in parenthesis. A Standby/On button (21) This button is used to set the DPC-7.4 to On or Standby. B Standby indicator (21) This indicator lights up when the DPC-7.4 is in Standby mode. C Last Memory button (37) This button is used with the Last Memory function.
Controls & Connectors—Continued Display 1 2 CHAIN MODE DISC ALL DVD CD 3 TITLE 4 5 6 7 8 9 0A B CHP PRGV TRACK LAST TOTAL REMAIN VCDVD D For detailed information, refer to the pages in parenthesis. 1 CHAIN MODE, ALL, DVD & CD indicators (31) The Chain Mode indicator appears when the Chain mode function is on. The ALL, DVD, and CD indicators show the type or Chain mode selected. 2 DISC indicator The number of the currently selected disc appears here.
Controls & Connectors—Continued Rear Panel 12 3 4 VIDEO OUTPUT COMPONENT 2 Y PB PR DVD CHANGER AUDIO OUTPUT COMPONENT 1 Y PB PR RS 232 MODEL NO. DPC-7.4 DIGITAL OPTICAL COAXIAL S VIDEO AC INLET AUDIO OUTPUT ANALOG VIDEO L R 5 IN IR OUT 6 REMOTE CONTROL 7 89 J For detailed information, refer to the pages in parenthesis.
Controls & Connectors—Continued For detailed information, refer to the pages in parenthesis. Remote Controller A Standby button (21) This button is used to set the DPC-7.4 to Standby. B On button (21) This button is used to turn on the DPC-7.4.
Controls & Connectors—Continued Q Repeat button (32) This button is used to set the Repeat Playback functions.
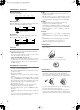
Before Using the DPC-7.4 Installing the Remote Controller’s Batteries 1 Using the Remote Controller To use the remote controller, point it at the DPC-7.4’s remote control sensor, as shown below. Open the battery compartment, as shown. Remote control sensor DPC-7.4 Standby/ On Last Memory Standby Repeat Dimmer Display Open /Close Disc Skip Pause Chain Mode Stop Play Enter 2 Insert the two supplied batteries (AA/R6) in accordance with the polarity diagram inside the battery compartment. DPC-7 .
Connecting the DPC-7.4 RCA/phono AV Connection Color Coding This chapter explains how to connect the DPC-7.4 to your other AV components. RCA/phono AV connections are usually color coded: red, white, and yellow. Use red plugs to connect right-channel audio inputs and outputs (typically labeled “R”). Use white plugs to connect left-channel audio inputs and outputs (typically labeled “L”). And use yellow plugs to connect composite video inputs and outputs.
Connecting the DPC-7.4—Continued Connecting Your TV or Projector This section explains how to connect the DPC-7.4 to your TV or projector. S-Video offers better picture quality than composite video, so if your TV supports it, use the supplied S-Video cable to connect the DPC-7.4’s S VIDEO output to an S-Video input on your TV. Failing that, use the supplied composite video cable to connect the DPC-7.4’s VIDEO output to a composite video input on your TV.
Connecting the DPC-7.4—Continued Notes: Connecting Your Hi-Fi Amp This section explains how to connect the DPC-7.4 to a stereo hi-fi amp or receiver for better sound quality than that of most TVs. This is ideal for playing your audio CDs and MP3/ WMA discs in the DPC-7.4. DVD-Videos and Video CDs will sound better too. You can also enjoy Dolby Pro Logic, so long as your receiver supports it. • Be sure to set the Digital Out–>Dolby Digital setting to “Dolby Digital>PCM” (see page 42).
Connecting the DPC-7.4—Continued Connecting Components Plug the supplied power cord into the AC INLET -compatible AV With (Remote Interactive) you can control your DPC-7.4 by using the remote controller supplied with your Onkyo or Integra -compatible AV receiver. Integra/Onkyo AV receiver • Do not use a power cord other than the one supplied with the DPC-7.4. The power cord supplied is designed for use with the DPC-7.4 and should not be used with any other device.
Connecting the DPC-7.4—Continued Controlling AV Components that are Out of Range You can use the following multi-room kits to control the DPC-7.4 when it’s out of range of the remote controller: • Integra Multi-Room System (IR Remote Controller Extension System) • Multiroom AV distribution and control systems such as those made by Niles® and Xantech®.
Powering Up & Setting Up the DPC-7.4 On Standby Standby/On On Standby/On Standby Search Last Memory Repeat Dimmer Open/ Close Last M Memory Chain Mode Here you need to specify the size of your TV (standard 4:3 or widescreen 16:9), select a language for the onscreen setup menus, and configure the digital audio output. You can change these settings later by using the onscreen setup menus (see page 39).
Basic Playback Notes: Play/Enter Open/Close Open/ Close On Standby Search Open/ Close Last M Memory Chain Mode Repeat 1 2 3 4 5 6 A-B Open /Close Random Pause Disc Skip Chain Mode Stop Play 7 8 9 +10 0 Clear Display Enter Menu Top Menu Enter Return Audio DPC-7.
Basic Playback—Continued Random Stop Play/Enter 7 8 9 +10 0 Clear Play Starting, Pausing & Stopping Playback Display Menu Top Menu DVD VCD CD MP3 WMA Pause Stop This section explains how to start, pause, and stop playback. Enter Return Setup Open /Close Pause Disc Skip Chain Mode Stop Audio Play Angle Subtitle Stop Play Pause ■ Start Enter Disc1–6 DPC-7.
Basic Playback—Continued • Prolonged display of the same picture or menu may cause irreparable damage to your TV screen called screen burnin. To prevent this, don’t keep playback paused for too long and always press the Stop [ ] button when you’ve finished playing a DVD-Video or Video CD. Your DPC-7.4 features a screen saver to protect your TV from the effects of burnin (see page 44). • With some DVD-Videos, you may experience picture noise that is not normally visible with regular TV broadcasts.
Basic Playback—Continued Play/Enter 2 Remote controller Open /Close Pause Disc Skip Chain Mode Stop Enter Play If you select a playback option (e.g., subtitles), another menu of options will typically appear, in which case you use the remote controller’s navigation buttons to select items and the [Enter] button to confirm your choice. Enter DPC-7.
Basic Playback—Continued 4 Play/Enter On Search Open /Close Disc Skip Pause Chain Mode Stop Play Number buttons Standby Search Open/ Close Last M Memory Chain Mode Remote controller Repeat 1 2 3 4 5 6 7 8 9 1 2 3 4 5 6 7 8 9 Use the number buttons to specify a chapter or title. To enter, for example, “2,” press the [2] button. A-B Random disc Display Enter +10 Clear Enter 0 Clear +10 Enter Return DPC-7.
Basic Playback—Continued 2 Stop Play/Enter On Memory Remote controller Standby Search Open/ Close Last M Memory Chain Mode Repeat 1 2 3 4 5 6 7 8 9 +10 0 Clear Enter A-B Random Open /Close Pause Disc Skip Chain Mode Stop Display Play Top Menu Enter / Return Enter DPC-7.
Basic Playback—Continued Memory Playback in the Disc Navigator MP3 WMA JPEG You can compile a playlist of tracks and folders in the Disc Navigator as follows. 1 Remote controller Memory 2 Remote controller Enter Memory 3 Play Enter Remote controller Play 28 With the Disc Navigator open, press the [Memory] button. The playlist appears in place of the file information.
Basic Playback—Continued 4 Play/Enter On Search Pause Disc Skip Chain Mode Stop Play Standby Search Open/ Close Last M Memory Chain Mode Repeat Number buttons Open /Close Play 1 2 3 4 5 6 Enter A-B Remote controller Random 7 8 9 +10 0 Clear Play Display Enter Press the Play [ ] button to start playback of the specified track. You can also select tracks while the DPC7.4 is during playback by using the Up [ ] and Down [ ] buttons. Menu Top Menu Enter Return DPC-7.
Basic Playback—Continued Play/Enter Dimmer On Dimmer Slow-motion Playback Standby Search Last Memory Repeat Open/ Close Last M Memory Chain Mode Open /Close Disc Skip Display Pause Chain Mode Stop Play Repeat 1 2 3 4 5 6 long. Your DPC-7.4 features a screen saver to protect your TV from the effects of burn-in (page 44). DVD VCD Enter A-B Random 7 8 9 +10 0 Clear With the Slow-motion Playback function you can watch a scene slowly either forward or backward.
Basic Playback—Continued Stop 3 Play/Enter On Standby Search Chain Mode Open /Close Disc Skip Pause Chain Mode Stop Play Menu To stop the slideshow, press the [Stop] or [Menu] button. Stop Open/ Close Last M Memory Chain Mode Repeat 1 2 4 5 3 6 7 8 9 +10 0 Clear A-B Random Enter Remote controller Display Stop Menu Top Menu Enter / The slideshow stops automatically when all pictures have been displayed.
Advanced Playback Repeat Play/Enter Open /Close Last Memory Repeat Dimmer Disc Skip Display Pause Chain Mode Stop Play Enter DPC-7.4 On Search Number buttons Open/ Close Last M Memory Chain Mode Repeat 1 2 3 4 5 6 7 8 9 +10 0 Clear A-B Repeat DVD VCD CD MP3 WMA With the Repeat Playback function you can play the current disc, title, chapter, track, or folder of MP3/WMA files overand-over again.
Advanced Playback—Continued Play/Enter On Search Open/ Close Last M Memory Chain Mode Repeat 1 2 3 A-B Pause Chain Mode Stop Play Select a disc. See page 23. 2 Press the [Random] button repeatedly to select a random option. The currently selected random option appears onscreen and “Random” appears on the display. Standby Search Open /Close Disc Skip 1 4 5 6 7 8 9 Random Enter Display +10 0 A-B Random Remote controller Random Clear Menu Top Menu Clear Enter / DPC-7.
Advanced Playback—Continued Open/ Close Last M Memory Chain Mode Repeat 1 2 4 5 6 7 8 9 +10 0 Clear Display Enter / Menu Clear Remote controller Play Enter Return Audio Angle Setup Angle Subtitle Stop Play FR FF Disc 1 Disc 2 Pause Down Play Up Disc 3 Step/Slow Memory Playback CD To play the memory list, press the Play [ ] button. The Memory Play Setup window must be open when you press the Play [ ] button.
Advanced Playback—Continued 9 Remote controller Enter 10 Remote controller Memory To edit a step, use the [ ]/[ ] buttons to select the list, use the [ ]/ [ ] buttons to select the step, and then use the [ ]/[ ] buttons to select the top row ( ) again. Edit the disc, title/folder, and chapter/track numbers, and then press the [Enter] button. To close the Memory Play Setup window, press the [Memory] button.
Advanced Playback—Continued Remote controller Subtitle On Standby Search Open/ Close Last M Memory Chain Mode Repeat 1 2 3 4 5 6 7 8 9 +10 0 Clear A-B Random To turn off subtitles, use the [Subtitle] button to select Off. Display Menu Top Menu During playback, press the [Subtitle] button repeatedly to cycle through the available subtitles. The name of the selected subtitle appears onscreen for several seconds.
Advanced Playback—Continued Last Memory Display Stop Play/Enter 4 Remote controller Enter Open /Close Last Memory Repeat Dimmer Pause Disc Skip Display Chain Mode Stop Play To resume playback from last memory point, select “Yes,” and then press [Enter]. To start playback from the beginning, select “No,” and then press [Enter]. To start playback from the beginning and delete the last memory point, select “Memory Clear,” and then press [Enter]. Enter DPC-7.
Advanced Playback—Continued Displaying Information You can display various information about the current disc, title, chapter, or track as follows. 1 Display Remote controller Display During playback, press the [Display] button. Various information appears onscreen. The operating status (e.g., Stop, Play, Resume), disc number, and disc type information is displayed along the top of the screen.
Configuring the DPC-7.4 This chapter explains the various functions and settings of the onscreen setup menus. Functions and settings are arranged into six menus: Picture, Audio, Language, Display, Operation Setting, and Initial. Menu Picture Audio Language Display Operation Setting Initial Setup The following table lists all the functions and settings, with a brief description and page number where you can find full details.
Configuring the DPC-7.4—Continued 7 A-B 4 5 6 Random 7 8 9 +10 0 Clear Remote controller Display Menu Top Menu Enter / Return Return Enter Return Audio Setup Play FR FF Disc 1 Disc 2 Di 4 Setup Angle Subtitle Stop Di Pause Down Up Disc 3 Step/Slow 5 Di 6 Using the Onscreen Setup Menus This section explains how to use the onscreen setup menus. 1 Turn on your DPC-7.4 and TV. On your TV, select the video input to which the DPC-7.4 is connected.
Configuring the DPC-7.4—Continued There are three memories (1, 2, 3) for storing your favorite settings. You could, for example, use one for daytime viewing (e.g., sun shining through window) and one for nighttime viewing (e.g., curtains drawn, lights down).
Configuring the DPC-7.4—Continued Audio Menu Digital Out With these settings you can specify how the DPC-7.4 outputs digital audio signals. The options you choose will depend on the type of AV component that you connect to the DPC-7.4’s digital audio outputs. ■ Dolby Digital Out DVD With this setting you can configure the DPC-7.4 to output Dolby Digital audio as it is or downmix it to 2-channel PCM. If you’re connecting the DPC-7.
Configuring the DPC-7.4—Continued Disc Menu Language DVD With this setting you can select your preferred language for disc menus. When you play a DVD-Video with multiple language disc menus, your preferred language will be selected automatically. English (default): French: Spanish: German: Italian: German: Italian: No Subtitle: No subtitles will be displayed. This option is useful with DVD-Videos that always display subtitles. Others: See “Selecting Other Languages” on page 45.
Configuring the DPC-7.4—Continued Screen Saver DVD VCD CD MP3 WMA JPEG 3 Remote controller With the Screen Saver function you can protect your TV against screen burn-in, which can occur when the same image or menu is displayed for a long time. Enter The parental lock levels conform to U.S. movie ratings as follows: Off: Screen saver off. • • • • • On (default): Screen saver on.
Configuring the DPC-7.4—Continued Auto Power Off DVD VCD CD Language Code List MP3 WMA JPEG With the Auto Power Off function the DPC-7.4 will turn itself off automatically if about 20 minutes have elapsed without any operation after stopping playback. Off (default): Auto Power Off function is off. On: Auto Power Off function on. Initial Setup Menu This menu appears automatically the very first time you turn on the DPC-7.4. See “First Time Setup” on page 21 for more information.
Troubleshooting Symptom Can’t turn on the DPC7.4? No picture? No sound? The picture distorts occasionally? Picture instability or noise? Can’t start playback? Can’t play MP3/WMA/ JPEG discs? Possible cause Remedy The power cord is not connected. Connect the power cord to a suitable wall outlet (page 21). External interference is affecting the DPC7.4’s digital circuitry. Turn off the DPC-7.4, wait five seconds, then try turning it on again.
Symptom Possible cause Remedy JPEG files without a “.jpg” or “.JPG” or “.JPEG” filename extension are not recognized. Use the correct filename extension (page 8). Only Baseline JPEG files are supported. Progressive JPEG files are not. Use Baseline JPEG files (page 8). Only JPEG files with the following brightness/color difference ratios are supported: 4:4:4, 4:2:2, and 4:1:1. Use JPEG files with the supported ratio (page 8). The JPEG file is too big.
Specifications Video system Standard NTSC (U.S. model), PAL/AUTO (Australian model) Region code 1 (U.S. model), 4 (Australian model) Laser Semiconductor laser, wavelength 650 nm (DVD), 780 nm (CD) Frequency response DVD linear audio 4 Hz–22 kHz @ 48 kHz sampling rate 4 Hz–44 kHz @ 96 kHz sampling rate CD audio 4 Hz–20 kHz Signal-to-noise ratio (digital audio) 100 dB Audio dynamic range (digital audio) 93 dB Harmonic distortion (digital audio) 0.