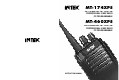
MT-174XPS 136-174 MHz VHF FM / 16CH / 5W PROFESSIONAL 2-WAY RADIO PC PROGRAMMABLE MT-460XPS 420-470 MHz UHF FM / 16CH / 4W PROFESSIONAL 2-WAY RADIO PC PROGRAMMABLE INSTRUCTION MANUAL
User Information USER INFORMATION in accordance with art. 13 of the Legislative Decree of 25th July 2005, no. 15 ”Implementation of Directives 2002/95/EC, 2002/96/EC and 2003/108/EC, relative to reduction of the use of hazardous substances in electrical and electronic equipment, in addition to waste disposal”. The crossed bin symbol shown on the equipment indicates that at the end of its working life the product must be collected separately from other waste.
NOTICE ! It is recommended to carefully read this owner’s manual before using the product. This will also help the user to prevent using the radio in violation of the regulations valid in the country where the product is used, as well as to avoid any possible interferences with other services. Do not place the radio in excessively dusty areas, humid areas or on unstable surfaces. Do not modify this radio for any reason. Refer service to qualified licensed or certificated technicians only.
sure limits for “ Occupational Use Only” . In addition, your authorized by the manufacturer for use with this radio. INTEK radio complies with the following Standards and DO NOT transmits for more than 50% of total radio use time (“ 50% Guidelines with regard to RF energy and electromagnetic energy duty cycle” ). Transmitting more than 50% of the time can cause levels and evaluation of such levels for exposure to humans: FCC RF exposure compliance requirements to be exceeded.
ntial for exposure and can exercise control over their exposure. phone is 5 to 10 cm (2 to 4 inches) away from the lips and the tra- IMPORTANT nsceiver is vertical. READ ALL INSTRUCTIONS carefully and completely before WARNING ! using the transceiver NEVER operate the transceiver with a headset or other audio acc- SAVE THIS INSTRUCTION MANUAL- This instruction manual essories at high volume levels.
CONTENTS 1. Package-opened Inspection andInstalling......................................1 2. Preparation......................................................................................2 2.1. Charge the battery..................................................................2 2.2. Install/remove the battery....................................................3-4 2.3. Install the antenna..................................................................4 2.4. Install external speaker/MIC................
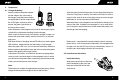
2. Preparation 2.1 Charge the battery Insert the cable of the power adaptor After being purchased or before the first charging after being laid into the adaptor jack at the back of aside for a long time (2 months), the battery can reach its normal the charger, insert the power adaptor capacity after several times of charging, please ensure to charge into applicable AC power output socket, the battery for at least once every three months.
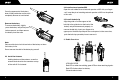
2.4 Install external speaker/MIC Press the upper end of the battery down till the push button on the radio completely bounce out and locked. Open the soft rubber cover of external speaker or MIC with your finger-nail, insert the pin of matching external speaker or MIC into the pinhole of the radio. 2.5 Install the belt clip Remove the battery To remove the battery, slightly press the battery and pull the push button upwards, and then remove the battery from the radio.
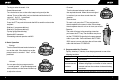
Turning to select channels 1-16. .Power/Volume knob . Channel: Turn the channel selector knob to select Turn clockwise to turn on the radio, keep turning to adjust the the required channel. When the correct signal volume.To turn off the radio, just turn the knob anticlockwise till a is received, you can hear sounds from the sound of “ Ka-Da” is produced. .PTT (PUSH-TO-TALK) key Press the PTT key and talk towards the MIC to send the voice to the recipient. .Side key 1 (programmable key) .
press again to resume normal operation. mode. 3.Call Key 1 Sends the DTMF/2Tone code assigned to 4.Call Key 2 Sends the DTMF/2Tone code assigned to call 1 key. 14.Squelch off momentary 15.Squelch off Press the key programmed as “ Emergency Alarm Press this key to quit the Emergency Alarm mode. Alarm Off 8.Mandown reset After enabling the Lone worker, press this key to reset the Lone worker timer and the timing resumes. 6. Auxiliary functions 6.
b)After the alarm, when the time of transmission exceeds the preset When changing the channel with the channel selector, after the cha- time, the TOT timer will act. nnel is changed, the radio will announce the number of the channel 4) TOT reset time: selected. a) Limiting the time delay from the PTT key is loosened to the timer 6.5 CTCSS /DCS resets.
6.8 Scan The radio can be programmed to scan multiple channels to receive signals from them. 6.8.1 Start/End Scan Function status, it will transmit signals from the current channel, otherwise, it will transmit signals from the channel where the scan is started. Priority channel: The priority channel preset in the Scan list.
If Transmission End has been set, when you release the PTT switch, 7. Wired Clone Mode the ID signals will be transmitted. If the wired clone function is enabled, the radio will not quit after If both have been set, the ID signals will be transmitted respectively entering the wired clone mode. To return to normal user mode, the user needs to restart the machine. when you press and release the PTT switch. The operating steps go as follows: 1.
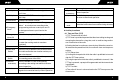
3 4 5 6 16 B. The crystal X4 of phase lock loop is broken. Please change it. C. The oscillator transistor is broken. Please change it. D. The IC1 of phase lock loop is broken. Please change IC. A. The frequency is not right. Please No talkback reselect the channel of the same frequency. B. The CTCSS/DCS code is not the same. Please reset it. C. It is out of the effective communication range. A. The antenna is not in good contact. No receiving signal Please fasten the antenna head. B.
Declaration of Conformity MT-174XPS Declaration of Conformity MT-460XPS EC Certificate of Conformity EC Certificate of Conformity (to EC Directive 2006/95, 2004/108, 99/5) (to EC Directive 2006/95, 2004/108, 99/5) DECLARATION OF CONFORMITY DECLARATION OF CONFORMITY With the present declaration, we certify that the following products : With the present declaration, we certify that the following products : INTEK MT-174XPS INTEK MT-460XPS comply with all the technical regulations applicable to the