User Manual www.samsung.
Table of contents Getting started Chrome OS Appendix 3 About this manual 27 Using applications 40 Product specifications 7 Layout 27 All about Chrome OS 41 Ergonomic tips 13 Turning the computer on 29 Get on the web 45 Powering your device and off 32 Discover web apps 47 Safety precautions 33 Using Play Store 57 Important safety 34 FAQ 34 Recovery (optional) Basics 16 Using the computer as a information 60 accessories tablet 17 Using the touch screen 20 Using the key
r Images and screenshots are those of the representative model of the series and may differ in appearance from the actual product. Getting started r Content may differ from the final product and is subject to change without prior notice. For the latest version of the manual, refer to the Samsung website, www.samsung.com. About this manual r This user manual is specially designed to detail the computer’s functions and features.
Getting started To service your computer Copyright For inquiries about the Chrome operating system or applications, visit www.google.com/support/chromeos. Copyright © 2016 Samsung Electronics If you have a problem while using the Chromebook hardware, please contact our Customer Care Center below or visit www.samsung.com/sec/support/guarantee.do.
Getting started Trademarks Chrome OS Software License r Samsung and the Samsung logo are trademarks or registered trademarks of Samsung Electronics. The software included in this product contains copyrighted software that is licensed under the GPL/LGPL. r Bluetooth® is a registered trademark of Bluetooth SIG, Inc. worldwide. You may obtain the complete Corresponding Source code from website: http://git.chromium.org/gitweb/ This offer is valid to anyone in receipt of this information.
Getting started Precautions for Operating System Support About the Product Capacity Representation Standard If a problem occurs because of the reinstallation of other operating systems(OS) or a previous version of an OS pre-installed on this computer, or a software that does not support the OS, the company will not provide technical support, a replacement or refund, and if our service engineer visits you due to this problem, a service charge will be applied.
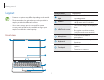
Getting started Layout Number/Name r Features or options may differ depending on the model. Camera indicator light r The items marked as optional may not be provided or may be provided in different locations. Camera r Since some storage space is reserved for system recovery and operations, the available storage space may be less than the actual capacity. LCD/Touch screen Front view 1 Microphone 2 Keyboard 3 Touchpad Description r This indicates the camera operating status.
Getting started Right view Number/Name USB-C™ port 2 1 Number/Name 3 4 Description PEN Volume button / r Adjusts the volume level. r Turns the computer on and off. Power button Power LED / r Shows the operating status of the computer. – Red: Charging – Green: Fully charged – Blue: Turned on 8 Description r The USB-C™ port can be used to connect and charge a USB-C™ device, or connect to an external display device. Purchase an adapter separately to connect to an external display.
Getting started Left view Number/Name Earpiece/Headset jack 1 2 3 USB-C™ port About the chargeable USB port r It may take longer to charge the battery when charging a USB device. Memory card slot r The battery power level may be reduced when charging a USB device while the computer is powered by the battery. r The charging status of the USB device is not displayed on the computer. r This feature may not be available on some USB devices.
Getting started Bottom view Number/Name Internal battery r To remove or replace the internal battery, take it to a Samsung Service Center. You will be charged for this service. Speaker r Sound is emitted from the speakers. 1 2 Description r Provides power to the computer when not connected to an AC adapter. If the bottom of the computer is replaced, the model name, serial number, and some logos will no longer be present.
Getting started Detaching the PEN PEN Press the end of the PEN to disengage it. Then, pull the PEN from the slot. To store the PEN, push it back into the slot until you hear it click. 1 2 Number/Name PEN nib Tweezers Description r Use the PEN to write, draw, or perform touch actions on the screen. r Remove the PEN nib with the tweezers when replacing the nib.
Getting started Replacing the PEN nib Be careful not to pinch your fingers with the tweezers. If the nib is dull, replace it with a new one. 1 r Do not reuse old nibs. Doing so may cause the PEN to malfunction. Firmly hold the nib with the tweezers and remove it. r Do not press the nib excessively when inserting the nib into the PEN. r Do not insert the round end of the nib into the PEN. Doing so may cause damage to the PEN or your device.
Getting started 3 Turning the computer on and off Fully charge the battery using the AC adapter before using the computer for the first time. If the computer does not turn on automatically, press the Power button. Turning the computer on 1 Before turning on the computer, check that the battery is charged and charge it if necessary. 2 Open the LCD panel. The computer turns on automatically when the LCD panel is opened.
Getting started Turning the computer off Using the Power button Using screen buttons Press and hold the Power button for about 8 seconds to shut down the Chromebook. 1 2 Select the account icon on the taskbar. Press and hold the Power button for about 2 seconds to enter power saving mode. Select Power button ( ). In this lock state, press and hold the Power button for about 2 seconds to shut down the Chromebook.
Getting started Controlling the power of the Chromebook Signed-in state If the LCD is closed When there is no input for a predetermined period of time If the Power button is pressed Enters power saving mode Enters power saving mode The state changes to the sign out state The computer is turned off The computer is turned off The Signed-out computer is state turned off Press any key or swipe the touchpad to unlock the screen.
r When the LCD panel is tilted past the transition point The keyboard and touchpad will automatically be locked and will not function. Basics The display will rotate automatically depending on the computer’s orientation. Using the computer as a tablet r When the screen is turned off while using the computer as a tablet, press the Volume button to unlock the screen. When the computer is in power saving mode, press the Power button to unlock the screen.
Basics Using the touch screen Tapping and holding (right-clicking) Use your fingers on the touch screen to perform actions. To use additional options of an item, tap and hold it on the touch screen. Touch screen gestures Tapping To select menus, options, or applications, tap the touch screen. Dragging To move an item to another location, tap and hold it, and then drag it on the touch screen to the desired location. Double-tapping To open files or items, double-tap the touch screen.
Basics Scrolling Spreading and pinching To scroll up, down, left, or right, swipe on the touch screen. To zoom in, spread two fingers apart on an image or text. Pinch to zoom out.
Basics r Do not subject the touch screen to severe impacts or press it with sharp objects. Doing so may damage the touch screen. r Leaving the touch screen idle for extended periods may result in afterimages (screen burn-in) or ghosting. Turn off the touch screen when you are not using the computer. r Do not allow the touch screen to come into contact with other electrical devices. Electrostatic discharges can cause the touch screen to malfunction.
Basics Using the keyboard Shortcut Keys Shortcut key functions and procedures are discussed in the following sections. Description r Enter Overview mode, which shows all windows. r Decrease screen brightness. r The keyboard image may differ from the actual keyboard. r Increase screen brightness. r The keyboard may differ depending on your country. The following mainly describes the shortcut keys. r Mutes the sound. In Mute mode, press the cancel the Mute function.
Basics Shift key Search key Hold the Shift key down to enter upper case letters. Where you’d find the Caps Lock key on a traditional keyboard, we’ve put the Search key. Hot key function Press the Search key to run the Launcher. Press the following keys at the same time. If you really need Caps Lock, go to the Settings page to make the Search key behave like a Caps Lock key. You can check the hot keys in Chrome OS.
Basics Clicking Using the touchpad Tap the touchpad. Use the touchpad to move the cursor or select an item. The left and right buttons of the touchpad act the same as the left and right buttons of a mouse. Tap r Use the touchpad only with fingers. The touchpad will not recognize actions of other objects. r Images and the touchpad layout may differ depending on the model. Basic touchpad functions Double-clicking Moving Double-tap the touchpad. To move the cursor, move a finger on the touchpad.
Basics Right-clicking Adjusting your Touchpad Settings To right-click, place two fingers on the touch area and tap once. If your touchpad is too sensitive, you can adjust your settings by following these steps: Tap Dragging To move an icon or an app tile to a desired location, press and hold it and then drag it to the target position. Move Press and hold the left touchpad 23 1 Click the list icon on the top-right corner of your browser. 2 3 Select Settings.
Basics r Some memory cards may not be fully compatible with the computer. Using an incompatible card may damage the computer or the memory card, or corrupt the data stored in it. Memory card Use a memory card to transfer data to other devices, such as digital cameras or MP3 players. Memory cards are sold separately. Purchase a memory card with the necessary capacity for the requirement. r Use caution to insert the memory card in the indicated direction.
Basics 3 4 Inserting a memory card 1 If a dummy card or a memory card adapter is inserted in the memory card slot, remove it. 2 Insert a memory card into the memory card slot in the indicated direction. A new tab opens and the list of files on the card appears. Click on a file to read the data for the file. Removing a memory card Push the card gently until it disengages from the memory card slot. Grasp the end of the card and pull it out of the slot.
Basics Wireless LAN 2 Select No network ĺ or Turn Wi-Fi on. The Wi-Fi list will appear. Connect the computer to a wireless network to use the Internet. The descriptions below are for computer models with a Wireless LAN card or device. A Wireless LAN device is optional. The pictures in this manual may differ from the actual product depending on the wireless LAN device model.
All about Chrome OS Chrome OS Your Chromebook runs the Chrome operating system that’s built and optimized for the web. Using your Chromebook is as easy as surfing the web. Using applications r Zero to web in 10 seconds. Chromebooks start in 10 seconds and resume instantly from power saving mode. Your favorite websites load quickly and run smoothly, with full support for the latest web standards and Adobe Flash.
Chrome OS r Built-in security. Usage Precautions Your Chromebook is much safer than a regular computer. Each webpage and application you visit runs in a restricted environment. So if you visit an infected page, it can’t affect the other tabs, apps, or anything else on your computer. r Some functions and screenshots are subject to change depending on the Chrome version. r To sign-in, you need a Google account. If you do not have a Google account, you can create one or connect with a guest account.
Chrome OS 2 Get on the web Get started with your Chromebook. When your Chromebook starts for the first time, updates may be performed for up to 5 minutes during the activation step. Logging in with your Google account Desktop You can use your Chromebook when it is connected to the internet. To login, you need a Google account. When you have completed the login, the Desktop appears. Select the icons on the taskbar to launch various apps and use Stylus tools.
Chrome OS Launcher Stylus tools You can search for and launch various apps on the Launcher. Use the Stylus tools to use additional touchscreen functions. On the Desktop, select to run the Launcher. Select All apps to display icons for all your apps, including newly installed apps. On the taskbar, select . To change Stylus tools, select and select one of the following: will be changed to a different icon depending on the tool you select.
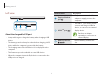
Chrome OS The browsing interface Number/Name Once you’re signed in, you’re instantly on the web. Here’s a quick overview of the interface you’ll see: Navigation buttons Description r Minimize the window or move it to the left or right. r Click to see your apps and most visited sites. r Go back, forward, or reload your page. Address bar r Search or enter a web address. Bookmark r Bookmark the page. Setting r Click to adjust your browser settings.
Chrome OS Discover web apps r To use the Web Store, you must have the latest version of the Chrome browser installed. Want to edit a photo, listen to music, or play games in your browsers? The Chrome Web Store offers a wide range of apps, games, extensions, and themes that you can use to customize your browser. r Some items purchased from the Web Store may not work depending on your computer specifications. r The web store items may or may not be free-of-charge.
Chrome OS Using Play Store Installing apps You can purchase and install various Android apps with your Chromebook just as you would with other Android devices. Download useful apps from Play Store to use your Chromebook more effectively. 1 2 3 4 Signing in to Play Store 1 2 3 On the taskbar, select the account icon ĺ Settings. Under Google Play Store, select the Enable Google Play Store on your Chromebook checkbox. Select ĺ Play Store. Browse apps by category or search for apps by keyword.
Chrome OS FAQ Recovery (optional) Using the Recovery function, you can restore your computer when a problem occurs with your computer. You can restore your computer after creating an update image and using a USB flash drive. For more information, refer to the Recover your Chromebook (https://support.google.com/chromebook/answer/1080595). How can I print on a Chromebook? Chromebook supports the Google Cloud Print service for printing.
Chrome OS 2 Open the LCD panel and press the power button to turn the power off. 3 Insert the SD card or the USB flash drive containing the recovery image, and press both the Refresh button and the Power button while holding down the ESC key. 4 When the Chromebook restarts, follow the onscreen instructions to complete the recovery process. 5 6 Remove the SD card or the USB flash drive as instructed. When the system has restarted, the update is successfully completed.
LCD bad pixels principle of computer Settings & Upgrade Samsung observes the specifications regarding strict quality and reliability of LCD. But in spite of that, it is inevitable that there might be a small number of bad pixels. A large number of bad pixels can cause problems in appearance, but a small number of pixels doesn’t affect the computer performance. LCD brightness Adjust the LCD brightness to reduce eye strain and save power.
Settings & Upgrade Volume Controlling volume using the taskbar Adjust the system volume or sound volume when playing music or video. 1 2 Select the account icon on the taskbar. Drag the adjustment bar to the desired volume. Controlling volume using the keyboard Press the Volume button on the right side of the computer to adjust the volume.
Settings & Upgrade Charging the battery Battery Fully charge the battery using the AC adapter before using the computer for the first time. Fully charge the battery using the AC adapter before using the computer for the first time. r Use only Samsung-approved AC adapters, batteries, and cables. If you use unapproved adapters, the battery cannot be charged or it may explode or damage the computer. r Incorrectly connecting the charger may cause serious damage to the computer.
Settings & Upgrade 3 When the battery is fully charged, the power LED turns green. Disconnect the AC adapter from the computer. Battery status Select the account icon on the taskbar to view the current battery charge. Battery usage time Power LED Batteries are replaceable items and over time the battery’s capacity to hold a charge and its power level is reduced. If a battery can only hold its charge for half of the time that it could when new, it is recommended to purchase a new, replacement battery.
r Optional components may not be provided or different components may be provided depending on the model. Appendix r The system specifications are subject to change without notice. Product specifications r Due to this computer’s design, memory cannot be replaced or upgraded. Also, additional storage space cannot be added. The system specifications may differ depending on the derived model. For detailed system specifications, refer to the product catalog.
Appendix r Use an adjustable chair with firm, comfortable support. Ergonomic tips r Adjust the height of your chair so that thighs are horizontal to the floor and feet are flat on the floor. Maintaining the proper posture during computer use is very important to prevent physical injury. Improper or prolonged keyboard use may result in repetitive strain injury. Viewing the monitor screen for extended periods of time may result in eye strain.
Appendix r When using the keyboard and touchpad, the shoulders should be relaxed. The upper arm and forearm should form an angle that is slightly greater than a right angle, with the wrist and hand in almost a straight line. Arms and hands r Use a light touch when typing or using the touchpad and keep the hands and fingers relaxed. Avoid rolling the thumbs under your palms or supporting the wrists on the desk while typing. r Use an external keyboard and mouse when using the computer for long periods.
Appendix Eye position and display illumination Hearing and volume control cm 50 VOLUME Check your volume! r Ensure that the volume is not too loud before using the headset or earpiece. Excessive exposure to loud sounds can cause hearing damage. r Position the screen at least 50 cm away from your eyes. r Adjust the height of the screen so that its top edge is equal to or just below the level of your eyes. r Avoid setting the screen’s brightness settings excessively high.
Appendix r If anyone related to you has experienced seizures or blackouts while using a similar product, consult a physician before using the computer. Operating conditions r Take at least a 10 minute break every hour. r Avoid using the computer in dark locations. Use the computer with as much ambient light as you would when reading a book. r If you feel discomfort, such as a muscle spasm, or disoriented, stop using the computer immediately and consult a physician.
Appendix Safety precautions Power related For your safety and security and to prevent damage, carefully read the following safety instructions. This ’Safety precautions’ relate to computer use. Some of the content may be not applicable to your computer. Handle the power cord with care. r Do not touch with wet hands. r Do not use a damaged power cord. r Do not overload a multi-outlet or an extension cord beyond the specified voltage/current capacity.
Appendix Use only properly earthed electric sockets or extension cords. Battery usage related Unearthed electric sockets or extension cords may cause electric shock. Any connection to unearthed electric sockets or extension cords may produce an electric field from a current leak. Use manufacturer-approved batteries, chargers, accessories, and supplies. r Using generic batteries or chargers may shorten the life of your product or cause the computer to malfunction.
Appendix Replace a run-down battery with a new, Samsung-approved battery. Usage related Do not use the computer on heated floors or electric pads, or on beds, blankets, or cushions that block the ventilation of the computer. Dispose of worn-out batteries properly. r There is a danger of fire or explosion. r The battery disposal method may differ depending on your country and region. Dispose of the used battery in an appropriate way.
Appendix Before cleaning the computer, disconnect all the cables that are connected to the computer. For notebook computers that are supplied with an optional removable battery, disconnect the battery. Caution Failure to follow instructions marked with this symbol may result in minor physical injury or damage to the computer. Failure to do so may result in electric shock or fire. Installation related Keep the computer away from water or liquid.
Appendix Do not place or use the computer on slanted or vibrating surfaces. Usage related Failure to do so may result in computer malfunction or damage. Do not use the pen for unintended purposes, such as poking the body like eyes or ears and do not put it in your mouth. Do not place heavy objects on the product. Doing so may result in physical injury. This may cause a problem with the computer. In addition, the object may fall and cause injury or damage the computer.
Appendix Close the LCD panel only after checking if the notebook computer is turned off. Do not store your device near or in heaters, microwaves, hot cooking equipment, or high pressure containers. r The battery may leak. The temperature may rise and it may cause deformation of the product. r Your device may overheat and cause a fire. Do not press the eject button while the CD-ROM drive is in operation. Do not use damaged or illegally modified CDs.
Appendix Do not use your computer in a hospital or on an aircraft that can be interfered with by radio frequency. Do not place your face close to the Optical Disc Drive tray when it is operating. r Avoid using your computer within a 15 cm range of a pacemaker, if possible, as your computer can interfere with the pacemaker. There is a danger of injury due to an abrupt ejection. Do not use the product if it is cracked or broken. Broken glass or acrylic could cause injury to your hands and face.
Appendix Shut down the computer and disconnect all cables before disassembling the computer. For notebook computers that are supplied with an optional removable battery, disconnect the battery. Upgrade Related Do not attempt to upgrade the computer, unless you are qualified. Otherwise, contact a Samsung Service Center or an authorized technician. Failure to do so may cause electric shock. Follow the specified instructions contained in the manual for user maintenance.
Appendix Storage and movement related Cautions on preventing data loss (hard disk management) Do not store the computer in an enclosed space, such as a computer bag, while it is running. Take care not to damage the data on a storage device. Failure to do so may result in fire. Completely shut down the computer before putting the computer into an enclosed space. r Subjecting the device to physical impacts may result in data loss.
Appendix LCD bad pixels Samsung observes strict specifications regarding the quality and reliability of the LCD. However, there is a small chance that a few pixels may be bad. A large number of bad pixels can cause problems with the display, but a small number of bad pixels does not generally affect computer performance.
Appendix Setting up the system Important safety information r Read and follow all instructions marked on the product and in the documentation before operating the system. Retain all safety and operating instructions for future use. Safety instructions The system is designed and tested to meet the latest standards for safety of information technology equipment.
Appendix r Ensure that the fan vents on the bottom of the casing are clear at all times. Do not place the computer on a soft surface, doing so will block the bottom vents. Care during use r Do not walk on the power cord or allow anything to rest on it. r Do not spill anything on the computer or its components. The best way to avoid spills is to not eat or drink near the computer or its components.
Appendix r Unplug the system from the wall outlet and contact a Samsung Service Center if: Operating instructions – The power cord or plug is damaged. 1 When installing and operating devices please refer to safety requirements in the user manual. 2 Devices can be used only with the equipment specified in the technical specifications of the devices. 3 If any smell of burning or smoke is detected from the computer the unit should be switched off and the battery removed.
Appendix Battery disposal Replacement parts and accessories Do not put rechargeable batteries or products powered by non-removable rechargeable batteries in the garbage. Use only replacement parts and accessories recommended by manufacturer. Contact the Samsung Service Center for information on how to dispose of batteries that you cannot use or recharge any longer. Follow all local regulations when disposing of old batteries. To reduce the risk of fire, use only No.
Appendix r Laser Safety Note: Use of controls or adjustments or performance of procedures other than those specified in this manual may result in hazardous radiation exposure. To prevent exposure to laser beams, do not try to open the enclosure of a CD or DVD drive. Laser safety All systems equipped with CD or DVD drives comply with the appropriate safety standards, including IEC 60825-1.
Appendix Power cord requirements General requirements The power cord set (all plug, cable and AC adapter plug) you received with your computer meets the requirements for use in the country where you purchased your equipment. The requirements listed below are applicable to all countries: r All power cord sets must be approved by an acceptable accredited agency responsible for evaluation in the country where the power cord set will be used.
Appendix The RF field strength of the wireless device or devices that may be embedded in the notebook are well below all international RF exposure limits as known at this time. Because the wireless devices (which may be embedded into the notebook) emit less energy than is allowed in radio frequency safety standards and recommendations, manufacturer believes these devices are safe for use. Regardless of the power levels, care should be taken to minimize human contact during normal operation.
Appendix r Radio frequency wireless communication can interfere with equipment on commercial aircraft. Current aviation regulations require wireless devices to be turned off while traveling in an airplane. 802.11ABGN (also known as wireless Ethernet or Wi-Fi) and Bluetooth communication devices are examples of devices that provide wireless communication. r Every country has different restrictions on the use of wireless devices.
Appendix United States of America Explosive Device Proximity Warning USA and Canada Safety Requirements and Notices Do not operate a portable transmitter (such as a wireless network device) near unshielded blasting caps or in an explosive environment unless the device has been modified to be qualified for such use. Do not touch or move antenna while the unit is transmitting or receiving.
Appendix The Part 15 radio device operates on a non-interference basis with other devices operating at this frequency. Any changes or modification to said product not expressly approved by Intel could void the user’s authority to operate this device. This equipment has been tested and found to comply with the limits for a Class B digital device pursuant to Part 15 of the FCC Rules. These limits are designed to provide reasonable protection against harmful interference in a residential installation.
Appendix If necessary, the user should consult the dealer or an experienced radio/television technician for additional suggestions. The user may find the following booklet helpful: “Something About Interference.” Intentional emitter per FCC Part 15 (If fitted with 2.4 G band or 5 G band) Low power, Radio LAN type devices (radio frequency (RF) wireless communication devices), operating in the 2.4 GHz/5 GHz Band, may be present (embedded) in the notebook system.
Appendix Operation of this device is subject to the following two conditions: Health and safety information (1) This device may not cause harmful interference, and (2) this device must accept any interference received, including interference that may cause undesired operation of the device. Exposure to Radio Frequency (RF) Signals Certification Information Wireless devices are not user serviceable. Do not modify them in any way. This product can contain an embedded radio transmitter and receiver.
Appendix For corresponding model only For body worn operation, this model meets the FCC RF exposure guidelines when used with Samsung accessory designated for this product. Non-compliance with the above restrictions may result in violation of FCC RF exposure guidelines. The Specific Absorption Rate (SAR) is a measure of the rate of absorption of RF energy by the human body expressed in units of watts per kilogram (W/kg). The FCC wireless devices to comply with a safety limit of 1.6 watts per kilogram (1.
Appendix The term “IC” before the equipment certification number only signifies that the Industry Canada technical specifications were met. To reduce potential radio interference to other users, the antenna type and its gain should be so chosen that the equivalent isotropically radiated power (EIRP) is not more than that required for successful communication.
Appendix The power output of the wireless device (or devices), which may be embedded in your notebook, is well below the RF exposure limits as set by Industry Canada. When using IEEE 802.11a wireless LAN, this product is restricted to indoor use due to its operation in the 5.15 to 5.25 GHz frequency range. Industry Canada requires this product to be used indoors for the frequency range of 5.15 to 5.25 GHz to reduce the potential for harmful interference to co-channel mobile satellite systems.
Appendix Brazil Samsung Electronics Vietnam Co., Ltd. Este produto esta homologado pela ANATEL, de acordo com os procedimentos regulamentados pela Resolucao 242/2000, e atende aos requisitos tecnicos aplicados. Yen Phong 1, I.P Yen Trung Commune, Yen Phong Dist., Bac Ninh Province, Vietnam For the web or the phone number of the Samsung Service Center, see the Warranty or contact the retailer where you purchased your product.
Appendix Household users should contact either the retailer where they purchased this product, or their local government office, for details of where and how they can take these items for environmentally safe recycling. WEEE symbol information Correct disposal of this product (Waste Electrical & Electronic Equipment) Business users should contact their supplier and check the terms and conditions of the purchase contract.
Appendix USA only Correct disposal of batteries in this product This Perchlorate warning applies only to primary CR (Manganese Dioxide) Lithium coin cells in the product sold or distributed ONLY in California USA. “Perchlorate Material- special handling may apply, see www.dtsc.ca.gov/hazardouswaste/perchlorate.” Dispose unwanted electronics through an approved recycler. To find the nearest recycling location, go to our website: www.samsung.com/recyclingdirect or call, (877) 278-0799.
Appendix Samsung package Take-Back program In partnering with select recyclers, Samsung offers packaging take-back at no cost to you. Simply call the following number for the locations nearest you. CRT Processing, LLC (877) 278-0799 Kathy Severson – Logistics contact Dispose unwanted electronics through an approved recycler. To find the nearest recycling location, go to our website: www.samsung.
Some content may differ from the computer depending on the region, service provider, software version, or computer model, and is subject to change without prior notice. www.samsung.com English. 11/2016. Rev. 1.