
Guide


Case Temperature Reference Metrology
Thermal and Mechanical Design Guidelines 101
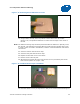
Figure 7-35. Removing Excess Adhesive from IHS
33. Using a blade, carefully shave any adhesive that is above the IHS surface
(Figure 7-35). The preferred method is to shave from the edge to the center of
the IHS.
Note: The adhesive shaving step should be performed while the adhesive is partially cured,
but still soft. This will help to keep the adhesive surface flat and smooth with no pits
or voids. If there are voids in the adhesive, refill the voids with adhesive and shave a
second time.
34. Clean IHS surface with IPA and a wipe.
35. Clean the LGA pads with IPA and a wipe.
36. Replace the land side cover on the device.
37. Perform a final continuity test.
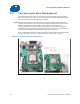
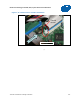
38. Wind the thermocouple wire into loops and secure or if provided by the vendor
back onto the plastic roll. (Figure 7-36).
Figure 7-36. Finished Thermocouple Installation
39. Place the device in a tray or bag until it’s ready to be used for thermal testing use.