
Standalone Switch Installation Guide


Getting Started - RAID Array 410 for Windows NT – Intel
3–8 EK–SMRAC–IG. C01
2. For this example, select Single Disk - JBOD and choose a target ID (by default you can
create up to eight logical units under a single ID).
Click on OK.
The RAID Manager responds by displaying a message window advising you to click on
the disk we wish to use (in our physical view) for the single disk. In our example, we
select (click on) the disk in the lower, left corner of the physical view.
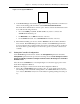
3. After selecting the disk, click on
Create in the message window
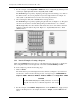
The RAID Manager responds by updating the physical view (see Figure 3–7). The physi-
cal view now shows the lower left disk superimposed with the letter “
J,” to indicate
JBOD (Single Disk). Note also that the status bar at the bottom of the window has been
updated to reflect the added component. Figure 3–7 Updated Physical View – Disk
(JBOD) Added
3.6.3 Practice Example: Creating a Stripeset
Click on the Configure button near the top of the main window, if necessary, to display the
three configuration buttons in the right side of the window:
Create, Modify, and CLI.
To create a Stripeset, perform the following steps:
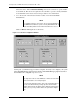
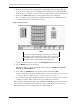
1. Click on
Create.
The Create button opens and displays the Create window (see Figure 3–6). Use the Cre-
ate window to select from the following choices of storageset types:
SPARE, RAID 0 -
Stripeset
, RAID 1 - Mirrorset, RAID 5/3 - Raidset, RAID 0+1, and Single Disk - JBOD
CAUTION
The EISA SWIA3-BB (Adaptec 2744W) is limited to one LUN per
target ID. You must choose a different target ID for each storage
set.
2. For this example, select RAID 0 - Stripeset. Then, in the Set Name box, supply (enter) a
name for the Stripeset. For our example, the name is “
Stripe1”. Click on OK when fin-
ished.