
Standalone Switch Installation Guide


Chapter 3. Installing and Using the RAID Array 410 Manager for Windows NT
EK–SMRAC–IG. C01 3–11
2. Choose (click on) Spare from the choices listed, then click on OK.
When the physical view window opens, click on the disk to be identified as a spare, then
Create.
3.6.6 Practice Example: Deleting Storagesets
To delete storageset elements, perform the following steps:
1. Select the
Configuration pull down menu. The choices include: Create Storageset,
Delete Storageset, Modify, Controller, Configure from File, Delete All Storagesets,
Controller Firmware Load.
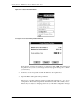
2. For this example, choose (click on)
Delete Storageset from the choices listed.
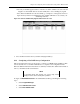
The RAID Manager opens the Delete window (see Figure 3–10).
Figure 3–10 Delete Window
3. Select Mirr1 for the first storageset to delete in our example.
Doing so opens a message window to confirm the delete operation. The message window
asks if you are sure you want to delete the set and advises you to type
yes to verify the
delete command.
4. Type
yes in the message window to confirm your intent to delete, then click on OK.
Doing so causes the RAID Manager to delete the set and to update the physical view.
5. Continue to delete remaining Storagesets or single disks by returning to the main win-
dow, choosing the
Configuration pull-down menu, and repeating the above steps to de-
lete the remaining practice examples.
Congratulations!
You may now configure your system. Use the RAID 410 Manager for Alpha/Intel User’s
Guide (AA-QU63C-TE) and the skills learned during the practice examples to set up
your specific configuration. When finished, save your configuration for future reference,
then proceed to Chapter 5, Completing your Configuration under Windows NT, in this
guide.