
Standalone Switch Installation Guide


Getting Started - RAID Array 410 for Windows NT – Intel
EK–SMRAC–IG. C01 4–3
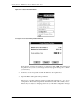
NOTE
The first time you run Disk Administrator after adding new disks,
one or more message window(s) may appear asking you to con-
firm whether you want to have Disk Administrator provide its
“signature” on the new disks. Confirm doing so (by clicking on
Yes) in order to have Disk Administrator recognize these new
disks. For more information on this subject, refer to your Windows
NT documentation.
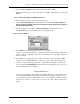
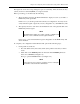
Figure 4–1 shows the partial screen display for a representative configuration.
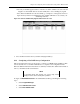
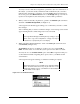
Understanding the Disk Administrator Display
Disk Administrator creates a “Bar Chart” display of your disk configuration (see
Figure 4–3), The figure shows that Windows NT has named the various devices that were
created using the RAID Array 410 manager graphical user interface. Each disk device found
by Windows NT is given a name, e.g., Disk 0, Disk 1, etc. There should be an entry (device)
shown for each disk (JBOD) or storageset created.
Windows NT assigns disk names based on the order in which the system drivers “find” disks
during Windows NT boot. The RAID Array 410 uses a special disk class driver
(HSZDISK.SYS) that connects to all SWXRC-04 disks before any other disks present in the
system are connected. Therefore, the first entries in the Disk Administrator display
(see Figure 4–3) should represent all your RAID Array 410 Logical Disks.
Figure 4–3 Disk Administrator Screen Display