Intel® NetStructure™ 6000 Switch Quick Start A19062-001
Copyright © 2000, Intel Corporation. All rights reserved. Intel Corporation, 5200 NE Elam Young Parkway, Hillsboro OR 97124-6497 Information in this document is provided in connection with Intel® products. No license, express or implied, by estoppel or otherwise, to any intellectual property rights is granted by this document.
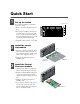
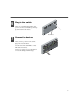
Quick Start 1 Set up the switch Front Panel Screws For complete installation requirements, see the User Guide. 1 Remove the switch and parts from the box. 2 If you plan to install the switch in a 19inch rack, remove the four front panel screws on each side of the unit, then use the screws included in the accessory kit to fasten the rack-mount brackets. 3 Install the switch in a rack or on a shelf.
Install additional power supplies If you purchased an additional power supply, place it in one of the empty power supply bays at the top of the chassis. 1 Loosen and remove the capture panel screws on the face plate of the power supply bay. Capture Panel Screws 2 Push the power supply into the power supply bay until the capture panel screws engage the chassis. 3 Tighten the capture panel screws.
6 Plug in the switch After you’ve installed all modules, plug power cords into each installed power supply at the back of the chassis. Back Panel 7 Connect to devices After you have powered on the switch, plug in the network cables. Use the network module LEDs to verify link status and activity. See the User Guide for more information on network cabling and LED usage.
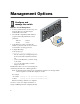
Management Options 8 Configure and manage the switch Option 1: Local Management 1 Connect your PC directly to the Console port on the Control Processor module using the included null modem cable. 2 Set a VT-100-compatible terminal emulation program (such as HyperTerminal*) to these parameters: - 9600 baud - 8 data bits - No parity - 1 stop bit 3 At the Password prompt, press Enter. By default, no password is set. See the User Guide for information on setting passwords.
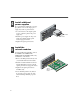
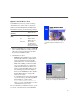
Option 2: Intel® Device View Use Intel® Device View if you want to manage other Intel devices (such as hubs or switches) in addition to the Intel NetStructure™ 6000 Switch. For Intel Device View, use the following software: - Windows* 95 or 98 - Windows NT* 4.0 Intel Device View (Windows) Intel Device View (Web) Browser - Internet Explorer 4.0 or later OS - Windows NT 4.0 - Windows 95 or 98 Web Server - IIS 2.0 or later - Peer Web Services - Netscape Enterprise* Web Server 3.
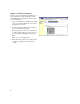
Option 3: Web Device Manager Before you can use the Web Device Manager, you must configure the switch’s IP settings. See the Local Management or Intel Device View sections for more information. 1 Open your Web browser. The Web Device Manager supports Internet Explorer* 4.0x or later or Navigator* 4.0x or later. 2 Type the switch’s IP address in the Address (or Location) field, then press Enter.