
64-bit Intel Xeon Processorwith up to 8MB L3 Cache Thermal/Mechanical Design Guidelines


Testing Methods
R
40 64-bit Intel
®
Xeon™ Processor MP with 8 MB L3 Cache
Thermal/Mechanical Design Guidelines
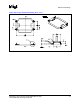
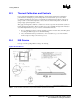
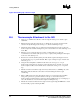
Figure B-4. Bending Tip of Thermocouple
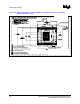
B.6 Thermocouple Attachment to the IHS
1. Clean groove with IPA and a lint free cloth removing all residues prior to thermocouple
attachment.
2. Place the thermocouple wire inside the groove letting the exposed wire and bead extend
about 3.2 mm [0.125 inch] past the end of groove. Secure it with Kapton* tape.
3. Lift the wire at the middle of groove with tweezers and bend the front of wire to place the
thermocouple in the channel ensuring the tip is in contact with the end of the channel grooved
in the IHS.
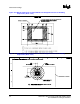
4. Place the processor under the microscope unit to continue with process. It is also
recommended to use a fixture (like processor tray or a plate) to help holding the unit in place
for the rest of the attach process.
5. Press the wire down about 6mm [0.125"] from the thermocouple bead using the tweezers.
Look in the microscope to perform this task. Place a piece of Kapton* tape to hold the wire
inside the groove.
6. Using the micromanipulator, install the needle near to the end of groove on top of
thermocouple. Using the X, Y, and Z axes on the arm place the tip of needle on top of the
thermocouple bead. Press down until the bead is seated at the end of groove on top of the
step.
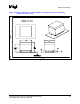
7. Measure resistance from thermocouple end wires (hold both wires to a DMM probe) to the
IHS surface. This should be the same value as measured during the thermocouple
conditioning.
8. Place a small amount of Loctite* 498 adhesive in the groove where the bead is installed.
Using a fine point device, spread the adhesive in the groove around the needle, the
thermocouple bead and the thermocouple wires already installed in the groove during step 5
above. Be careful not to move the thermocouple bead during this step.
9. Measure the resistance from the thermocouple end wires again using the DMM and to ensure
the bead is still properly contacting the IHS.