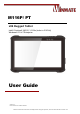
M116P/ PT x86 Rugged Tablet Intel® Pentium® N4200, 1.1GHz (turbo to 2.5GHz) Windows® 10 IoT Enterprise User Guide Version 1.0 Document Part No. 91521110105G Please read these instructions carefully before using this product, and save this manual for future use.
1 11.6" Rugged Tablet M116P/ PT Series User Guide Contents CONTENTS CHAPTER 1: READ ME FIRST 1.1 ADVISORY CONVENTIONS 1.2 SAFETY INFORMATION 1.3 HANDLING AND MAINTENANCE 1.4 DECLARATION OF CONFORMITY (DOC) CHAPTER 2: GETTING STARTED 2.1 INTRODUCTION 2.2 UNPACKING 2.3 DESCRIPTION OF PARTS 2.4 INDICATORS 2.5 HOTKEY FOR SPECIFIC FUNCTIONS 2.6 FIRST-TIME OPERATION 2.6.1 Installing a Micro SD Card 2.6.2 Installing Battery 2.6.3 Charging Your Tablet 2.6.4 Using LAN Port (RJ45) 2.6.
Contents APPENDIX APPENDIX A: PRODUCT SPECIFICATIONS 58 58 2
3 11.6" Rugged Tablet M116P/ PT Series User Guide Chapter 1: Read Me First 1.1 Advisory Conventions Four types of advisories are used throughout the user manual to provide helpful information or to alert you to the potential for hardware damage or personal injury. These are Notes, Important, Cautions, and Warnings. The following is an example of each type of advisory.
Chapter 1: Read Me First 1.2 Safety Information Precaution on Battery Pack Précaution avec le bloc-pile Do Not Disassemble, Modify, or Insert Sharp Objects Into the Battery Pack. Electrolyte leakage, generation of heat, ignition or rupture may result. [FR] Ne pas démonter, modifier, ou insérer des objets pointus à l'intérieur du bloc-pile. Une fuite d'électrolyte, la génération de chaleur, l'amorçage ou la rupture peuvent être occasionnés.
5 11.6" Rugged Tablet M116P/ PT Series User Guide General Product Safety Sécurité générale des produits ▪ Do not block any ventilation openings. Do not place the product against a wall or in an enclosed space as doing so might impede the flow of cooling air. ▪ [FR] Ne pas bloquer les ouvertures de ventilation. Ne pas placer le produit contre un mur ou dans un espace clos de façon à entraver la circulation de l'air de refroidissement.
Chapter 1: Read Me First 1.3 Handling and Maintenance General Guideline Guide Général Keep the product at least 13 cm (5 inches)away from electrical appliances that can generate a strong magnetic field such as TV, refrigerator, motor, or a large audio speaker. [FR] Garder le produit au moins à 13 cm (5 pouces) de distance des appareils électriques qui peuvent générer un fort champ magnétique comme une télévision, un réfrigérateur, un moteur, ou un important haut-parleur.
7 11.6" Rugged Tablet M116P/ PT Series User Guide 1.4 Declaration of Conformity (DoC) FCC Statement This device complies with part 15 FCC rules. Operation is subject to the following two conditions: ⚫ This device may not cause harmful interference. ⚫ This device must accept any interference received including interference that may cause undesired operation This equipment has been tested and found to comply with the limits for a class "B" digital device, pursuant to part 15 of the FCC rules.
Chapter 2: Getting Started Chapter 2: Getting Started This chapter tells you step by step how to get the Tablet Computer up and running. 2.1 Introduction Congratulations on purchasing Winmate® 11.6-inch x86 Rugged Tablet M116P/ PT Series. The M116 platform is a next-generation Windows rugged tablet series designed to boost efficiency in a mobile, versatile form factor. The large 11.6-inch sunlight readable full HD display allows for a premium viewing experience no matter where work takes place.
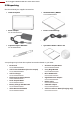
9 11.6" Rugged Tablet M116P/ PT Series User Guide 2.2Unpacking Check and identify the supplied accessories: • Tablet Computer • Standard Battery BM101 Part No.98K000A000D6 • Power Adapter • Power Cord and Plugs Part No.922D065W19V1 t • Capacitive Stylus DS-M101 • Quick Start Guide & Driver CD Part No.9B0000000415 Your package may include other optional accessories based on your order: • Desk Dock • Part No.98DT00A0001G • Vehicle Dock DD-M116 (w/o VGA output) Part No.
Chapter 2: Getting Started 2.3Description of Parts Dimensions: 300.67 x 201.97 x 22.5 mm Front: Left: No Item 1 11.6” PCAP Touchscreen 2 Front Camera 3 Light Sensor 4 LED Indicators 5 6 7 Digital Mic with Noise Cancellation Speakers All-Around Rubber Description 11.6-inch display with LED backlight, acts as one of the inputs for the Tablet Computer. 2MP front camera. Indicates the environment brightness.
11 11.6" Rugged Tablet M116P/ PT Series User Guide Rear: Top: Bottom: No 15 16 17 18 19 20 21 22 23 Item Description Smart Card Reader, Smart Card complies with Reader(Option IS07816-1.2.3T=1 and al) T=Ø protocol For optional add-on UHF Expansion Slot RFID Reader or Smart (Optional) Card Reader. 8MP rear camera with Rear Camera autofocus. Captures photos and videos. SliderSpring-loaded BatteryReleas slider that latches the e battery in. Touch Pen Pen holder slot to store Slot touch pen.
Chapter 2: Getting Started 2.4Indicators Icon Indicator Power Indicator Battery Status Disk Activity Indicator RF Communication Description Blue– Tablet is ON No light– Tablet is OFF Orange–AC adapter is plugged in and charging Green–AC adapter is plugged in and battery is full charged Solid Red - Low battery (<10%) Blinking Red – Battery is being hot swapped.
13 11.6" Rugged Tablet M116P/ PT Series User Guide 2.6.1 Installing a Micro SD Card Your tablet supports additional storage with an optional micro SDXC card. To install Micro SDXC Card: 1. Open I/O protective cover by pulling out the latch. 2. Insert micro SDXC card into slot with contacts facing down. 3. Press the card in to ensure that it is seated properly. 4. Close I/O protective cover. To remove Micro SD Card: 1. Open I/O protective cover by pulling out the latch. 2.
Chapter 2: Getting Started To remove the battery pack: 1. Shut down the tablet (or put into sleep mode). Turn the tablet computer over, back facing up. 2. Pushthe Battery Lock Latch it to the “Unlocked” position. 3. Pull up and holdthe Battery Release Slider that is spring-loaded. 4. Lift the battery out using the opening on the side of battery compartment. 2.6.3 Charging Your Tablet The Tablet operates either on external AC power or internal battery power.
15 11.6" Rugged Tablet M116P/ PT Series User Guide 2.6.4Using LAN Port (RJ45) Notice that the LAN Port (RJ45) is optional and may not be supported by your device. Check your order specifications for more details. 1. Connect the tablet PCto external devices using LAN cable. 2.6.5Starting the Tablet Important: When powering on the device for the first time, please make sure there’s no interruption during the Windows setting up process, for example, accidentally powering off.
Chapter 3: Setting Up Windows for the First Time Chapter 3: Setting Up Windows for the First Time This chapter details how to setup the Windows that may be installed on the tablet for the first time. 3.1 Introduction The M116P/ PT Series Rugged Tablet operate on Windows 10 IoT Enterprise operating system. CautionMake sure the battery is full charged before starting the Tablet Computer for the first time with internal battery power.
17 11.6" Rugged Tablet M116P/ PT Series User Guide 3. On the Here's the legal stuff screen, read through the disclosures, then tapAccept. 4. Windows will then try to connect to network.TapSkip this step to continue without a wireless connection as you can then set up the network later. 5. On the Get going fast screen, click Use Express settingsfor the fastest setup. If you would like more information, tapLearn more, or if you would like to select your own options, click Customize settings.
Chapter 3: Setting Up Windows for the First Time 6. To create a local account, type your User name, password, and Password hint in the fields provided, and thentapNext. 7. The initial setup screens are complete, and the desktop is displayed. 8. Read any introductory screens describing features of your computer, and tapNext upon completing each. You are now done with the initial setup process.
19 11.6" Rugged Tablet M116P/ PT Series User Guide Chapter 4: Operating the Device This chapter describes how to operate the M116P/ PT Series Rugged Tablet, including camera, Hottab, barcode, RFID, WLAN, GPS features. Note:Please download the SDK from Winmate Download Center. >>M116P>>Development Kit or check the Driver CD which is shipped with the tablet. Please notice that HF RFID reader, Barcode reader are optional module, please make sure user have ordered the module before using the SDK. 4.
Chapter 4: Operating the Device Icon Description Allows users to configure short cut to quickly access programs with a few tabs. Shortcuts Camera Device ON/OFF Allows users take a picture or record a video. User can also adjust setting related to camera in this menu option. Enables/disables tablet computer’s hardware functions. The configurable functions are Wi-Fi, GPS, Bluetooth, Camera, LED indicators, Barcode Reader, RFID Reader, and GPS Antenna routing options.
21 11.6" Rugged Tablet M116P/ PT Series User Guide 4.3 UsingCamera This Hottab menu option allows users take a picture or record a video. Before use, make sure the camera is powered on under Devices ON/OFF menu with the following scenarios. To open camera interface: 1. Launch the HottabUtility . 2. Tap on "Device ON/OFF" button to check the built-in devices status. 3. Check the status color of the Camera icon: Item Status Color Description Orange Camera is enabled. White Camera is disabled. Camera 4.
Chapter 4: Operating the Device 4.4 Built-in Devices On/Off This section describes how to get a quick access to set-up built-in devices, including turning on/off RF modules, setting up barcode reader, and RFID reader. HottabUtility . 4.4.1 Using theWireless LAN (Wi-Fi) To use the wireless LAN(Wi-Fi) feature to connect to the network, perform the following procedure: 1. Launch the HottabUtility . 2. Tap on the Device ON/OFF button. 3.
23 11.6" Rugged Tablet M116P/ PT Series User Guide Item Status Color Description Orange GPS is enabled. White GPS is disabled. GPS 4. If the GPS feature is disabled (white), tap on the GPS icon to enable it (orange). 5. Now the GPS feature is ready to be used with an application utilizing the GPS. 4.4.3 Turn on/off the GPS External Antenna The vehicle dock of M116P/ PT Series Rugged Tablet supports external GPS antenna through standard SMA connector.
Chapter 4: Operating the Device 4.4.5TurningOn/OffLED Indicators The LED Indicators for Power Status, Battery Status, and RF Communication can be turned on/off from Hottab menu. To enable/disable the LED indicators: 1. Launch the HottabUtility . 2. Tap on the Device ON/OFF button. 3. Check the status color of the Indicator icon: Item Status Color Description Orange LED indicator is enabled. White LED indicator is disabled. Indicator 4.
25 11.6" Rugged Tablet M116P/ PT Series User Guide 4.4.6.1 Device Configuring and Setting 1.Click on Windows and search for EZConfig-Scanning from the Start menu. 2.Click on EZConfig-Scanning v4_IE and allow the blocked content if browser is blocking the content. 3.Click on “Connected Device” icon and wait for system to discover the device(Honeywell N660X).
Chapter 4: Operating the Device 4.Once Honeywell N660X is discovered please click “Configure Device” button as shown. 4.4.6.2 Scanning Mode Settings 1. Click Device Settings under the Input/Output settings section. 2. Select the desire scanning mode from the drop-down menu shown as below.
27 11.6" Rugged Tablet M116P/ PT Series User Guide 3. After selecting a desire scanning mode, click on the “Save to Device” on the side bar. Scanning Mode Description Manual Trigger When in manual trigger mode, the scanner scans until a bar code is read, or until the trigger is released. Two modes are available, Normal and Enhanced. Normal mode offers good scan speed and the longest working ranges (depth of field).
Chapter 4: Operating the Device 4.4.6.3 Setting the 1D/2D Barcode Scanner Symbologies The barcode scanner is shipped with default settings shown below. If the default setting suits the usage requirement, setting symbologies is not necessary.
29 11.6" Rugged Tablet M116P/ PT Series User Guide Important: The reset to default button will change all setting to default. N660X could disconnect with system after clicking the reset to default button. If the Disconnection happened please scan barcodes below in the following steps. Step1. Scan the USB HID barcode: Step 2. Thenscan the USB keyboard barcode: Step 3.Run EZConfig-Scanning again by following 4.4.6.1Device Configuring and Setting 4.4.6.4 Adding a Prefix or Suffix 1.
Chapter 4: Operating the Device 2.Click on Editor button under the Prefix or Suffix section and create Prefix/Suffix value by typing in the block or select desire characters in the Control chars, Printable chars, and Extended ASCII. as shown below: 3. When you finish creating Prefix/Suffix, please click on “Save to Device” on the side bar. 4. For checking the functionality of Prefix/Suffix, please chick on “Scan Data Window” icon on the top.
31 11.6" Rugged Tablet M116P/ PT Series User Guide 4.4.7 Using the HF RFID Reader The HF RFID Reader is optional for M116P/ PT Series Rugged Tablet and is not re-workable by the end user. To use this feature, please make sure the tablet PC is built-in HF RFID reader before use, or contact our sales contact window for more details. To enable the HF RFID Reader feature: 1. 2. 3. Launch the HottabUtility . Tap on the Device ON/OFF button. Tap on RFID, and the setting utility will show up as below: 4. 5.
Chapter 4: Operating the Device 4.4.7.1 RFID Trigger Setting Auto Scan The default setting for RFID trigger is Auto Scan. Under this setting, the RFID Reader will always be ready to scan tags. 1. When the RFID tag is detected from RFID antenna, the data will be read automatically. 2. User can define the RFID scanning frequency from the drop-down menu shown as below. The frequency can be from 1 second to 9 seconds. Single Scan User can also define the RFID Reader scanning as Single Scan.
33 11.6" Rugged Tablet M116P/ PT Series User Guide 4.4.7.2 Settings Sound TheSound check box defines whether a beep sound will come with the data scanning. Output to This setting defines the output type of the scanned data. Two options are available: Keyboard Wedge Under this setting, the data scanned is sent like keyboard data. The scanned data can be output directly to the demo area below this window, or user can also open other utility, such as Office Word or Notepad files, for data input.
Chapter 4: Operating the Device Item Prefix Suffix Append Enter Append TAB Regex Filter Description User can type in this field to define the characters BEFORE the data scanned. User can type in this field to define the characters AFTER the data scanned. The check box user can defines to append an “Enter” which is followed by the characters. The check box user can defines to append an“TAB” which is followed by the characters.
35 11.6" Rugged Tablet M116P/ PT Series User Guide Note: User can download the SDK from Winmate Download center website >>M116P>>Development Kit or check the Driver CD which is shipped with the tablet. 4.4.7.3 RFID Output Setting I Select The default setting for built-in HF RFID Reader is to Read UID. For some RFID applications, user might need to read or write further block data; the drop-down Output menu under this section can do this change.
Chapter 4: Operating the Device 4.4.9ChangingTouchscreen Modes The tablet computer supports three built-in operating modes for different usage scenarios: Mode Description Hand/Rain (Default) Stylus Glove In Hand/Rain mode the touchscreen rejects false inputs from liquid drops. When the liquid is removed, the touchscreen accepts touch inputs from bare fingertips.
37 11.6" Rugged Tablet M116P/ PT Series User Guide 1. 2. 3. 4. 5. Launch the HottabUtility . Tap on the Setting button. Tap on F1 icon. Tap on the Long Press icon. Change the Long Press function to “Touch Mode” as shown below: Once the touchscreen mode switching is set to the programmable function button, Long Press on “F1” function button to cycle through the different touchscreen modes.
Chapter 4: Operating the Device Caution Do not open when the expansion port is not used To enable the add-on module from expansion port: 1. 2. 3. Open the Hottab utility by press the (Menu) Button located on the front panel, OR launching the Hottab Utility application. Tap on the Device ON/OFF button. Check the status color of theExt. Module icon: Item Status Color Description Orange Expansion Module is enabled. White Ext. Module is disabled. Ext. Module 4.4.
39 11.6" Rugged Tablet M116P/ PT Series User Guide 4.4.11.2 How to Use 1. 2. Launch the Hottab Utility . Choose “Device ON/OFF”and click on “Ext. Module”, and the setting utility will show up as below: 3. 4. Tap on the ON button. Check the status color of the ON icon is green. Trigger Setting Auto Scan The default setting for UHF RFID trigger is Auto Scan. Under this setting, the UHF RFID Reader will always be ready to scan tags. 1.
Chapter 4: Operating the Device Single Scan User can also define the UHF RFID Reader scanning as SINGLE SCAN. Under this setting, the UHF RFID Reader will be triggered only when user click on “Send”. Settings Sound The Sound check box defines whether a beep sound will come with the data scanning. Region Based on different regional regulations about UHF RFID frequencies, user can switch frequency to NA (North America, 902-928 MHz) or EU3 (Europe, 865-868 MHz)from the drop-down menu shown as below.
41 11.6" Rugged Tablet M116P/ PT Series User Guide SDK: For users following SDK for software porting, the scanned data can also be output with the format needed RFID Output To This setting defines the output type of the scanned data. Two options are available: Keyboard Wedge Under this setting, the data scanned is sent like keyboard data. The scanned data can be output directly to the demo area below this window, or user can also open other utility, such as Office Word or Notepad files, for data input.
Chapter 4: Operating the Device Prefix Type in this field to define the characters BEFORE the data scanned. Suffix Type in this field to define the characters AFTER the data scanned. Append Enter To define to append an “Enter”this is followed by the characters. Append TAB To define to append a “TAB”this is followed by the characters. Regex Filter Press on “Presets…” button, user can define how many characters to show after the data scanned.
43 11.6" Rugged Tablet M116P/ PT Series User Guide Disconnect / Connect User can tap on the Disconnect button to stop the connection with UHF RFID Reader. *To recover the connection, please turn off the module from setting UI and then turn on the module again.
Chapter 5: Frequently Used Settings Chapter 5: Frequently Used Settings 5.1 Screen Resolution Scaling and Setting The M116P/ PT Series Rugged Tablet’s 1920 x 1080 Full HDhigh resolution display is perfect for viewing image, video, or other applications; however, Windows user interface (icons, buttons, and other user interface elements) may be too small to read and operate at the default Windows settings.
45 11.6" Rugged Tablet M116P/ PT Series User Guide 5.1.2 Changing Screen Resolution Alternatively, instead of changing the display scaling setting, user may choose to change the overall resolution setting to make screen elements bigger. 1.
Chapter 5: Frequently Used Settings 2. Click on the dropdown option next to “Resolution” and select the desire resolution by tapping on the scale: 3. Hit “Apply”. A prompt “Display Settings” prompt will show up to ask the user if the applied resolution is usable. 4. If the new resolution is the desired display setting hit “Keep changes” and continue to next step. If the new resolution is not desirable, hit “Revert” and select a different resolution to change to, and start again from Step 2. 5.
47 11.6" Rugged Tablet M116P/ PT Series User Guide To remove the battery pack: 1. Shut down the tablet (or put into sleep mode). Turn the tablet computer over, back facing up. 2. Pushthe Battery Lock Latch it to the “Unlocked” position. 3. Pull up and holdthe Battery Release Slider that is spring-loaded. 4. Lift the battery out using the opening on the side of battery compartment. 5.
Chapter 5: Frequently Used Settings 4. A warning message about data loss will show up. Make sure data is backed up before recovery, and click on “Yes” to continue. 5. Wait till the recovery process to complete. During the recovery process, a command prompt will show up to indicate the percent of recovery process. 6. After recovery is completed, please press any key to continue, and the tablet computer will shut down automatically.
49 11.6" Rugged Tablet M116P/ PT Series User Guide 5.4Docking Connector Pin Definition The M116P/ PT Series Rugged Tablet supports one 19-pin docking connector at the bottom side. The pin definition is listed as the following table. Pin No. 1 2 3 4 5 6 7 8 9 10 Description RF_GND DOCK_DET # GPS ANT RF_GND RF_GND NC NC DETECT+ Power Power Pin No. 11 12 Description NC NC 13 14 15 16 17 18 19 GND Power USB+ USBGND GND DETECT- 5.
Chapter 5: Frequently Used Settings 2. Tap on "Port Setting" tab and click on "Advanced" button. 3. Tap on the dropdown list and choose the correct COM Port Number (refer to the COM Port Definition Table), and click "OK". 4. Double-check "Device Manager" to make sure the COM Port number has been re-defined successfully, and then restart the system. 5.6 GigaLAN Port Definition Notice that GigaLAN port is an optional feature of the M116P/ PT Series Rugged Tablet and may not be present in your device.
51 11.6" Rugged Tablet M116P/ PT Series User Guide 5.7Pairing with a Wireless Bluetooth Barcode Scanner The computer is affixed with a Bluetooth MAC (Media Access Control) address barcode label that enables wireless Bluetooth Barcode Scanner to quickly establish Bluetooth connection with the computer. It is encoded with leading characters to instruct the wireless Bluetooth barcode scanner to initial Bluetooth Serial Port Profile pairing request. 5.7.
Chapter 5: Frequently Used Settings 4. go to “Options” tab, and make sure that in the Discovery section, the computer is set to “Allow Bluetooth devices to find this computer”, as shown below: Click OK to continue. 5. In theBluetooth Settingsmenu, go to “COM Ports” tab. COM port has to be setup for the wireless Bluetooth Barcode Scanner to communicate via the Bluetooth Serial Port Profile. Click on the “Add…” button.
53 11.6" Rugged Tablet M116P/ PT Series User Guide . 6. You are in “Add COM Port” window. Choose “Incoming (device initiates the connection)”, and click “OK”. 7. The computer will automatically assign COM Port to the Bluetooth connection. In the screenshot below, COM4 is allocated. Click OK to continue.
Chapter 5: Frequently Used Settings 8. Next, the user has to configure the application that is used to accept the scanned data from the wireless Bluetooth Barcode Scanner. The application has to be configured to accept the same COM Port that has been assigned for the Bluetooth Serial Port Profile in the previous step. Important:Make sure the application stays open while pairing. 9. Now the computer is ready for pairing process to start 5.7.
55 11.6" Rugged Tablet M116P/ PT Series User Guide 5. In Add a Bluetooth Device window, click Nextto connect the Barcode Scanner to the Computer. In order to ensure that Bluetooth Device is successfully pared to the Computer, follow the steps below: 1. Locate the Bluetooth icon in the Notification Area. Select Show Bluetooth Devices. You can access this menu in the Control Panel: Windows ➔Control Panel ➔ Devices and Printers➔ Bluetooth Devices 2. Make sure your device is connected to the Computer.
Chapter 6: Troubleshooting Chapter 6: Troubleshooting 6.1 Basic Troubleshooting Problem Solution The removable battery is not charging. • Make sure the AC adapter is properly connected, and that the removable battery is properly inserted. Nothing appears on the screen. • The tablet computer may be in sleep mode. Press the power button to wake up the display. The brightness level may be too low. Increase brightness. • The screen suddenly turns blank and the power indicator goes off.
57 11.6" Rugged Tablet M116P/ PT Series User Guide Problem Solution No sound is produced. • • Adjust volume of the tablet computer by pressing on the volume rocker. If using an external audio device, make sure that the cable is properly connected. I cannot project the tablet computer display to another monitor. • • Make sure the VGA driver is installed. Make sure the output setting selected is correct. Barcode scanner does not emit laser beam and does not seem to work.
58 M116P Rugged Tablet User Guide Appendix Appendix A: Product Specifications M116P Model Name Display Specification System Specification Size 11.6-inch display with LED Backlight 11.
59 M101S Rugged Tablet User Guide Model Name M116P Microphone Built-in dual digital mic with noise cancellation Built-in dual digital mic with noise cancellation Speaker 2 x 1 watt front-facing speakers 2 x 1 watt front-facing speakers Web Camera 2MP front camera 8MP rear camera with autofocus and LED light Optional 1D/2D Barcode Reader Optional HF RFID Reader OptionalSmart Card Reader, complies with IS07816-1.2.
Winmate Inc. 9F, No.111-6, Shing-De Rd., San-Chung District, New Taipei City 24158, Taiwan, R.O.C www.winmate.com Copyright © 2018 Winmate Inc. All rights reserved.