
User's Manual
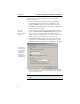
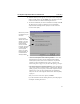
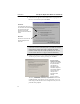
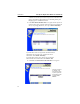
Table Of Contents
- Understanding your AnyPoint™ Wireless II Network 1
- What is a network?
- Components required to connect a PC to a network
- How does my Wireless II adapter operate?
- How do I use my Wireless II laptop in different locations?
- What is the AnyPoint Connection Manager?
- What is sharing and mapping?
- What is Internet Sharing Software (ISS)?
- Guidelines for setting up your network
- Set Up the AnyPoint™ Wireless II Network 2
- Share Drives and Printers 3
- Connect to the Internet 4
- Managing your Wireless II Network 5
- Using the AnyPoint Connection Manager
- View and edit current settings using the Wireless Control Panel tab
- Activate a profile
- Creating a new profile
- Scan for public access points
- Create a profile for a public access point
- Create an AnyPoint profile for your home or small office
- Create a profile for a corporate wired network
- Troubleshooting 6
- I can’t see a network PC from another PC
- I have an insufficient permissions error when running Windows 2000
- Remove incompatible network adapters
- I can’t connect to my ISP from an ISS client PC
- Make sure the ISS server PC is turned on and running the ISS software
- Make sure both the ISS server and ISS client PCs are on the network
- If you are using AOL*, check the AOL software
- If you are using AT&T WorldNet*, or CompuServe 2000*, check their settings
- Find out if the problem is ISS or your ISP connection
- I keep getting disconnected from the Internet without hanging up
- Can I use Internet sharing software from more than one manufacturer?
- ISS and ICS (Internet Connection Sharing)
- Network game problems
- I can’t see a drive or printer on a network PC
- I can’t map or print to a printer
- I can’t map to a drive
- I can’t write or save files to a drive on a network PC
- Printer drivers not found
- My laptop has speaker noise
- I am trying to access my Wireless II network with an Intel PRO/Wireless adapter
- I am trying to install a Wireless II adapter into an Intel PRO/Wireless network
- My Wireless II connection keeps getting interrupted
- What do the lights on my Wireless II adapter mean?
- Internet Service Provider Reference 7
- Technical Support Option 8
- Agency Notices
- Glossary
- Specifications

CHAPTER 2 Set Up the AnyPoint™ Wireless II Network
12
installation process. During installation, you will be making decisions that
will affect the way your network operates, so be sure to pay careful
attention to the screens.
1 Insert the AnyPoint Connectivity Suite CD in the CD-ROM drive.
Using Windows Explorer, double-click the CD-ROM drive, then
double-click
Setup to begin. The main presentation screen appears.
2 Click Install. An installation summary screen appears. Click Next. The
license agreement screen appears.
See "Your
Wireless II
network adapter"
on page 2
.
If Setup detects an incompatible network adapter already installed on
your PC, the
More than one network adapter found screen appears. If
you receive this screen, refer to "Remove incompatible network
adapters" on page 53, which will show you how to resolve the adapter
conflict. If you do not receive this screen, go to the next step.
3 Click I Accept or I decline the agreement. If you decline, the Setup
program exits. If you click
Accept, the destination directory appears.
4 Click Next to select the default directory. The PC name screen appears.
5 Assign a name to the PC. Be sure to use a different name for each PC
on the network. Make a note of the Workgroup name. All PCs
must use
the same Workgroup name.
The PC name
can have up to
15 characters,
including any
combination of
letters (A-Z),
numerals (0-9),
and dashes (-).
Important: If your ISP has named the PC, don’t change the PC’s
name.