
User's Guide
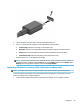

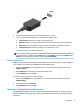
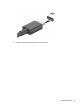
Table Of Contents
- Welcome
- Components
- Network connections
- Connecting to a wireless network
- Connecting to a wired network
- Using HP MAC Address Pass Through to identify your computer on a network (select products only)
- Navigating the screen
- Entertainment features
- Using a camera (select products only)
- Using audio
- Using video
- Connecting a DisplayPort device using a USB Type-C cable (select products only)
- Connecting a Thunderbolt device using a USB Type-C cable (select products only)
- Connecting video devices by using a VGA cable (select products only)
- Connecting video devices using an HDMI cable (select products only)
- Connecting a Thunderbolt DisplayPort device
- Discovering and connecting wired displays using MultiStream Transport
- Discovering and connecting to Miracast-compatible wireless displays (select products only)
- Discovering and connecting to Intel WiDi certified displays (select Intel products only)
- Using data transfer
- Managing power
- Using Sleep and Hibernation
- Shutting down (turning off) the computer
- Using the Power icon and Power Options
- Running on battery power
- Security
- Protecting the computer
- Using passwords
- Setting passwords in Windows
- Setting passwords in Computer Setup
- Managing a BIOS administrator password
- Using DriveLock Security Options
- Windows Hello (select products only)
- Using antivirus software
- Using firewall software
- Installing software updates
- Using HP Client Security (select products only)
- Using HP Device as a Service (HP DaaS) (select products only)
- Using an optional security cable (select products only)
- Using a fingerprint reader (select products only)
- Maintenance
- Backing up, restoring, and recovering
- Using Windows tools
- Creating HP Recovery media (select products only)
- Restoring and recovery
- Restoring, resetting, and refreshing using Windows tools
- Restoring using HP Recovery Manager and the HP Recovery partition
- Recovering using HP Recovery Manager
- Recovering using the HP Recovery partition (select products only)
- Recovering using HP Recovery media
- Changing the computer boot order
- Removing the HP Recovery partition (select products only)
- Computer Setup (BIOS), TPM, and HP Sure Start
- Using HP PC Hardware Diagnostics
- Specifications
- Electrostatic Discharge
- Accessibility

Discovering and connecting to Miracast-compatible wireless displays (select
products only)
NOTE: To learn what type of display you have (Miracast-compatible or Intel WiDi), refer to the
documentation that came with your TV or secondary display.
To discover and connect to Miracast-compatible wireless displays without leaving your current apps, follow
the steps below.
To open Miracast:
▲ Type project in the taskbar search box, and then click Project to a second screen. Click Connect to a
wireless display
, and then follow the on-screen instructions.
Discovering and connecting to Intel WiDi certied displays (select Intel products
only)
Use Intel WiDi to wirelessly project individual les such as photos, music, or videos, or to duplicate your entire
computer screen to a TV or a secondary display device.
Intel WiDi, a premium Miracast solution, makes it easy and seamless to pair your secondary display device;
provides for full-screen duplication; and improves speed, quality, and scaling.
To connect to Intel WiDi certied displays:
▲ Type project in the taskbar search box, and then click Project to a second screen. Click Connect to a
wireless display, and then follow the on-screen instructions.
To open Intel WiDi:
▲ Type Intel WiDi in the taskbar search box, and then click Intel WiDi.
Using data transfer
Your computer is a powerful entertainment device that enables you to transfer photos, videos, and movies
from your USB devices to view on your computer.
To enhance your viewing enjoyment, use one of the USB Type-C ports on the computer to connect a USB
device, such as a cell phone, camera, activity tracker, or smartwatch, and transfer the les to your computer.
IMPORTANT: Be sure that the external device is connected to the correct port on the computer, using the
correct cable. Follow the device manufacturer's instructions.
For information on using your USB Type-C features, refer to HP Support Assistant.
Connecting devices to a USB Type-C port (select products only)
NOTE: To connect a USB Type-C device to your computer, you need a USB Type-C cable, purchased
separately.
1. Connect one end of the USB Type-C cable to the USB Type-C port on the computer.
24 Chapter 5 Entertainment features