User Guide for NUC7i3BNHXF, NUC7i5BNHXF, NUC7i7BNHXG Intel® NUC 7 Home, a Mini PC with Windows® 10 – NUC7i3BNHXF Intel® NUC 7 Home, a Mini PC with Windows® 10 – NUC7i5BNHXF Intel® NUC 7 Enthusiast, a Mini PC with Windows® 10 – NUC7i7BNHXG User Guide 1
User Guide for NUC7i3BNHXF, NUC7i5BNHXF, NUC7i7BNHXG Before You Begin CAUTIONS The steps in this guide assume you’re familiar with computer terminology and with the safety practices and regulatory compliance required for using and modifying computer equipment. Disconnect the computer from its power source and from any network before performing any of the steps described in this guide.
User Guide for NUC7i3BNHXF, NUC7i5BNHXF, NUC7i7BNHXG This guide tells you how to: • • • • • • • • Upgrade system memory Change/install an M.2 SSD Change/install a 2.5-inch drive Use a VESA mount bracket Connect power Set up Microsoft® Windows® 10 Keep device drivers current Recover the operating system Open the Chassis Unscrew the four corner screws on the bottom of the chassis and lift the cover.
User Guide for NUC7i3BNHXF, NUC7i5BNHXF, NUC7i7BNHXG Upgrade System Memory The Intel NUC Kits NUC7i3BNHXF, NUC7i5BNHXF, and NUC7i7BNHXG have two 260-pin DDR4 SODIMM sockets. Pre-installed memory NUC7i3BNHXF One 4GB memory module NUC7i5BNHXF One 4GB memory module NUC7i7BNHXG One 8GB memory module To upgrade memory, be sure to select memory modules that meet these requirements: 1.
User Guide for NUC7i3BNHXF, NUC7i5BNHXF, NUC7i7BNHXG Install an additional memory module a. Align the small space at the bottom edge of the memory module with the key on the socket. b. Insert the bottom edge of the module at a 45 degree angle into the socket (A). c. When the module is inserted, push down on the outer edges of the module until the retaining clips snap into place (B). Make sure the clips are firmly in place (C). 4.
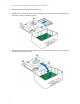
User Guide for NUC7i3BNHXF, NUC7i5BNHXF, NUC7i7BNHXG To Change an M.2 SSD: 1. Remove the small silver screw from the 80mm or 42mm metal standoff on the board (A). 2. Remove the pre-installed SSD/Intel Optane Memory from the connector. 3. Align the space at the bottom of the new M.2 SSD to the key on the connector. 4. Insert the bottom edge of the M.2 SSD into the connector (B). 5. Secure the card to the standoff with the small silver screw (C). Change a 2.
User Guide for NUC7i3BNHXF, NUC7i5BNHXF, NUC7i7BNHXG 2. Remove the pre-installed drive from the drive bay. 3. Slide the new 2.5” drive into the drive bay, ensuring the SATA connectors are fully seated into the connectors of the SATA daughter card (A). 4. Secure the drive into the drive bay with the four screws that were used in step 1. Set the drive bay bracket down inside the chassis (C).
User Guide for NUC7i3BNHXF, NUC7i5BNHXF, NUC7i7BNHXG Close the Chassis After all components have been installed, close the Intel NUC chassis. Intel recommends this be done by hand with a screwdriver to avoid over-tightening and possibly damaging the screws. Attach and Use the VESA Bracket (Optional) Follow these instructions to attach and use the VESA mount bracket: 1. Using the four small black screws that were included in the box, attach the VESA bracket to the back of the monitor or TV.
User Guide for NUC7i3BNHXF, NUC7i5BNHXF, NUC7i7BNHXG 2. Attach the two slightly larger black screws to the bottom chassis cover of the Intel NUC. 3. Slide the Intel NUC onto the VESA mount bracket.
User Guide for NUC7i3BNHXF, NUC7i5BNHXF, NUC7i7BNHXG Connect Power Country-specific power plug attachments are included in the box. 1. Choose the attachment for your region.
User Guide for NUC7i3BNHXF, NUC7i5BNHXF, NUC7i7BNHXG 2. Slide the attachment (B) onto the power plug, locking it into place (A). 3. Connect AC power.
User Guide for NUC7i3BNHXF, NUC7i5BNHXF, NUC7i7BNHXG Set Up Microsoft® Windows® 10 Microsoft Windows 10 is already installed on the Intel NUC. The first time you start the computer, you’re guided through the Windows 10 setup steps, including: Selecting your region and language. Accepting the Microsoft Windows license terms. Personalizing Windows and assign a PC Name. "Get Online" dialog to pick a wireless network (this step is optional). Choosing Express Settings or Customize.
User Guide for NUC7i3BNHXF, NUC7i5BNHXF, NUC7i7BNHXG Operating System Recovery There’s a Windows recovery partition on the Intel NUC. You can use this partition to Refresh, Reset, or Restore Windows. Here is what each of these actions do: Refresh If your PC isn't performing as well as it once did, and you don't know why, you can refresh your PC. This action doesn’t delete any of your personal files or change your settings.
User Guide for NUC7i3BNHXF, NUC7i5BNHXF, NUC7i7BNHXG 14