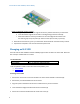
User Guide for NUC7i5BNKP, NUC7i7BNKQ Intel® NUC7 Home, a Mini PC with Windows® 10 – NUC7i5BNKP Intel® NUC7 Enthusiast, a Mini PC with Windows® 10 – NUC7i7BNKQ User Guide 1
User Guide for NUC7i5BNKP, NUC7i7BNKQ Before You Begin CAUTION The procedures in this guide assume familiarity with the general terminology associated with personal computers and with the safety practices and regulatory compliance required for using and modifying electronic equipment. Always disconnect the computer from its power source and from any network before performing any of the procedures described in this guide.
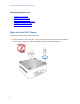
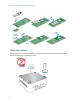
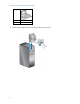
User Guide for NUC7i5BNKP, NUC7i7BNKQ This guide tells you how to: • • • • • • Upgrade memory (RAM) Change/install an M.2 SSD Use a VESA mount bracket Identify the correct power adapter Installing an operating system Keeping device drivers current Open the Intel NUC Chassis To open the Intel NUC chassis, follow these steps: 1. Using a screwdriver, unscrew the four corner screws on the bottom cover of the chassis and lift the cover (using an electric or battery operated screw driver can damage the NUC).
User Guide for NUC7i5BNKP, NUC7i7BNKQ Upgrading System Memory The Intel NUC Mini PCs NUC7i5BNKP and NUC7i7BNKQ have two 260-pin DDR4 SO-DIMM sockets. Both mini PCs come with pre-installed memory. Pre-installed memory NUC7i5BNKP Two - 4GB memory modules – 8GB Total NUC7i7BNKQ Two - 8GB memory modules – 16GB Total To upgrade memory, be sure to select memory modules that meet these requirements: 1.
User Guide for NUC7i5BNKP, NUC7i7BNKQ Install an additional memory module a. Align the space at the bottom edge of the memory module with the key on the socket. b. Insert the bottom edge of the module at a 45 degree angle into the socket (A). c. When the module is inserted, push down on the outer edges of the module until the retaining clips snap into place (B). Make sure the clips are firmly in place (C). 4. Reinstall and reconnect any parts you removed or disconnected to reach the memory sockets. 5.
User Guide for NUC7i5BNKP, NUC7i7BNKQ Close the Chassis After all components have been installed, close the Intel NUC chassis (using an electric or battery operated screw driver can damage the NUC).
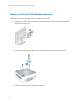
User Guide for NUC7i5BNKP, NUC7i7BNKQ Attach and Use the VESA Bracket (Optional) Follow these instructions to attach and use the VESA mount bracket: 1. Using the four small black screws that are included in the box, attach the VESA bracket to the back of the monitor or TV. 2. Attach the two slightly larger black screws to the bottom chassis cover of the Intel NUC. 3. Slide the Intel NUC onto the VESA mount bracket.
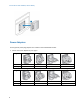
User Guide for NUC7i5BNKP, NUC7i7BNKQ Power Adapters Country-specific power plug adapters are included in the Intel NUC Mini PC box. 1. Choose the correct adapter for your region.
User Guide for NUC7i5BNKP, NUC7i7BNKQ Plug Code BRA Country Brazil 2. Slide the adapter (B) onto the power plug, locking it into place (A).
User Guide for NUC7i5BNKP, NUC7i7BNKQ 3. Connect AC power. Installing an Operating System If a Hard drive or SSD has been removed or replaced, it may be necessary to reinstall the Windows® 10 operating system. Refer to Operating System Installation page for installation steps.
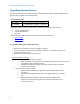
User Guide for NUC7i5BNKP, NUC7i7BNKQ The following Drivers are available: 11 Realtek* Audio Intel® Bluetooth Intel® Chipset ITE* Consumer Infrared Intel® Graphics Intel® ME Intel® Rapid Storage Technology Intel® Ready Mode Technology Intel® LAN (wired and wireless) Thunderbolt™ Realtek Card Reader Driver