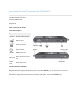
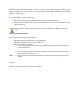
User Guide for Intel® Compute Stick STCK1A8LFC Last Reviewed: 02-Oct-2017 Article ID: 000017236 Expand all Click or the topic for details: Product Description Symbol Description Security Security cable opening USB 2.0 port Power connector Power button HDMI* HDMI connector Micro SD Micro SD memory card slot Power LED Power LED—blue Connect Directly to a Display Plug the Intel® Compute Stick directly into a standard HDMI port on a television or monitor.
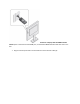
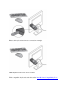
Connect to a Display with the HDMI Extender CableIf space is limited around the HDMI port, use the flexible HDMI extender cable that came in the box. 1. Plug the Intel Compute Stick into the female end of the extender cable (A).
2. Plug the male end of the extender cable into the HDMI port on the television or monitor (B). Find compatible televisions and monitors at the Intel Product Compatibility Tool.
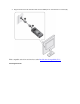
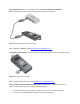
Using the AC Adapter Connect the power adapter to the Intel Compute Stick as shown. Note The Intel Compute Stick starts automatically when power is applied. Shut down the Intel Compute Stick using the normal shutdown process for Ubuntu*. Subsequent power-ups are done by pressing the power button on the side of the Intel Compute Stick. Using a USB Port If a television or monitor has an HDMI* port and a USB port, try using the USB port to power the Intel Compute Stick.
The Intel Compute Stick is designed to use up to 10 W of power. If the television's USB port can supply enough power, you can use it to power the Intel Compute Stick. A USB 2.0 port normally supplies 2.5 W of power. To use the USB port, follow these steps: 1. Plug the micro-USB end of the 3-foot USB cable into the Intel Compute Stick 2. Plug the standard USB end of the cable into the USB port on the TV or monitor, instead of using the AC power plug.
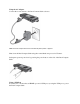
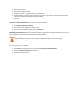
Bluetooth keyboard and mouse connection example: Note Keyboard and mouse aren't included. Find compatible keyboards and mice at the Intel Product Compatibility Tool.
Using the USB 2.0 PortYou can use the USB 2.0 port to:Connect a USB Hub to the USB 2.0 PortConnecting a USB hub to the Intel Compute Stick provides more USB ports. Note USB Hub and USB cable aren't included. Find compatible USB hubs at the Intel Product Compatibility Tool. Use the Micro SD Card portThe Intel Compute Stick supports Micro SD card sizes from 8 GB to 128 GB. Note Micro SD card isn't included. Find compatible microSD cards at the Intel Product Compatibility Tool.
3. 4. 5. 6. Select your location. Select your keyboard layout. Assign your name, a computer name, and password. Choose whether to create recovery media. This step is not required, since the Compute Stick comes with a Recovery Partition already installed. 7. Finished. Connect to a Wireless NetworkTo connect to a wireless network: 1. Click System Settings > Network. 2. Click the wireless network you want to join. 3. Enter the authentication details and click Connect.