
Personal Computer User Manual

ESM-2740/2743
24 ESM-2740/2743 User’s Manual
2.2 Installation Procedure
This chapter explains you the instructions of how to setup your system.
1. Turn off the power supply.
2. Insert the DIMM module (be careful with the orientation).
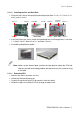
3. Insert all external cables for hard disk, floppy, keyboard, mouse, USB etc. except for flat
panel. A CRT monitor must be connected in order to change CMOS settings to support
flat panel.
4. Connect power supply to the board via the ATXPWR.
5. Turn on the power.
6. Enter the BIOS setup by pressing the delete key during boot up. Use the “LOAD BIOS
DEFAULTS” feature. The Integrated Peripheral Setup and the Standard CMOS Setup
Window must be entered and configured correctly to match the particular system
configuration.
7. If TFT panel display is to be utilized, make sure the panel voltage is correctly set before
connecting the display cable and turning on the power.
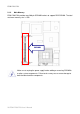
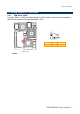
2.1.1 Installing Processor
2.1.1.1 Installing Pentium M CPU
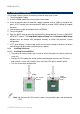
• The processor socket comes with a screw to secure the processor, please unlock the
screw first.
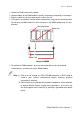
• Position the CPU above the socket and the gold triangular mark on the CPU must
align with pin 1 of the CPU socket. Then Insert the CPU gently seated in place.
• Turn the screw to the lock position.
Note: Do not force the CPU into the socket. It may bend the pins and damage the
CPU.
Unlock Lock
Pin 1 of the
socket
Gold
triangular
mark