Intel EtherExpress™ PRO/100 LAN+Modem56 PC Card User’s Guide How to Use This Manual This Users Guide contains the latest information on the EtherExpress PRO/100 LAN+Modem56 PC Card available at press time. It is designed to help both new and experienced users with installation and configuration. Installation and Configuration Overview For an overview, see the Quick Installation Card.
ii PRO/100 LAN+Modem PC Card User's Guide Copyright © 1997 Intel Corporation. All rights reserved. Intel Corporation 5200 N.E. Elam Young Parkway Hillsboro, OR 97124-6497 Intel Corporation assumes no responsibility for errors or omissions in this guide. Nor does Intel make any commitment to update the information contained herein. * Other product and corporate names may be trademarks of other companies and are used only for explanation and to the owners benefit, without intent to infringe.
Contents Hardware Installation ..................................... 1-1 Software Supplied ................................................................... 1-2 Hardware Installation .............................................................. 1-3 Unpacking and Inspection ....................................................... 1-3 Other Required Equipment ..................................................... 1-4 Installing Card and Cables ......................................................
iv PRO/100 LAN+Modem PC Card User's Guide Windows 3.x Troubleshooting ................................................ 4-51 Computer-Specific Application Notes (Windows 3.x) ............ 4-60 Utilities and Applications .............................. 5-1 Utilities ..................................................................................... 5-1 Country Identifier Utility ........................................................... 5-1 Modem Test Utility ...............................................
CHAPTER 1 Hardware Installation Introduction The PRO/100 PC Card is the ideal high-speed, multifunction solution for portable PC users. It supports 10 and 100Mbps Ethernet networks and modem speeds up to 56Kbps for high-performance connectivity in any environment. The PRO/100 PC Card plugs into your computers Type II PC Card slot for simultaneous connection to an Ethernet LAN and the telephone network. 56K Technology The PRO/100 PC Card uses K56flex* modem technology to reach speeds up to 56Kbps.
1-2 PRO/100 LAN+Modem PC Card User’s Guide With K56flex technology, current country-specific regulations may limit download speeds. Additional factors such as phone line conditions, can affect the performance of the PRO/100 PC Card. You can find more detailed technical information on K56flex performance on Intel's support web site, support.intel.com. Model MBLA1656 Combination card that provides access to 10Base-T and 100Base-TX networks and modem speeds up to 56Kbps.
Hardware Installation 1-3 HotSwap This card supports HotSwap on a PC Card computer that is running Microsoft Windows 95 or Windows 3.x/MS-DOS using Card and Socket Services. This feature allows the PRO/100 PC Card to be removed from the computer, temporarily replaced with another type of PC card, then reinserted without loss of the local area network connection.
1-4 PRO/100 LAN+Modem PC Card User’s Guide Package Contents EtherExpress PRO/100 LAN+Modem PC Card PC Card (Model MBLA1656) Model MBLA-1656: Ethernet adapter cable with a 15-pin PC Card connector at one end and female RJ-45 connector at the other for 10Base-T or 100Base-TX connectivity Modem cable with RJ-11 telephone connector Intel EtherExpress PRO/100 LAN+Modem PC Card User's Guide (this book) Intel EtherExpress PRO/100 LAN+Modem PC Card Quick Start card Software on two 1.44 MB 3.
Hardware Installation 1-5 4 For modem operations: an analog telephone line or PABX connection (RJ-11), and if needed, an RJ-11 adapter for the local telephone system. Note Do not connect to a digital telephone line or digital PABX system. The hardware on the adapter will protect your modem from inadvertent connection to a digital line.
1-6 PRO/100 LAN+Modem PC Card User’s Guide Note The PRO/100 PC Card may feel hot to the touch, after prolonged periods of normal use in some environments. This is normal and is not known to affect operation of the Intel card, the host computer, or any other peripheral device. However, to avoid discomfort, use caution when removing the card from your computer after extended use (see your computer manual for removal procedures).
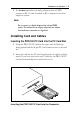
Hardware Installation 1-7 Caution The PRO/100 PC Card will not work with digital telephone lines or digital PABX systems. The adapter hardware will protect your modem against damage from inadvertent connection to a digital line. TRANSMIT/RECEIVE (YELLOW) TELEPHONE CABLE CARRIER DETECT (GREEN) MODEM CABLE Connecting the Telephone Cable to the Modem Cable. Connecting the Ethernet Adapter Cable to the PRO/100 Hold the PC Card with the top facing upward.
1-8 PRO/100 LAN+Modem PC Card User’s Guide Connecting to a Twisted Pair network. Caution For safety reasons, do not interchange the telephone (RJ-11) and Ethernet (RJ-45) cables by forcing the Ethernet cable into the modem sloton the PRO/100 PC Card. Plug the male RJ-45 connector at the end of the network cable into the female RJ-45 connector on the Ethernet Adapter Cable.
CHAPTER 2 Windows 95 Installation Which Version of Windows 95? Two Versions and Two Installation Paths Currently two versions of Windows 95 are available: The standard retail version (designated 4.00.950 or 4.00.950a) OEM Service Release Version 2 (designated 4.00.
2-2 PRO/100 LAN+Modem PC Card User’s Guide For Microsoft Windows 95 4.00.
Windows 95 Installation 2-3 Windows 95 troubleshooting information is provided in this chapter following the installation sections. Recommended Installation Steps Insertion, Detection, and Prompt for Disk 1 With the computer powered-up and Windows 95 running, insert the PRO/100 PC Card into the PC Card slot in the computer. Windows 95 will detect the insertion of the adapter. (If it does not, see item 3 of the Troubleshooting Checklist: Be sure that PCMCIA support is enabled ... later in this chapter.
2-4 PRO/100 LAN+Modem PC Card User’s Guide the program. (For details on this utility, see Chapter 5. Utilities and Applications.) Windows 95 OSR2 Installation (OEM Version) Overview Installation under the OSR2 version of Windows 95 should be performed using the Update Device Driver Wizard, as described below. Windows 95 will recognize the Intel card when it is inserted and display the Update Device Driver Wizard window.
Windows 95 Installation 2-5 Recommended Installation Steps Insertion, Detection, and Prompt for Disk 1 With the computer powered-up and Windows 95 running, insert the PRO/100 PC Card into the PC card slot in the computer. 2 Windows 95 will detect the Intel adapter and then display the following Update Device Driver Wizard screen (if the adapter is not detected, see Troubleshooting Item 3: Be sure that PCMCIA support is enabled ... under Windows 95 Troubleshooting later in this chapter).
2-6 PRO/100 LAN+Modem PC Card User’s Guide Copying Intel Files 5 At the Insert Disk screen, click . KO 6 At the Copying Files... screen, specify A:\ in the Copy files from: box and click . KO Copying Windows 95 Network Files In most cases Windows 95 network files will need to be installed, using CAB files from diskette or CD-ROM. If another PC Card modem or network adapter was installed previously on your system, some of these files may already be present.
Windows 95 Installation 2-7 7 Windows 95 will detect new hardware and copy files. At the Insert Disk screen, click OK. 8 At the Copying Files... screen, specify the path to the Windows 95 files (usually c:\windows\options\cabs) in the Copy files from: box and click OK. 9 At the System Settings Change screen, remove the Intel disk from the disk drive and click Yes. The computer will restart.
2-8 PRO/100 LAN+Modem PC Card User’s Guide How to Install for Windows 95 and NetWare 1 Install the PRO/100 PC Card driver and verify the installation as described above in the installation procedures. 2 In the Control Panel, double-click the Network icon. 3 From the Configuration tab in the Network window, click Add. 4 From the Select Network Component Type window, select Client and click Add. 5 Under Manufacturers in the Select Network Client window, select Microsoft.
Windows 95 Installation 2-9 These utilities are automatically copied to your hard drive during installation under Windows 95, and icons for the utilities are installed in a Windows program group at the time of installation. See Chapter 5. Utilities and Applications for additional information. Power-Saving Modes The PRO/100 PC Card has two power-saving modes to reduce adapter power consumption under certain conditions: Network-only mode and Modem-only mode (Network & Modem is the default).
2-10 PRO/100 LAN+Modem PC Card User’s Guide For Windows 95 OSR2 (OEM Version), expand the item Modem. 4 For either version, select Intel EtherExpress PRO/100 LAN+Modem PC Card (Multi-function Parent Device) and click Properties. 5 From the Properties window, select the Resources tab. 6 Confirm that there are no conflicts with other installed devices.
Windows 95 Installation 2-11 1 Be sure you have the latest firmware and driver. To determine what firmware and driver version you have, click My Computer, Control Panel, Modems, highlight the Intel EtherExpress PRO 100 LAN+Modem PC Card (Modem), click Diagnostics, click the Port the Intel modem is using, click More Info. The firmware information for the adapter should display.
2-12 PRO/100 LAN+Modem PC Card User’s Guide the PCMCIA icon in the Control Panel, so that Windows 95 will automatically detect the type of PCMCIA controller in the machine. 4 Create C:\WINDOWS\MODEMLOG.TXT to record the status of the modem. Double-click My Computer, Control Panel, Modems, highlight the Intel EtherExpress PRO 100 LAN+Modem PC Card (Modem), click Properties, Connection, Advanced, check the box Record a log file, remove any modem strings in the box Extra settings, then click OK.
Windows 95 Installation 2-13 Windows 95 Driver Parameters Reference Caution Under most circumstances it will not be necessary to make modifications directly to the registry. Incorrect settings can result in undesirable changes to the configuration of Windows 95. Consult Intel Customer Support for assistance if you find it necessary to modify the registry. M16B.SYS (NDIS 3) Settings for Microsoft Windows 95 M16B.SYS is an NDIS 3 LAN adapter.
2-14 PRO/100 LAN+Modem PC Card User’s Guide There are user-configurable parameters for the M16B.SYS driver that can be modified using the Network Control Panel applet built into Windows 95. This applet queries the user for parameter selections and then sets the corresponding parameters in the registry.
Windows 95 Installation 2-15 Caution Under most circumstances it will not be necessary to make modifications directly to the registry. Incorrect settings can result in undesirable changes to the configuration of Windows 95 or NT. The registry parameters are as follows: Keyword Default Valid Values DEVICEVXDS M16B.SYS DEVLOADER NDIS DIRECTENABLE 0 DRIVERDESC INTEL ETHEREXPRESS PRO/100 LAN+MODEM PC CARD (NETWORK) EARLYTRANSMIT 1 ENUMPROPPAGES NETDI.
2-16 PRO/100 LAN+Modem PC Card User’s Guide
CHAPTER 3 Windows NT Installation Which Version of Windows NT? Two Versions and Two Installation Paths Installation of the PRO/100 PC Card is different for versions 4.0 and 3.51 of Windows NT. Before starting the installation you must know what version of Windows NT you have. If youre using version 3.51, you must also know the version of any software Service Pack installed. Currently two versions of Windows NT are supported: Windows NT Version 4.0 Windows NT Version 3.
3-2 PRO/100 LAN+Modem PC Card User’s Guide How Can I Tell Which Version and Service Pack I Have? If you don't know what version you have, follow the steps below. If you know you have Version 4.0, skip to the Windows NT 4.0 Installation section. No additional version information is required. If you know you have Version 3.51, follow the steps below to determine what Service Pack version is installed. This information is required in step 9 of the Windows NT 3.51 Installation section.
Windows NT Installation 3-3 Windows NT 4.0 Installation Installing the PRO/100 PC Card under Windows NT 4.0 requires installing the network driver and the modem separately. The network driver must be installed first. PCMCIA Services Verification Before installing the Intel adapter, make sure that PCMCIA services are enabled on your computer. 1 Select Devices from the Control Panel. 2 Scroll down the Device list to the PCMCIA device. The Status should be Started and the Startup should be Boot.
3-4 PRO/100 LAN+Modem PC Card User’s Guide 7 Select the Adapters tab and click Add. 8 On the Select Network Adapters screen, click Have Disk. Insert Intel Disk 1, Installation Disk and make sure the specified path is correct, for example: A:\. Click OK. 9 Select Intel EtherExpress PRO/100 LAN+Modem PC Card and click OK. 10 At the PRO/100 PC Card Setup screen, choose appropriate settings. Click OK. 11 At the Network screen click Close.
Windows NT Installation 3-5 15 The country identifier utility will be autmatically launched. At the country identifier utility screen, make the appropriate country selection. 16 At the Install New Modem screen click Finish. 17 At the Modems Properties screen click Dialing Properties... to set up dialing properties (not necessary if a modem had been previously installed). Click Close. Windows NT 3.
3-6 PRO/100 LAN+Modem PC Card User’s Guide 9a For Windows NT 3.51 with Service Pack 5 or greater, specify: \A: 9b For all other versions of Windows NT 3.51 specify: A:\NT351. Click OK. 10 Select Intel EtherExpress PRO/100 LAN+Modem PC Card and click OK. 11 At the PRO/100 PC Card Setup screen, choose appropriate settings. Click OK. 12 The Network Settings screen should show Intel EtherExpress PRO/100 LAN+Modem PC Card under Installed Adapter Cards. Click OK.
Windows NT Installation 3-7 Power-Saving Modes The PRO/100 PC Card has two power-saving modes to reduce adapter power consumption under certain conditions: Network-only mode and Modem-only mode. Network-only mode disables the modem function on the PRO/100. This mode should only be used when the modem will not be needed. Modemonly mode disables the network function on the PRO/100. It should only be used when the network will not be needed.
3-8 PRO/100 LAN+Modem PC Card User’s Guide Windows NT Driver Parameters Reference M16B.SYS (NDIS 3) Settings for Microsoft Windows NT M16B.SYS is an NDIS 3 network interface card (NIC) driver. It conforms to the Microsoft Network Driver Interface Specification (NDIS). It supports both Windows NT and Windows 95. Caution Under most circumstances it will not be necessary to make modifications directly to the registry.
Windows NT Installation 3-9 Parameter DIRECT ENABLE EARLY TRANSMIT FULL DUPLEX FUNCTION(S) Default DISABLED ENABLED DISABLED NETWORK Valid Values Registry Value DISABLED 0 ENABLED 1 DISABLED 0 ENABLED 1 DISABLED 0 ENABLED 1 NETWORK & MODEM 0 NETWORK ONLY 1 MODEM ONLY 2 INTERRUPT 5 3, 4, 5, 7, 10, 11, 15 SAME I/O PORT 0X320 0X200-0X3D0 SAME I/O PORT 0X2E8 3F8,2F8,3E8,2E8 SAME LINE SPEED AUTO DETECT AUTO DETECT 0 10MBPS 1 100MBPS 2 DISABLED 0 ENABLED 1 MEMORY
3-10 PRO/100 LAN+Modem PC Card User’s Guide The registry parameters are as follows: Keyword Default Valid Values BUSNUMBER 0 BUSTYPE 0X1 DIRECTENABLE 0 0-1 EARLYTRANSMIT 0X1 0-1 FULLDUPLEX 0 0-1 FUNCTIONENABLE 0 0-2 INTERRUPTNUMBER 0X5 3,4,5,7,8,9,A,B,F IOBASEADDRESS 0X2E8 3F8,2F8,3E8,2E8 IOBASEADDRESS_1 0X320 0X200 - 0X3D0 IOLENGTH 0X07 IOLENGTH_1 0XF LINESPEED 0 0-2 LINKINTEGRITY 0X1 0-1 MEMORYMAPPEDBASEADDRESS 0XD6000 A2000-FF000 MEMORYMAPPEDSIZE 0X1000 MODE 0
CHAPTER 4 Windows 3.x/DOS Installation This chapter contains comprehensive information on how to install and configure the PRO/100 PC Card for systems running Microsoft Windows 3.x and MS-DOS. The topics covered are: Installation under MS-DOS Installation under Windows 3.x Windows 3.x Network Operating System Alphabetical Reference Windows 3.x Modem Configuration Notes Windows 3.x Network Driver Parameters Error Messages for Windows and Windows 3.x/DOS Drivers Windows 3.
4-2 PRO/100 LAN+Modem PC Card User’s Guide Installation under MS-DOS For systems running MS-DOS without Windows, see Manual Installation in the Alphabetical Reference section later in this chapter. Installation under Windows 3.x (including Windows for Workgroups) Run the Intel Installation Program if you are using Windows 3.1 or Windows for Workgroups 3.11. Proceed as follows: 1 With Windows running, insert Disk 1, Installation Disk, into your disk drive.
Windows 3.x/MS-DOS Installation 4-3 Installation of Other Network Operating Systems For listed network operating systems other than Novell NetWare, highlight your network operating system and click the OK button. 6 Once you have completed the steps prompted by the Intel Installation Program, exit the program and find your network operating system in this chapter of the Users Guide, using the Alphabetical Reference. Follow the procedures indicated there to complete the installation.
4-4 PRO/100 LAN+Modem PC Card User’s Guide The PRO/100 PC Card supports ODI, NDIS (version 2.01) and packet drivers under Windows 3.x. To determine which of these drivers you need for your networking environment, consult your network administrator or network documentation. Artisoft LANtastic version 6.0 NDIS 2.0 Driver 1 Run the Intel Installation Program from the Installation Disk. 2 Choose Artisoft LANtastic from the Select Network Operating System screen.
Windows 3.x/MS-DOS Installation 4-5 Banyan VINES version 5.5 NDIS 2.0 Driver Prior to installing the Banyan Vines client software, it is necessary to determine the Interrupt Number for the PRO/100 PC Card. After you have installed the Adapter, follow these steps to determine the Interrupt Number: 1 Insert Intel Disk 2, Network Drivers Disk in the floppy drive. 2 At the DOS prompt, enter M16BTEST.EXE 3 Press Enter. 4 When the Main Menu opens, run Test.
4-6 PRO/100 LAN+Modem PC Card User’s Guide 9 At the PROTOCOL.INI bindings prompt, type INTELNET. 10 Press F10 to save and Esc to return to the main menu. 11 Select Login Environment Settings, followed by Default Communications Driver, followed by NDIS Ethernet. 12 Press Esc to return to the Main Menu and press F10 to save. 13 Manually add these lines to your AUTOEXEC.BAT file: CD\VINES BAN DEC PATHWORKS versions 5.x or 6.x NDIS 2.
Windows 3.x/MS-DOS Installation 4-7 Now continue with the DEC PATHWORKS installation as follows: 1 In Windows 3.x run the Intel Installation Program from Intel Disk 1. Installation Disk, as described at the beginning of this chapter. 2 Choose DEC PATHWORKS from the Select Network Operating System screen. 3 Follow the prompts to complete the Intel segment of the installation. 4 Check the README file on your PATHWORKS SETUP disk for requirements such as lastdrive, setver, etc.
4-8 PRO/100 LAN+Modem PC Card User’s Guide NDIS DRIVER FILE: M16BNDIS.EXE NDIS DRIVER NAME: INTEL$ b. for PATHWORKS 5.1: DRIVER FILE: A:\M16BNDIS.EXE PROTOCOL.INI STUB: A:\DEC\PROTOCOL.INI c. for PATHWORKS 6.0: DRIVER FILE: A:\M16BNDIS.EXE PROTOCOL.INI STUB: A:\DEC\PROTOCOL.INI Skip the Additional Files section. 12 Insert Intel Disk 2, Network Drivers Disk when prompted. 13 Enter your node information when prompted. 14 Save the PROTOCOL.INI file with the default settings.
Windows 3.x/MS-DOS Installation 4-9 22 In LAN Manager System Service Connection Information window, enter username and press Enter. 23 Enter the Windows directory path. 24 Press Enter to add the STARTNET.BAT file to your AUTOEXEC.BAT file. 25 A PROTOCOL.INI file created by SETUP will display in edit mode.
4-10 PRO/100 LAN+Modem PC Card User’s Guide 2 Choose FTP LANWatch from the Select Network Operating System screen. 3 Follow the prompts to complete the Intel segment of the installation. 4 Install LANWatch according to the instructions in your FTP LANWatch manual. 5 Copy the file M16BPD.COM from the C:\INTEL\M16B directory to the directory where your LANWatch files are stored. 6 (This step is not required for LANWatch versions 3.0 and later.) Using a text editor, add the following line to your CONFIG.
Windows 3.x/MS-DOS Installation 4-11 DEVICE = C:\LW\IFCUST.SYS 6 Create a directory called NDIS on your hard disk, by typing: MD NDIS 7 At the DOS prompt, copy M16BNDIS.EXE from the C:\INTEL\M16B directory on your hard disk and the file PROTOCOL.FTP from the \NDIS directory on the Intel Network Drivers Disk to the \NDIS directory you created in Step 6. 8 Use a text editor to modify the PROTOCOL.FTP file to match the keywords and values in the sample PROTOCOL.INI file in the \INTEL\M16B directory.
4-12 PRO/100 LAN+Modem PC Card User’s Guide 5 Follow the prompts to the Network Card Screen, then select Other NDIS Driver or Updated Packet Driver. 6 Insert Intel Disk 2, Network Drivers Disk when prompted. 7 Choose the appropriate driver then follow prompts to complete the installation. 8a For NDIS installation, reboot the PC. 8b For ODI installation, do not reboot. Continue with step 9.
Windows 3.x/MS-DOS Installation 4-13 FTP PC/TCP 3.X with OnNet 1.1 with Windows 3.1 1 Run the Installation Program from Intel Disk 1, Installation Disk. 2 From the Select Network Operating System screen, choose FTP PC/TCP. 3 4 5 6 7a 7b Follow the prompts to complete the Intel installation. Run the PC/TCP installation program OnNet 1.1. When prompted, insert Intel Disk 2, Network Drivers Disk. Follow prompts to complete the PC/TCP installation. For an NDIS installation, reboot the PC.
4-14 PRO/100 LAN+Modem PC Card User’s Guide 14 Copy the file ODIPKT from disk 5 of the FTP PC/TCP installation disks to the directory into which PC/TCP was installed. 15 Reboot the PC. FTP Software PC/TCP Packet Driver Installation with OnNet 1.1 1 Run the Installation Program from Intel Disk 1, Installation Disk. 2 Choose FTP PC/TCP from the Select Network Operating System screen. 3 Follow the prompts to complete the Intel segment of the installation.
Windows 3.x/MS-DOS Installation 4-15 12 Continue your server or workstation startup as instructed in the PC/TCP documentation. ODI with FTP Software PC/TCP and NetWare If you need to run Novell NetWare concurrently with FTP PC/TCP, proceed as follows: 1 Run the Installation Program from Intel Disk 1, Installation Disk. 2 Choose FTP PC/TCP from the Select Network Operating System screen. 3 Follow the prompts to complete the Intel segment of the installation.
4-16 PRO/100 LAN+Modem PC Card User’s Guide Generic Installation If your network operating system is not listed in the Intel Installation Program, you can try selecting Generic NDIS Driver or Generic ODI Driver in the Intel Installation Program and clicking the Install button. A sample configuration file containing parameters optimized for your system will be created in the \INTEL\M16B directory on your hard disk. For NDIS, this will be a custom PROTOCOL.INI file. For ODI, it will be a custom NET.
Windows 3.x/MS-DOS Installation 4-17 8 Press Esc twice to bypass error messages. 9 Continue with the installation until finished. 10 Use a text editor to add the following two lines in your CONFIG.SYS file at the location indicated by the rem statement concerning insertion of the driver name: DEVICE=\LSP\M16BNDIS.EXE 11 Copy M16BNDIS.EXE from the directory C:\INTEL\M16B to the C:\LSP directory on your hard disk. 12 Use a text editor to edit the PROTOCOL.
4-18 PRO/100 LAN+Modem PC Card User’s Guide 10 Use a text editor to replace the line in your CONFIG.SYS file that reads: DEVICE=\XX.DOS with the line DEVICE=\M16BNDIS.EXE 11 Still in the CONFIG.SYS file, add the parameter O=N (where O is a letter, not zero) to the line DEVICE=\DXMT0MOD.SYS as follows DEVICE=\DXMT0MOD.SYS O=N 12 Copy M16BNDIS.EXE from the directory C:\INTEL\M16B to the root directory of your hard disk or boot disk. 13 Change to the LANMAN directory on your hard disk or boot disk.
Windows 3.x/MS-DOS Installation 4-19 2 Reboot the PC. 3 Install IBM PC LAN or IBM DOS LAN Requester according to the instructions in the IBM documentation. 4 Reboot the PC. Manual Installation All network drivers provided on Intel Disk 2, Network Drivers Disk can be installed manually, without the Intel Installation Program. You must copy the correct driver files to your hard disk and make appropriate changes to CONFIG.SYS, AUTOEXEC.BAT, and configuration files such as NET.CFG (for ODI) or PROTOCOL.
4-20 PRO/100 LAN+Modem PC Card User’s Guide Microsoft LAN Manager Microsoft LAN Manager (version 2.1) NDIS 2.0 Driver 1 Run the Installation Program from Intel Disk 1, Installation Disk. 2 Choose Microsoft LAN Manager from the Select Network Operating System screen. 3 Follow the prompts to complete the Intel segment of the installation. 4 Begin installation of LAN Manager using setup. 5 When prompted to select the available network adapter driver, choose Other Driver.
Windows 3.x/MS-DOS Installation 4-21 5 Follow the prompts to complete the Intel segment of the installation. 6 Start Windows and, in the Network program group, double-click on the Network Setup icon. 7 If you have not installed network support, choose Networks in the Network Setup dialog box, select Install Microsoft Windows Network, and click OK. Otherwise proceed with step 8. 8 In the Network Setup dialog box, choose Drivers. 9 In the Network Drivers dialog box, choose Add Adapter.
4-22 PRO/100 LAN+Modem PC Card User’s Guide The following topics are covered for Windows for Workgroups: How to install for Windows for Workgroups version 3.11 and NetWare using the ODI driver How to install for Windows for Workgroups 3.11 using the NDIS 2.0 driver How to Disable Windows for Workgroups Networking For troubleshooting tips for Windows for Workgroups, see Chapter 4. Troubleshooting. Windows for Workgroups Version 3.
Windows 3.x/MS-DOS Installation 4-23 Windows for Workgroups Setup will also attempt to determine what NetWare driver model you are using. If for some reason Windows for Workgroups was unable to detect the driver model, you should select IPXODI and LSL as the driver type. Note that you can install NetWare as an additional network under Windows for Workgroups, as follows: 11 In the Network Setup dialog box, choose Networks.
4-24 PRO/100 LAN+Modem PC Card User’s Guide Add the following command to the AUTOEXEC.BAT file, where \WINDOWS is the directory into which Microsoft Windows was installed: C:\WINDOWS\NET START Add the following command to the STARTNET.BAT file in your NWCLIENT directory, where \WINDOWS is the directory into which Microsoft Windows was installed: C:\WINDOWS\ODIHLP.EXE Windows for Workgroups 3.11 Using the NDIS 2.0 Driver 1 Run the Installation Program from Intel Disk 1, Installation Disk.
Windows 3.x/MS-DOS Installation 4-25 How to Remove an Existing Windows for Workgroups Installation 1 Start Windows and select Network Setup in the Network program group. 2 In the Network Setup dialog box, choose Drivers. 3 In the Network Drivers dialog box, choose Remove to discard any existing network adapter drivers. 4 Choose Close and return to the Network Setup dialog box. 5 Exit the Network Setup program and exit Windows.
4-26 PRO/100 LAN+Modem PC Card User’s Guide Novell NetWare ODI Driver The Intel ODI driver allows for the concurrent use of Novell NetWare and other protocols that support Novells Open Data-Link Interface (ODI) specification. NetWare 1 Run the Intel Installation Program from the Installation Disk. 2 Choose Novell NetWare from the Select Network Operating System screen. 3 Follow the prompts to complete the installation.
Windows 3.x/MS-DOS Installation 4-27 SunSoft PC-NFS (version 3.5) NDIS 2.0 Driver 1 Run the Intel Installation Program from the Installation Disk. 2 Choose SunSoft PC-NFS from the Select Network Operating System screen. 3 Follow the prompts to complete the Intel installation. 4 Install PC-NFS for Ethernet according to instructions in the PCNFS documentation. Choose NDIS setup, and follow the instructions to complete the setup.
4-28 PRO/100 LAN+Modem PC Card User’s Guide DEVICE=C:\LANMAN\M16BNDIS.EXE between the two lines DEVICE=C:\LANMAN\PROTMAN.SYS DEVICE=C:\LANMAN\NFS-NDIS.SYS as follows: DEVICE=C:\LANMAN\PROTMAN.SYS DEVICE=C:\LANMAN\M16BNDIS.EXE DEVICE=C:\LANMAN\NFS-NDIS.SYS 9 Verify that your AUTOEXEC.BAT file contains a line that reads C:\LANMAN\NETBIND before the line that reads NET INIT 10 Configure PC-NFS options according to your PC-NFS documentation, and reboot the computer. Ungermann-Bass Net/One for DOS NDIS 2.
Windows 3.x/MS-DOS Installation 4-29 5 Continue with the installation until it is completed. 6 Following the UB instructions, modify your CONFIG.SYS file by adding the following lines: For DOS: DEVICE = [PATH]M16BNDIS.EXE where [path] is the drive and directory in which you installed your network operating system. 7 Use a text editor to modify your PROTOCOL.INI file as follows: For each protocol that you want to bind, set the protocol definition area of the PROTOCOL.
4-30 PRO/100 LAN+Modem PC Card User’s Guide 3 Follow the prompts to complete the Intel segment of the installation. 4 Install PathWay Access for DOS Kernel and Drivers programs according to the instructions in the PathWay Access for DOS manual. Before rebooting the PC, continue with the following steps. 5 Use a text editor to modify the CONFIG.SYS file. After the statement that reads DEVICE=C:\PATHWAY\PWTCP.SYS add the lines DEVICE=\PATHWAY\[PROTMAN FILE] /I:C:\PATHWAY DEVICE=\PATHWAY\M16BNDIS.
Windows 3.x/MS-DOS Installation 4-31 from the Intel Network Drivers Disk to the PATHWAY directory on your hard disk or boot disk. (The files are LSL.COM, M16BODI.COM, IPXODI.COM, VLM.EXE, and NET.CFG.) 6 Change to the PATHWAY directory and load the software in the following order: LSL M16BODI IPXODI VLM (ONLY IF USING NOVELL NETWARE) (ONLY IF USING NOVELL NETWARE) 7 Load the Wollongong file ODI.EXE. 8 Continue with the instructions in the PathWay Access for DOS manual. 9 Reboot the PC.Windows 3.
4-32 PRO/100 LAN+Modem PC Card User’s Guide Using Network or Modem Communications under Windows 3.x All Intel Windows 3.x network drivers initialize both the LAN and the modem. When a network driver is loaded, the modem driver is automatically initialized. Using Modem Communications Only under Windows 3.x If you want to use the modem under Windows 3.x without loading a network driver, and you are NOT using Card and Socket Services, reboot the computer and run the utility IMENABLE.
Windows 3.x/MS-DOS Installation 4-33 COM Ports, IRQs, and I/O Base Addresses Automatic COM Port Detection The PRO/100 PC Card drivers will automatically configure a COM port on the system. The driver scans the BIOS table for the first unused COM port, then checks to see if the corresponding IRQ is in use. If it is, it moves to the next available COM port. This process takes precedence over the network resources.
4-34 PRO/100 LAN+Modem PC Card User’s Guide tion to activate serial port emulation. The COMx keyword can also be stated on the command line with the modem-only driver IMENABLE.COM. Use the keywords COMIRQ and COMBASE to override the values set with COM1, COM2, COM3, or COM4 in case of a conflict between LAN and modem settings. Sample NET.CFG File (ODI Driver) with COM Port Setting LINK DRIVER M16BODI INT 10 PORT 280 MEM D2000 COM3 Sample PROTOCOL.
Windows 3.x/MS-DOS Installation 4-35 Changing Interrupt or I/O Address Settings The COMIRQ keyword is used to override the predefined interrupt value for a specific COM port in case of a conflict between LAN and modem settings. It can also be used with COMBASE to select a user-defined COM port. Default is keyword not used. Setting is a decimal value which must be different from the value used with the INTERRUPT keyword.
4-36 PRO/100 LAN+Modem PC Card User’s Guide Here are some examples of MEMORY keyword settings and the corresponding 8K exclusion: Configuration Keyword Setting NET.CFG MEM CC000 PROTOCOL.INI MEMORY=D4000 Command Line MEMORY=C8000 Exclusion X=CC00-CDFF X=D400-D5FF X=C800-C9FF Notes Memory settings used to configure the PRO/100 PC Card always use 5 digits. Memory settings on the EMM386 command line only require 4 digits.
Windows 3.x/MS-DOS Installation 4-37 do not need IMENABLE.COM because the network drivers also initialize the modem.) Reboot the computer and run IMENABLE.COM from the DOS prompt before launching Windows or a communications program. IMENABLE.
4-38 PRO/100 LAN+Modem PC Card User’s Guide ODI Settings (for driver M16BODI.COM) Custom parameters for networks using the ODI driver can be entered manually, using an ASCII editor, in the NET.CFG file. DOS ODI Driver Configuration Notes (M16BODI.COM) The ODI driver M16BODI.COM conforms to the Novell ODI Specification: 16-bit DOS Client HSMs. It is a DOS-based terminate-and-stay-resident (TSR) program. The driver will configure itself according to the options specified in the NET.CFG file.
Windows 3.x/MS-DOS Installation 4-39 M16BODI.COM Keywords KEYWORD DEFAULT VALID VALUES COMX AUTO (X = 1, 2, 3, OR 4) COMIRQ= AUTO (3 TO 15) COMBASE= AUTO (0X248 TO 0X3F8) INTERRUPT AUTO (3 - 15) IOADDRESS AUTO (240 - 380) IOWAITSTATES 0 (1 - 3) LINESPEED AUTO (10 OR 100) LINKDISABLE (NO KEYWORD = LINK INTEGRITY ENABLED) LINK DRIVER M16BODI (REQUIRED FIRST ITEM IN NET.
4-40 PRO/100 LAN+Modem PC Card User’s Guide NDIS 2.0.1 Settings (for driver M16BNDIS.EXE) Custom parameters for the NDIS driver can be entered manually, using an ASCII editor, in the PROTOCOL.INI file. NDIS 2.0.1 DOS Driver Configuration Notes The DOS NDIS driver M16BNDIS.EXE conforms to the Microsoft Network Driver Interface Specification (NDIS) version 2.0.1.
Windows 3.x/MS-DOS Installation 4-41 NDIS 2.0.1 Keywords (M16BNDIS.EXE) KEYWORD DEFAULT VALID VALUES COMX AUTO (X = 1, 2, 3, OR 4) COMIRQ= AUTO (3 TO 15) COMBASE= AUTO (0X248 TO 0X3F8) DRIVERNAME=INTEL$ (REQUIRED FIRST ITEM IN PROTOCOL.
4-42 PRO/100 LAN+Modem PC Card User’s Guide Refer to your network documentation for instructions on how to install the packet driver with your network. Keywords are not case sensitive, and can be abbreviated to a unique sequence of initial characters (for example, IN for INTERRUPT).
Windows 3.x/MS-DOS Installation 4-43 If nondefault configuration settings are used, these must be stated on the M16BPD.COM command line. For example, M16BPD IOADDRESS=320 INT=7 ETHDRV Driver Keyword Alphabetical Reference ? COMx displays a summary of command line options. specifies which COM port the PRO/100 PC Card should use when providing serial port emulation for modem operations. Values for x can be 1, 2, 3, or 4.
4-44 PRO/100 LAN+Modem PC Card User’s Guide FRAME (ODI) designates support for multiple Ethernet frame types. One or more types can be used. Refer to your NetWare documentation for more information. The Intel ODI drivers default frame type is 802.2, but the NET.CFG file supplied with the ODI driver on Disk 2, Network Drivers Disk sets both 802.2 and 802.3. Therefore if your networks frame type is 802.3, you must use Intels NET.CFG with the ODI driver. INTERRUPT specifies a LAN interrupt to use.
Windows 3.x/MS-DOS Installation 4-45 MEMORY specifies the memory location to use. It is specified in hexadecimal notation and is not a segment value. Specify the full address for all drivers. For example, D2000, not D200. The PRO/100 PC Card uses 4 Kbytes of memory (1000 hexadecimal) for the LAN. Use the MODE IO setting to disable MEMORY MODE. Default is D2000. Possible values are C0000 through E0000. MEMORYBASEADDRESS see MEMORY.
4-46 PRO/100 LAN+Modem PC Card User’s Guide NOEARLYTX disables early transmit features of the PRO/100 PC Card. Try using this keyword if you are experiencing a large number of transmit overruns. NOLEDS turns off network LED indicators on LAN adapter cables to conserve battery power. PORT (ODI) specifies the LAN I/O address to use, in hexadecimal notation. Default address is 320. SHAREIRQ is optional when no Card Services are being used.
Windows 3.x/MS-DOS Installation 4-47 Error Messages for Windows 3.x and MS-DOS drivers Except as noted, these messages are specific to the PRO/100 PC Card. For an explanation of other messages that may appear on the screen, see your computer and network operating system documentation. A PCMCIA card was not detected If the SOCKET keyword was stated, then no PC Card was detected in the slot specified. If the SOCKET keyword was not used, then no PC Card was detected in any slot.
4-48 PRO/100 LAN+Modem PC Card User’s Guide The card is unreadable, possible memory conflict The Card Information Structure (CIS) of the PC Card was unreadable. This could be a result of failure to exclude the selected memory range from the memory managers loaded on the machine. Either exclude a 8K memory range, select a memory range that has already been excluded, or include the NOCHECK keyword in the configuration file.
Windows 3.x/MS-DOS Installation 4-49 Please specify a hexadecimal number for the IOADDRESS keyword This message applies only to the NDIS 2.0 Driver. The value specified under the IOADDRESS keyword in the PROTOCOL.INI file must be a hexadecimal number. Please specify a hexadecimal number for the MEMORY keyword This message applies only to the NDIS 2.0 Driver. The value specified under the MEMORY keyword in the PROTOCOL.INI file must be a hexadecimal number.
4-50 PRO/100 LAN+Modem PC Card User’s Guide The I/O test failed - Please select a different I/O address The driver failed the I/O test. Try a different I/O address. The IRQ test failed - Please select a different IRQ The driver failed the IRQ test. Try a different IRQ address. Please specify either IO or MEM for the MODE keyword This message applies to both the ODI and NDIS 2.0 drivers. The value specified under the MODE keyword in the NET.CFG or PROTOCOL.INI file must be either IO or MEM.
Windows 3.x/MS-DOS Installation 4-51 The selected COM port already exists The COM port is already in use by another device. Assign a different I/O port for the COM port. Windows 3.x Troubleshooting Important For application notes covering installation and configuration issues pertaining to specific computers, Card and Socket Services, and communications software packages, see Chapter 5. Utilities and Applications.
4-52 PRO/100 LAN+Modem PC Card User’s Guide After the driver has been successfully loaded, the memory exclusion may be reduced through trial and error or in accordance with the Card and Socket Services documentation. The system must be rebooted before the revised settings take effect. B. When the PRO/100 PC Card driver is loaded it either reads a configuration file or uses command line parameters to determine which resources it should use.
Windows 3.x/MS-DOS Installation 4-53 The AUTODRV.INI file is used to assign resources to the PRO/100 PC Card. The AUTODRV.INI file should be edited to read as follows: ETHERNET. CARDID=ETHER,CREDI ;OPTION=IGNORE (THE SEMICOLON IS REQUIRED) PORT1=320, IRQ=5, MEMORY1=C800, WAITSTATE=1 The same resources should be specified in the PRO/100 PC Card driver initialization file. Phoenix The Phoenix Card and Socket Services super client driver PCMSCD.EXE should NOT be configured with the PCM.
4-54 PRO/100 LAN+Modem PC Card User’s Guide the resources assigned by the LAN1xxxxxx keywords in the CARDID.INI file. The LAN1MEMORYBASE2 entry can be ignored. A driver failed to load, and I’m NOT using Card and Socket Services A. Verify that a block of memory for use by the PRO/100 PC Card has been excluded from any memory manager being loaded. Memory managers are generally loaded in the CONFIG.SYS. The following example is given for EMM386.
Windows 3.x/MS-DOS Installation 4-55 Type ODI NDIS2 Packet Test File Name M16BODI.COM M16BNDIS.EXE M16BPD.EXE M16BTEST.EXE Configuration Method reads NET.CFG configuration file reads PROTOCOL.
4-56 PRO/100 LAN+Modem PC Card User’s Guide If none of the above settings allows the driver to load, it may be necessary to add an IOWAITSTATES=2 and MEMWAITSTATES=2 parameter to the appropriate PRO/100 PC Card driver configuration file or command line. D. If the driver still fails to load after youve tried the combinations above, your machine may require the use of Card and Socket Services. See the preceding section. E.
Windows 3.x/MS-DOS Installation 4-57 The driver loaded, but my DOS modem software won’t work The PRO/100 PC Card is configured to add a second interrupt and I/O address window in order to emulate a standard serial port interface. Use the COMx keyword in your driver configuration file or as a command line parameter to enable serial port emulation. If no COMx keyword is used, the Intel driver will configure the PRO/100 PC Card at the first available COM port.
4-58 PRO/100 LAN+Modem PC Card User’s Guide modem driver (IMENABLE). If they do not match, either there are multiple COMx keywords listed in the file or there are multiple configuration files. 4 Run Microsoft Diagnostics (MSD) and see if the COM port shows up. On some machines MSD will not show what COM port was configured for the PRO/100 PC Card. If it doesnt, try the following command: ECHO ATDTNNNNNNN > COMX: where nnnnnnn is a telephone you can hear ring, and x is the COM port number.
Windows 3.x/MS-DOS Installation 4-59 3 Turn computer power off and then on again (cold boot). 4 Start the Windows Terminal program in the Accessories group. Select a COM port under the setting/communications options, click OK to get back to the terminal screen. Change to modem command mode and type AT, then press enter. If the modem responds with OK, the trial configuration was correct. 5 In some cases an interrupt conflict will not be apparent until a Windows mouse driver is loaded.
4-60 PRO/100 LAN+Modem PC Card User’s Guide I can't hear the modem A. Be sure the computer speaker is enabled in the computers CMOS setup utility. B. To enable modem sound, include the following AT command in any communications package modem initialization string: M1 or as a standalone command preceded by the letters AT: ATM1 The PRO/100 PC Card does not have a built-in speaker. It relies on the PC Card software to direct signals to the computers speaker.
Windows 3.x/MS-DOS Installation 4-61 REM DEVICE=C:\PCM3\DBLFALSH.EXE REM DEVICE=C:\PCM3\MS-FLASH.SYS The configuration above will work with the PRO/100 PC Card driver at memory location D8000. AST Power Exec DEVICE=C:\DOS\EMM386.EXE NOEMS X=D000-DFFF DEVICE=C:\CARDSOFT\SS365SL.EXE DEVICE=C:\CARDOSFT\CS.EXE DEVICE=C:\CARDSOFT\CSALLOC.EXE REM DEVICE=C:\CARDSOFT\ATADRV.EXE REM DEVICE=C:\CARDSOFT\MTSRAM.EXE REM DEVICE=C:\CARDSOFT\MTDDRV.EXE DEVICE=C:\CARDSOFT\CARDID.
4-62 PRO/100 LAN+Modem PC Card User’s Guide REM DEVICE=C:\CPQDOS\MS-FLASH.SYS The above configuration uses only the drivers necessary for the Intel adapter. This configuration will work with the PRO/100 PC Card driver at memory location D2000. Compaq LTE Elite models DEVICE=C:\DOS\EMM386.EXE NOEMS X=D000-DFFF DEVICE=C:\CPQDOS\SSVLSI.EXE DEVICE=C:\CPQDOS\CS.EXE DEVICE=C:\CPQDOS\CSALLOC.EXE C:\CPQDOS\CSALLOC.INI DEVICE=C:\CPQDOS\ATADRV.EXE DEVICE=C:\CPQDOS\CARDID.EXE C:\CPQDOS\CARDID.
Windows 3.x/MS-DOS Installation 4-63 Gateway ColorBook series DEVICE=C:\DOS\EMM386.EXE NOEMS X=D000-DFFF DEVICE=C:\CARDSOFT\SSCIRRUS.EXE DEVICE=C:\CARDOSFT\CS.EXE DEVICE=C:\CARDSOFT\CSALLOC.EXE REM DEVICE=C:\CARDSOFT\ATADRV.EXE REM DEVICE=C:\CARDSOFT\MTSRAM.EXE REM DEVICE=C:\CARDSOFT\MTDDRV.EXE DEVICE=C:\CARDSOFT\CARDID.EXE The above configuration will work with the PRO/100 PC Card driver at memory location D2000. IBM ThinkPad 350, 755CS DEVICE=C:\DOS\EMM386.
4-64 PRO/100 LAN+Modem PC Card User’s Guide The above configuration will work with the PRO/100 PC Card driver at memory location C8000. IBM ThinkPad 750CS DEVICE=C:\DOS\EMM386.EXE X=B000-BFFF X=C800-CFFF The switch X=C800-CFFF on the EMM386 line must be used with the configuration below. DEVICE=C:\THINKPAD\IBMDSS01.SYS /S0=2 DEVICE=C:\THINKPAD\IBMDOSCS.SYS DEVICE=C:\THINKPAD\DICRMU01.SYS /MA=C800-CFFF DEVICE=C:\THINKPAD\$ICPMDOS.SYS DEVICE=C:\THINKPAD\AUTODRV.SYS C:\THINKPAD\AUTODRV.
Windows 3.x/MS-DOS Installation 4-65 The above configuration will work with the PRO/100 PC Card driver at memory location D2000. Toshiba 19xx, 47xx, 48xx series DEVICE=C:\DOS\EMM386.EXE NOEMS X=C800-CFFF DEVICE=C:\PCMPLUS3\CNFIGNAM.EXE /DEFAULT DEVICE=C:\PCMPLUS3\PCMSS.EXE DEVICE=C:\PCMPLUS3\PCMCS.EXE DEVICE=C:\PCMPLUS3\PCMRMAN.SYS DEVICE=C:\PCMPLUS3\PCMSCD.EXE The above configuration will work with the PRO/100 PC Card driver at memory location C8000.
4-66 PRO/100 LAN+Modem PC Card User’s Guide
CHAPTER 5 Utilities and Applications This chapter describes software utilities provided with the PRO/100 PC Card and provides configuration guidelines for popular communications applications to be used with the Intel modem. UTILITIES Intel provides several utilities with the PRO/100 PC Card that run under Microsoft Windows or MS-DOS. The utilities are: Country Identifier Utility (Windows 95, NT, 3.x) Modem Test (Windows 95, NT, 3.
5-2 PRO/100 LAN+Modem PC Card User’s Guide How to Use Country Identifier The country identifier utility is automatically copied to your hard drive and launched during installation of the PRO/100 PC Card under Windows 95 and Windows NT version 4.0, or when you run the Intel Installation Program under Windows 3.1 or 3.11. An icon for Country Identifier is also installed in the Windows program group so that the utility can be rerun if the country settings needs to be changed.
Utilities and Applications 5-3 Diagnostic Test Utility (M16BTEST.EXE) Intel provides a DOS-based self test diagnostics program. This program, located on PRO/100 PC Card Disk 2, Network Drivers Disk, tests several adapter functions. It also reports test results, the serial number of the unit, and the node (or Ethernet) address. M16BTEST can only be run from an MS-DOS command line.
5-4 PRO/100 LAN+Modem PC Card User’s Guide Main Screen The program consists of several function buttons and a view pane. Pressing or invoking a function will bring up the corresponding screen in the view pane. This view remains until another is selected. To exit M16BTEST type 'x' or push the 'Exit' button. When a function is active, the button appears to remain down or pushed. Once the button pops up, the function is completed and the screen is a passive results display.
Utilities and Applications 5-5 HARDWARE This function attempts to determine if a PCMCIA controller exists on the machine. It first checks for PCI BIOS extensions, and then it searches for any PCMCIA controllers. If found it displays controller type, base I/O address, offset, number of the socket in which the PRO/100 is installed, and the PCI interrupt (if enabled by the BIOS). NETWORK This function enables the card on the Ethernet network and performs some diagnostics.
5-6 PRO/100 LAN+Modem PC Card User’s Guide How to Use the COM port monitor To launch the COM port monitor, double-click on the the COM port monitor icon in the Intel PRO/100 program group. The COM port monitor window will be present on the desktop and within applications, and can be moved by dragging it with the mouse. COM port monitor is configurable with COM ports 1-4. To configure with a specific COM port, click once on the COM port monitor window, and a dialog box will appear.
Utilities and Applications 5-7 CompuServe - WinCIM 2.5.1 with Internet Explorer 2.1 CompuServe - WinCIM v.3.02 with Windows 95 Laplink v.6.0 Laplink v.6.0 with Windows 95 Lotus CC:Mail Mobile v.2.22 with Windows Lotus CC:Mail Mobile v.2.22 with Windows 95 Lotus Notes v.4.11a with Windows Lotus Notes v.4.11a with Windows 95, NT 4.0 Microsoft Dial-Up Adapter Networking for Windows 95 Microsoft Remote Access Server (RAS) Prodigy Internet v.1.1.
5-8 PRO/100 LAN+Modem PC Card User’s Guide If the communications program is already installed, you are installing a new modem, or your modem is not functioning, follow the instructions for your application. Modem Setup After Windows 95 Installation 1 Install the PRO/100 PC Card according to the instructions in Chapter 2. Windows 95 Installation. 2 Verify modem settings as follows: a Go to Control Panel. b Double-click the Modem icon. c Highlight the EtherExpress PRO/100 LAN+Modem PC Card.
Utilities and Applications 5-9 a In the C:\AOL30\MPM sub-directory, b Rename the CLASS73.MDM file to CLASS73.OLD and MODEM.INI file to MODEM.OLD. c Copy the new CLASS73.MDM and MODEM.INI files to the C:\AOL30\MPM sub-directory. d Start the America Online program. 2 To set up the PRO/100 PC Card, click SETUP on the Welcome screen. a Click Modem Setup in the Network & Modem Setup window. b In the Modem Selection and Customization window.
5-10 PRO/100 LAN+Modem PC Card User’s Guide a Click Modem Setup in the Network & Modem Setup window. b In the Modem Selection and Customization window. Select the COM # that is assigned to the Intel modem under Modem Port. Highlight "EtherExpress PRO/100 LAN+Modem PC Card," then click OK. Note: Use the default initialization string. If you need to change the string, you may do so under the Edit Commands options. CompuServe WINCIM version 2.5.1 with Internet Explorer version 2.
Utilities and Applications 5-11 2 Click Preferences. 3 In the Connection window under Connection Type check all settings for accuracy. a Winsock: (Default WINSOCK). b Connect using: c Phone #: d Port: e Port speed: f Dial type: Modify any of the above settings are not valid. 4 To modify the modem type, click Define Modem, highlight Intel as manufacturer and the EtherExpress PRO/100 LAN+Modem PC Card model. Note The default initialization string should suffice.
5-12 PRO/100 LAN+Modem PC Card User’s Guide c Enable Port by clicking box in that field. 3 Click Configure to configure the modem. a Select your modem Speed under Modem Settings. b Under Modem Type, select Hayes Generic. c To modify the modem initialization string, which is usually not necessary, click Customize and make any changes required. Click OK, then Close. d Enter the phone number(s) of your service provider and/or BBS in the Connect over Modem window under Phone Number.
Utilities and Applications 5-13 EtherExpress PRO/100 LAN+Modem PC Card. d Verify that the entry in Services section matches the action you wish to exercise. e There is no Security category. Lotus cc:Mail Mobile version 2.22 with Windows 3.1 1 Copy the M16BLOT.MDM file to the default directory where the Lotus cc:Mobile *.MDM files are located. 2 Setup Lotus cc:Mobile to use this M16BLOT.MDM file as follows: a From the Lotus cc:Mail Mobile Main Menu, select Mobile. b Next, select Location Setup.
5-14 PRO/100 LAN+Modem PC Card User’s Guide Lotus cc:Mail Mobile version 2.22 with Windows 95 1 Copy the M16BLOT.MDM file to the default directory where the Lotus cc:Mobile *.MDM files are stored. 2 Setup Lotus cc:Mobile to use this M16BLOT.MDM file as follows: a From the Lotus cc:Mail Mobile Main Menu, select Mobile,. b Next select Location Setup. c In Telephone, verify that the Dialing Rules and Strings are correct.
Utilities and Applications 5-15 4 Click User Preferences. 5 Click the Ports icon. 6 Under Communications Ports. a Select the appropriate protocol if connecting via the network. b If connecting over the modem . Select the correct COM port. Click in the Port Enabled box. 7 If connecting over modem, click COM# Options,. a Under Modem type, verify EtherExpress PRO/100 LAN+Modem PC Card is listed. b Verify that the Maximum port speed is set to 115.2Kbps. c Use the default initialization string. .
5-16 PRO/100 LAN+Modem PC Card User’s Guide a Select the appropriate protocol if connecting via the network b If connecting over the modem . Select the correct COM#. Click in the Port Enabled box. 7 If connecting over modem, click COM# Options,. a Under Modem type, verify that EtherExpress PRO/100 LAN+Modem PC Card is listed. b Verify that the Maximum port speed is set to 115.2 Kbps. c Use the default initialization string. If you need to modify.
Utilities and Applications 5-17 8 Modify the Dial-Up Adapter properties. a Double-click the My Computer icon on the desktop. b Double-click the Dial-Up Networking icon. c Double-click the Make New Connection icon. Type in the Name of the computer or service you want to dial Under Select a Modem, select the Intel modem that is installed Click Configure, confirm COM Port and Maximum Speed Use the default Initialization String.
5-18 PRO/100 LAN+Modem PC Card User’s Guide g Select M16BNDIS.EXE Real Mode (for all Intel adapters), then click OK h Remove the IPX/SPX Compatible Transport with NetBIOS driver only, click Close, then OK i In the Windows Setup screen click Yes to All, ...to replace all later files with the version you are installing now...
Utilities and Applications 5-19 All. Windows disks #7 and 8 are required to complete the installation d In the Remote Access Configuration screen, Click the COM port assigned to the Intel modem Under Device, select Intel EtherExpress PRO/100. Click OK to save changes, then Click Restart Computer 9 Restart RAST to input the phone number(s) into RAS a Click Edit to access the Edit Phone Book Entry screen.
5-20 PRO/100 LAN+Modem PC Card User’s Guide
CHAPTER 6 Modem Reference This chapter contains a comprehensive modem reference guide, including result codes and all AT commands and S-Registers supported by the PRO/100 LAN+Modem PC Card.
6-2 PRO/100 LAN+Modem PC Card User’s Guide Long Short Description CONNECT 75/1200 23 Connection at 75 (Tx)/1200 (Rx) bps CONNECT 7200 24 Connection established at 7200bps CONNECT 12000 25 Connection established at 12000bps CONNECT 38400 28 Connection established at 38400bps CONNECT 300 40 Connection established at 300bps CONNECT 21600 55 Connection established at 21600bps CONNECT 24000 56 Connection established at 24000bps CONNECT 26400 57 Connection established at 26400bps CONNECT 28800 58 Connection esta
Modem Reference 6-3 Long Short Description CARRIER 75/1200 * Carrier detected 75 (Tx)/1200 (Rx) bps CARRIER 1200 * Carrier detected at 1200bps CARRIER 1200/75 * Carrier detected 1200 (Tx)/75 (Rx) bps CARRIER 2400 * Carrier detected at 2400bps CARRIER 4800 * Carrier detected at 4800bps CARRIER 7200 * Carrier detected at 7200bps CARRIER 9600 * Carrier detected at 9600bps CARRIER 12000 * Carrier detected at 12000bps CARRIER 14400 * Carrier detected at 14400bps CARRIER 16800 * Carrier detected at 16800bps CARR
6-4 PRO/100 LAN+Modem PC Card User’s Guide AT Command Reference With the exception of the Special Commands described at the beginning of the Command Reference, all commands must be preceded by the AT attention code (or command prefix) and terminated by pressing the Enter key. The modem responds with the result code OK, which means it understands and can execute the command, or with ERROR, which means that the modem does not understand the command or that the command is invalid.
Modem Reference 6-5 AT Command Reference A Answer Typing ATA causes the modem to go off-hook and respond to an incoming call by generating a carrier signal and starting the handshaking process. This must be the only command or the final command in the command line. If the handshaking process is successful and a connection is established, the normal CONNECT message is displayed. If the carrier signal is not detected within the time specified in S-Register S7, a NO CARRIER result code is displayed.
6-6 PRO/100 LAN+Modem PC Card User’s Guide Cn Carrier Control The ATCn command, where n is 1, guarantees backward compatibility with communications software that issues the C1 command. C0 is not supported; it may set some modems to "receive only mode." C0 C1 Dn Transmit carrier always off (not supported). Normal transmit carrier switching. Dial A Telephone Number The ATDn command is used to dial a telephone number.
Modem Reference 6-7 Dial Modifiers (continued) S=n Dial a Stored Telephone Number The S modifier instructs the modem to dial a number that had been previously stored by the use of the AT&Zn=x command. The command to dial a stored telephone number is ATDS=n, where n represents telephone number storage location 0 or 1. For example, ATD P S=1 pulse dials the telephone number written to telephone number storage location 1.
6-8 PRO/100 LAN+Modem PC Card User’s Guide Dial Modifiers (continued) @ Wait for Quiet Answer The @ modifier in a dial string instructs the modem to wait for five seconds of silence after dialing the number. If silence is not detected, the modem sends a NO ANSWER result code to the user.
Modem Reference 6-9 Fn Online Data Character Echo command Ths ATFn command determines whether the modem will echo data from the DTE. This modem does not support the F0 version of the command. To ensure backward compatibility, the modem will accept F1. F0 Online data character echo enabled (not supported; returns ERROR) F1 Online data character echo disabled Hn Switch Hook Options The ATHn command hangs up the modem or prepares it for dialing. ATH0 ATH1 In Causes the modem to go on-hook (default).
6-10 PRO/100 LAN+Modem PC Card User’s Guide Ln Monitor Speaker Volume The ATLn command, where n represents 0, 1, 2, or 3, is listed here for backward compatibility reference only. The volume of the monitor speaker is controlled by the laptop computer, not by the modem. Mn Speaker On/Off Selection The ATMn command, where n represents 0, 1, 2, or 3, enables or disables the transmission of sound signals from the modem to the computer speaker.
Modem Reference 6-11 P O0 Instructs modem to leave online command mode and return to data mode (see +++ Escape Sequence under Special Commands) O1 This setting issues a retrain command before returning to online data mode. O2 This setting issues a rate negotiation command before returning to online data mode. Select Pulse Dialing The ATP command instructs the modem to use pulse (rotary) dialing.
6-12 PRO/100 LAN+Modem PC Card User’s Guide beginning of this chapter showing result codes in both long and short formats.. Type the command ATV or ATV0 to select numeric result codes. The factory default is to display the result codes as words (ATV1). You should issue an ATV1 command either to reset the factory default after a change has been made or to select the long-form (word) result codes. Negotiation progress messages (extended result codes) are those with a numerical value of 40 or more.
Modem Reference 6-13 X0 Result codes 0-4 enabled. Busy detect and dial tone detect disabled. X1 Result codes 0-5, and 10 enabled. Busy detect and dial tone detect disabled. X2 Result codes 0-6, and 10 enabled. Busy detect disabled and dial tone detect enabled. X3 Result codes 0-5, 7, and 10 enabled. Busy detect enabled and dial tone detect disabled. X4 Result codes 0-7, and 10 enabled. Busy detect and dial tone detect enabled.
6-14 PRO/100 LAN+Modem PC Card User’s Guide &B0 Disables the V.32 automatic retrain capability (not supported). &B1 Enables the V.32 automatic retrain capability (supported for backward compatibility only). &Cn Data Carrier Detect (DCD) The AT&Cn command, where n represents 0 or 1, selects the method by which the modem handles the carrier detect signal. &C0 The carrier detect signal is forced on regardless of the condition of the distant modems carrier.
Modem Reference 6-15 &Fn Load Factory Settings The AT&F command loads factory default parameters from ROM into the active configuration profile, replacing the parameters stored there. This command must be issued by itself. If it is used with another AT command, its function will be ignored. &F0 &F5 Recall factory settings as active configuration Recall factory settings appropriate for ETC mode as active configuration. This command enables ETC operation.
6-16 PRO/100 LAN+Modem PC Card User’s Guide &Kn Local Flow Control Options The AT&Kn command, where n represents 0-4, determines how the flow control between the computer and the local modem is handled. &K0 &K1 &K2 &K3 &K4 Disable local flow control. Reserved. Reserved. Enable RTS/CTS flow control (default). Enable XON/XOFF flow control. &Mn Asynchronous Communications Mode The AT&Mn command, where n represents 0-4, determines how the flow control between the computer and the local modem is handled.
Modem Reference 6-17 &Qn Asynchronous Communications Mode &Q0 &Q1 &Q2 &Q3 &Q4 &Q5 &Q6 &Q7 Asynchronous mode, buffered (same as \N0) Reserved Reserved Reserved Reserved Error control mode, buffered (default; same as \N3) Asynchronous mode, buffered (same as \N0) Reserved &Sn Data Set Ready (DSR) Options The AT&Sn command controls the functions of the modems DSR circuits.
6-18 PRO/100 LAN+Modem PC Card User’s Guide &V View Configuration Profile The AT&V command displays the contents of the active configuration profile. &Wn Write Active Profile to Memory The AT&Wn command, where n is 0, allows you to save a copy of the current active configuration profile to nonvolatile memory. This profile can be restored at any time by using the ATZ command or a power-up reset of the modem.
Modem Reference 6-19 \Kn Break Control The AT\Kn command determines how the modem processes a Break signal received from the local DTE during a connection (online). \K5 \Nn Modem sends Break to remote modem in sequence with transmitted data, non-destructive/non-expedited (default) Error Mode Control Selection The AT\Nn command sets the type of error correction supported by the modem when sending or receiving data. \N0 \N1 \N2 Buffered mode. No error control (same as &Q6).
6-20 PRO/100 LAN+Modem PC Card User’s Guide \Tn Inactivity Timer Limit The AT\Tn command specifies length of time (in minutes) that the modem waits before disconnecting when no data is sent or received. The time period can be set at n = 0 - 255. A setting of zero disables the timer. As an alternative, the timer may be specified in S-Register S30. This function is only applicable in buffer mode.
Modem Reference 6-21 Note Some countries do not permit calling tone to be disabled. +GCAPRequest Complete Capabilities List Syntax: AT+GCAP AT+GCAP=? This command displays one or more lines of information text, in a standard format, describing the basic capabilities of the modem. This allows a software package to determine which groups of extended-syntax commands the modem supports. The response may contain one or more of the following responses: +CGSM GSM (+C) commands.
6-22 PRO/100 LAN+Modem PC Card User’s Guide ported. To determine the current country setting, use AT+GCI? The command will respond with the T.35 code for the country selected. To change the current country selection, use AT+GCI= Country
Modem Reference 6-23 +GMI Request Manufacturer Identification Syntax: AT+GMI AT+GMI=? This command displays one or more lines of information text, identifying the manufacturer of the modem. +GMI=? may be used to determine whether the adapter supports the +GMI command: an OK response indicates support, ERROR indicates non-implementation. +GMM Request Model Identification Syntax: AT+GMM AT+GMM=? This command displays one or more lines of information text, identifiying the modem model.
6-24 PRO/100 LAN+Modem PC Card User’s Guide +MS=? Displays range of acceptable values for each subparameter Specifies the preferred modulation to be used in originating or answering a connection. The subparameter is an unquoted string of characters. If the parameter is specified, the other subparameters will revert to factory defaults. If is omitted, any unspecified parameters will keep their current values (for example, AT+MS=,0 or AT+MS=,,,2400).
Modem Reference 6-25 Specifies the lowest bit rate at which the modem may establish a connection. (This value is fixed at zero for the EtherExpress PRO/ 100 LAN/Modem PC Card Adapter.) Specifies the highest bit rate at which the modem may establish a connection. For modulations that support only a fixed bit rate (such as V.22bis), has a fixed value to which it defaults. If the default rate or a rate other than zero is specified, the modem will return ERROR.
6-26 PRO/100 LAN+Modem PC Card User’s Guide S-Registers because doing so could result in the modem behaving unpredictably. To display the value of an S-Register, type ATSn? where n is the number of the S-Register, then press Enter. To modify the value of an S-Register, type ATSn=r where n is the SRegister number and r is the new value or setting, then press Enter.
Modem Reference 6-27 S4 Response Formatting Character This register contains the ASCII value of the line feed character. The factory default value is 10. You can set register S4 to any value between 0 and 127. The modem uses a line feed character in command mode when it responds to the computer. S5 Command Line Editing Character This register contains the ASCII value of the backspace character and is applicable to asynchronous transmissions only. The factory default value is 8.
6-28 PRO/100 LAN+Modem PC Card User’s Guide S8 Duration of Pause for Comma Dial Modifier This register determines the number of seconds to pause for each comma (,) in a dial string or command line. The default is 2 seconds, but any value from zero to 65 is acceptable. Defaults and limits are country-specific. S10 Delay Between Lost Carrier/Hang Up This register specifies the time (in tenths of a second) that the modem waits after carrier loss before hanging up. The default is 20 (2.0 seconds).
Modem Reference 6-29 by AT\Tn. Values are 0-255. Default is 0 (disabled). S34 DTE Throughput Limit This register specifies whether the modem should limit throughput when the DTE is operating at higher speeds (57,600 or 115,200bps) S34=0 S34=1 Do not limit throughput (default). Limit throughput to DTE speed. S35 Data Calling Tone This register enables or disables a tone of a certain frequency and cadence as specified in V.25 that allows remote data/fax/voice discrimination. It is set by AT-Cn.
6-30 PRO/100 LAN+Modem PC Card User’s Guide S37=5 S37=6 S37=7 S37=8 S37=9 S37=10 S37=11 S37=12 S37=13 S37=14 S37=15 S37=16 S37=17 S37=18 S37=19 Attempt to connect at 1200bps Attempt to connect at 2400bps Attempt to connect at 4800bps Attempt to connect at 7200bps Attempt to connect at 9600bps Attempt to connect at 12000bps Attempt to connect at 14400bps Attempt to connect at 16800bps Attempt to connect at 19200bps Attempt to connect at 21600bps Attempt to connect at 24000bps Attempt to connect at 26400bps
Modem Reference 6-31 S46 Data Compression Selection The setting of this register is used to turn data compression on or off. It is set by AT%Cn. Data compression can only be enabled when the modem is operating in an error-control (EC) mode using either V.42 LAP-M or MNP protocols. S46=0 Modem will not attempt negotiation for data compression S46=2 Modem will negotiate with a remote modem for data compression (default).
6-32 PRO/100 LAN+Modem PC Card User’s Guide S91 Line Transmit Level This register is effective only for Japan. It specifies the line transmit level, in dB, with an implied minus sign. Default is 15 dB, range is 6 - 15. S92 Direct Connect Transmit Level This register sets the transmit level, in dBm, for direct connect cellular. This value may have different settings for different phones. Default is 0 dBm.
APPENDIX A Automated Customer Support You can reach Intel’s automated support services 24 hours a day, every day at no charge. The services contain the most up-to-date information about Intel products. You can access installation instructions, troubleshooting information, and general product information. World Wide Web & Internet FTP Intel Bulletin Board Service (BBS) Access Intel’s World Wide Web home pages or download information using anonymous FTP. Use Intel’s BBS.
A-2 PRO/100 LAN+Modem PC Card User’s Guide Intel Web and Internet Sites Support: http://support.intel.com News: news://cs.intel.com Network Products: http://www.intel.com/network Corporate: http://www.intel.com FTP Host: download.intel.
APPENDIX B Specifications General Specifications Size: 3.37 in x 2.13 in x 0.197 in (85.6 mm x 54.0 mm x 5.0 mm) Weight: 1.47 oz (42.1 g) Temperature range: Operating: 32°F to 131°F (0°C to 55°C) Storage: -4°F to 149°F (-20°C to 65°C) Humidity: 95% maximum noncondensing Memory size: 512K flash memory, 160K SRAM Memory alloc.
B-2 PRO/100 LAN+Modem PC Card User’s Guide Modem Specifications Data modulation: V.34 from 33,600 down to 2400 bps, V.32terbo with trellis coding at 19200 and 16800 bps; V.32bis (with trellis coding at 14400, 12000, 9600, and 7200 bps; uncoded at 4800 bps); V.32 (with trellis coding at 9600 bps, uncoded at 4800 bps); V.23 at 1200/75 and 75/ 1200 bps; V.22bis at 2400 bps; V.22 at 1200 bps; Bell 212A at 1200 bps Fax modulation: Compatible with Class 1 software; V.
APPENDIX C Limited Lifetime Warranty Intel warrants to the original owner that the hardware product delivered in this package will be free from defects in material and workmanship. This warranty does not cover the product if it is damaged in the process of being installed or improperly used.
C-2 PRO/100 LAN+Modem PC Card User’s Guide If the Customer Support Group verifies that the product is defective, they will have the RMA department issue you an RMA number to place on the outer package of the product. Intel cannot accept any product without an RMA number on the package. All other locations: Return the product to the place of purchase for a refund or replacement.
APPENDIX D Agency Notices FCC Compliance Statement FCC Rules and Regulations - Part 15 This product has been tested and found to comply with the limits for a Class B computing device pursuant to Part 15 of the FCC rules. These limits are designed to provide reasonable protection against harmful interference in a residential installation. Installed correctly, it probably will not interfere with radio or TV reception. However, we do not guarantee the absence of interference.
D-2 PRO/100 LAN+Modem PC Card User’s Guide NOTE This device complies with Part 15 of the FCC Rules. Operation is subject to the following two conditions: (1) This device may not cause harmful interference, and (2) this device must accept any interference received, including interference that may cause undesired operation. CAUTION If the device is changed or modified without permission from Intel, the user may void his or her authority to operate the equipment.
Agency Notices D-3 Canadian compliance (Industry Canada) When tested in at least one intended host: This digital apparatus does not exceed the Class B limits for radio noise emissions from digital apparatus set out in the interference-causing equipment standard entitled Digital Apparatus, ICES-003 of the Canadian Department of Communications.
D-4 PRO/100 LAN+Modem PC Card User’s Guide Manufacturer declaration This certifies that Intel EtherExpress PRO/100 Mobile Adapters comply with the EU Directive 89/336/EEC, using the EMC standards EN55022 (Class B) and EN50082-1. This product also meets or exceeds EN60950 safety requirements. This product has been tested and verified to meet CISPR 22 Class B requirements. Intel Corporation Network Products Division - MS JF3-446 2111 N.E. 25th Ave.
APPENDIX E Software License Agreement BY USING THIS SOFTWARE, YOU ARE AGREEING TO BE BOUND BY THE TERMS OF THIS AGREEMENT. DO NOT USE THIS SOFTWARE UNTIL YOU HAVE CAREFULLY READ AND AGREED TO THE FOLLOWING TERMS AND CONDITIONS. IF YOU DO NOT AGREE TO THE TERMS OF THIS AGREEMENT, PROMPTLY RETURN THE SOFTWARE PACKAGE AND ANY ACCOMPANYING ITEMS. LICENSE: Intel Corporation (“Intel”) grants you the non-exclusive right to use the enclosed software program (the “Software”).
E-2 PRO/100 LAN+Modem PC Card User’s Guide TRANSFER: You may transfer the Software to another party if the receiving party agrees to the terms of this Agreement and you retain no copies of the Software and accompanying documentation. Transfer of the Software terminates your right to use the Software. OWNERSHIP AND COPYRIGHT OF SOFTWARE: Title to the Software and all copies thereof remain with Intel or its vendors.
Software License Agreement E-3 U.S. GOVERNMENT RESTRICTED RIGHTS: The Software and documentation were developed at private expense and are provided with “RESTRICTED RIGHTS.” Use, duplication, or disclosure by the Government is subject to restrictions as set forth in FAR 52.227-14 and DFAR 252.227-7013 et seq. or its successor. EXPORT LAWS: You agree that the distribution and export/re-export of the Software is in compliance with the laws, regulations, orders or other restrictions of the U.S.
E-4 PRO/100 LAN+Modem PC Card User’s Guide
Index Symbols 100Base-TX Ethernet 1-4 10Base-T Ethernet network 1-4 56Kbps connections 1-1 technology 1-1 A Advanced Look-ahead Pipelining 4-45 Alphabetical reference, NOSes 4-3 America Online 5-8 Analog telephone line 1-5 Artisoft LANtastic 4-4 installation 4-4 AT Command Reference 6-4 AT commands reference 6-1 AT&T StarGROUP installation 4-4 auto-sensing, speed 1-2 B Banyan VINES installation 4-5 Banyan VINES Dial-In 5-10 C CAB files, Windows 95 2-2 Cabling data grade 1-2 Card and Socket Services 4-51
Index-2 COM port automatic detection 4-33 setting with COMx 4-33 COM Port Monitor 5-5 COMBASE keyword 4-35, 4-43, 4-48, 4-57 COMIRQ keyword 4-35, 4-43, 4-48, 4-57 Communications application notes 5-6 CompuServe WINCIM 5-10 Computer-specific application notes 4-60 COMx keyword 4-33, 4-43 Conflicts, memory 4-35 CONNECT message 6-1 Country Identifier utility 5-1 Country of installation codes 6-21 Customer Support A-1 D Data compression 4-31 DCOMPVLM.
Index-3 FTP LANWatch installation 4-9 NDIS driver 4-10 Packet driver 4-10 FTP PC/TCP 4-11 and NetWare 4-15 installation 4-11 Packet driver 4-14 G Generic installation 4-16 H Hardware installation requirements Hayes 4-31 Hayes commands 6-1 Heat during normal use 1-6 HotSwap 1-3 HP LAN Manager installation 4-16 1-3 I IBM DOS LAN Requestor 4-19 IBM Local Area Network Support Program installation 4-16, 4-17 IBM Local Area Support Program 4-16 IBM PC LAN 4-19 Indicator lights LAN adapter cable 1-8 modem cab
Index-4 Installation Program 1-2, 4-3 Intel Web and Internet Sites B-2 INTERRUPT keyword 4-44, 4-48 INTERRUPTNUMBER keyword 4-44 IOADDRESS keyword 4-44 IOBASEADDRESS keyword 4-44 IOWAITSTATES keyword 4-44 K K56flex technology 1-1 L LAN card 4-31 LAN Manager Microsoft LAN Manager 4-20 Ungermann-Bass Net/One 4-28 LANtastic, Artisoft 4-4 LANWatch, FTP 4-9 LapLink 5-11 LEDs LAN adapter cable 1-8 modem cable 1-7 LINKDISABLE keyword 4-44 LINKINTEGRITY keyword 4-44 Lotus cc:Mail 5-13 Notes 5-15 M M16BTEST.
Index-5 Windows for Workgroups. See Windows for Workgroups Microsoft LAN Manager installation 4-20 Microsoft Remote Access Server (RAS) 5-17 Microsoft Windows 3.x installation 4-2 MODE keyword 4-45, 4-47 Models 1-2 Modem driver 4-36 driver example 4-37 driver parameters 4-36 reference information 4-31 sound 4-60 volume levels 4-60 Modem commands 6-4 Modem result codes 6-1 Modem script files 5-6 Modem setup 5-7 Modem Test utility 5-2 MODEMLOG.TXT 2-12 N NDIS 3.
Index-6 NetWare.
Index-7 PC-NFS 4-27 PC/TCP, FTP 4-11 PCMCIA 1-2 PORT keyword 4-46 Power management 1-3 Power-saving modes under Windows 95 2-9 Prodigy 5-19 PROTOCOL.
Index-8 U Ungermann-Bass Net/One installation 4-28 Update Device Driver Wizard 2-5 Utilities 5-1 V Version Windows 95 2-1 VINES, Banyan 4-5 VLM file decompression 4-19 VLM shell 4-2 Volume, modem speaker 4-60 W WinCim 5-10 Windows 3.