
User Guide

Intel® BMC And RMM4 User Guide Configuring the Integrated BMC Web Console and Intel® RMM4
Revision 2.8 Intel order number H54847-001 33
4.1 Configuring the Server Management NIC using BIOS Setup on
S1200BTL
1. During POST, press <F2> to go to BIOS setup.
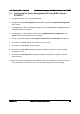
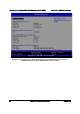
2. Navigate to the Server Management tab and then scroll down to BMC LAN Configuration.
Press <Enter>.
3. If configuring your Server Management BMC LAN, scroll to IP source > IP source and then
select either Static or Dynamic.
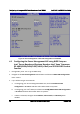
4. If configuring your Intel
®
RMM4, scroll down to Intel(R) RMM4 LAN configuration > IP
source and then select either Static or Dynamic.
5. If Static is selected, configure the IP address, Subnet mask, and Gateway IP as required.
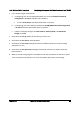
6. Scroll down to User ID. Select the user that you want to use.
7. Scroll down to User status. Select Enabled.
8. Scroll down to User name. Change the name as needed. Note that you cannot change
anonymous or root.
9. Scroll down to User password. Change the password. Note that you need to enter the
password twice.
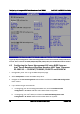
10. When you finish configuring the LAN addresses and user information for the server, press
<F10> and select save and exit. Your server will reboot with the new LAN settings.