
Quick Installation Guide Part 2


9
General Installation Process
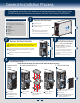
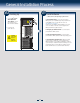
Install PCI-e Card Assembly ... Continued
From inside of chassis,
press open the back
panel PCI-e add-in
board retention device.
D
E
While holding the
PCI-e add-in board by
its top edge or upper
corners, firmly press
the add-in board into
the expansion slot.
Note: If the optional
card fixture is
installed, align the
PCI-e card with
card fixture slot
while pushing
down the card.
Server
Board
D
Server
Board
E
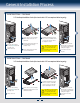
Install PCI-e Card Assembly ... Continued
F G
Close the PCI-e
add-in board
retention device.
Rotate the PCI-e card
retainer until the PCI-e card
retainer is secured by the
chassis.
Make sure the PCI-e card is
secured into the slot under
the PCI-e card retainer.
Server
Board
F
Server
Board
G
Note: Screws are
recommended to
secure the heavy
PCI-e cards (i.e
GPGPU cards)
with chassis
back panel.
8
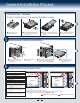
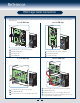
Install PCI-e Card Assembly
A
Remove the PCI-e slot shield by pushing the shield out
from inside the chassis.
B
Install the optional PCI-e card fixture with screws. The
card fixture helps to hold heavy PCI-e cards (i.e
GPGPU card). The card fixture is ordered seperately.
Rotate the PCI-e retainer all the
way to open.
C
Server
Board
B
A
Server
Board
C
7
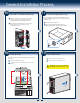
Complete Server
Board Cabling
Connections
See your Intel
®
Server Board Quick
Start User's Guide or Service
Guide for server board and system
cable connections.
Return to this document when finished .