
Software User Guide for Windows*


RAID OpROM Utility
24 Intel
®
RSTe for Microsoft Windows* OS Software User’s Guide
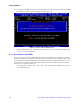
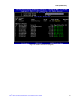
2. Use <Up> and <Down> arrow keys to select the RAID volume that is no longer needed. Press <DEL>
key to delete the volume. A warning message will pop up on screen.
Figure 16. Confirm to Delete RAID Volume
3. Double confirm if data on the volume can be deleted. Press <Y> to go on deleting the RAID volume,
or press <N> to cancel the deletion.
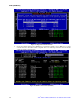
3.1.3 Reset Disks to Non-RAID
This feature is used when specific disk needs to be set back to non-RAID mode. For example, in a RAID5
volume, if one disk is set to non-RAID mode, this disk can work in pass-through (non RAID) mode, or join
in the configuration of another RAID volume. The RAID5 volume will be in degraded mode due to loss of
this disk, and can be rebuilt if another disk joins this RAID5 volume. This feature is useful when specific
drive needs to be replaced by another one.
1. In the Main Menu, choose option 3. Reset Disks to Non-RAID and press <Enter> key to enter the
Reset RAID Data option.