
Intel RAID Basic Troubleshooting Guide

Troubleshooting Intel® RAID Basic Troubleshooting Guide
Revision 2.0
14
- Provide exact system configuration including Firmware and BIOS versions, system
memory configuration, RAID configuration, and configuration of other adapters in the
system.
- List the steps to reproduce the failure and include a history of the system, the
simplest failure mode, and all troubleshooting completed.
- Provide a copy of all available logs.
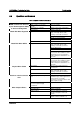
4.2 How to Replace a Physical Drive
Do not attempt to replace an online drive if the virtual drive that the drive belongs to, is in a
degraded or rebuild state.
If a spare drive is rebuilding and a second drive in the same RAID group reports errors such as
Soft Bus errors, do no replace the second drive until the rebuild is complete. It is strongly
recommended that you wait until the rebuild is completed before replacing the bad drive.
Note: Do not reuse failed drives that have been marked failed by the RAID controller.
To replace a physical drive, follow the steps below.
Identify the drive that needs to be replaced. You can use the ‘Locate Physical Drive’
function under RAID Web Console 2 or RAID BIOS Console to identify the drive.
Before replacing the drive, it is recommended that you use RAID Web Console 2 or
RAID BIOS Console to determine the state of the physical drive and the virtual disk
group that the drive belongs to. Do not replace a drive if the virtual disk group that the
drive belongs to is degraded or rebuilding. Call technical support if you are unsure.
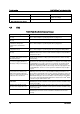
When replacing a commissioned hot-spare drive, it is strongly recommended to wait until
the rebuild is completed. After the rebuild completes and the virtual drive is optimal, add
a new hot-spare drive and use the ‘Make Global/Dedicated Hot spare’ function under
RAID Web Console 2 or RAID BIOS Console to add that drive as a hot-spare drive.
Before removing a drive that is in the Unconfigured Good state, use the ‘Prepare For
Removal’ function under RAID Web Console 2 or RAID BIOS Console, and then pull out
the physical drive. Then a new physical drive can be inserted.