
Service Guide

Hardware Installations and Upgrades
Intel® Server System SC5650HCBRP Service Guide 33
Removing and Installing System Fan Duct
WARNING
This system chassis must be operated with the fan duct installed to ensure proper
cooling.
Removing the System Fan Duct
1. Observe the safety and ESD precautions listed in “Appendix B: Safety Information”.
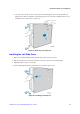
2. Power down the server and unplug all peripheral devices and the AC power cable. Remove the left side
cover. For instructions, see “Removing the Left Side Cover”.
3. Remove hot swap hard disk cage. For instructions, see “Replacing Hard Disk Cage Fan”.
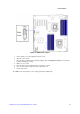
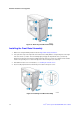
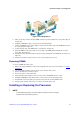
4. Remove the system fan duct as shown (see letter “A”).
Figure 25. Removing System Fan Duct
Installing the System Fan Duct
1. Observe the safety and ESD precautions listed in “Appendix B: Safety Information”.
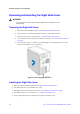
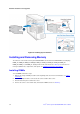
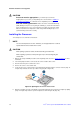
2. Align the chassis and fan duct alignment rails as shown (see letter “A”).
3. Install the system fan duct, making sure the latch engages. (see letter “B”).
4. Install hot swap hard disk cage. For instructions, see “Replacing Hard Disk Cage Fan”.
5. Reinstall the left side cover. For instructions, see “Installing the Left Side Cover”.
6. Reconnect all peripheral devices and the AC power cable. Power up the server.
CAUTION
Remove the fan duct inlet filler board for the second processor installation (see letter
“C”).