
User

2. Using the Intel® SEL Viewer
Installing the Intel® SEL Viewer
To install the SEL Viewer Utility in EFI, do the following:
1. Copy all the files in the SEL Viewer release directory for EFI to a USB flash drive, or
create an EFI-bootable CD.
2. Insert the removable media into the server.
3. Boot the server and press the F2 key when prompted to enter BIOS setup.
4. Go to the Boot Manager menu and select the option to boot to EFI shell.
5. At the EFI shell prompt, type fsn: , where n is the file system number corresponding to the
device that contains the SEL Viewer utility files.
To install the SEL Viewer Utility in Windows* with the standalone installation, do the following:
1. Copy all files and subdirectories from the utility released location into a folder on the hard
drive. (for example, c:\selviewer)
2. Open a command prompt and change to that directory (for example, cd
c:\selviewer\imbdriver).
3. Execute "install.cmd <full-path>" specifying the full path of the folder in which files were
copied (for example, "install c:\selviewer\imbdriver").
4. This install script will install the imbdrv.sys driver.
5. To run the SEL Viewer Utility, open a command prompt, and change directory to the folder
in which the selview.exe file resides (for example, cd c:\selviewer).
You can now run the utility.
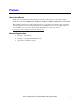
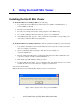
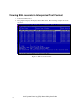
Note: If the driver is not installed Utility displays an error as shown below
Figure 1. Error displayed if no driver present (WinPE*)
Intel® System Event Log (SEL) Viewer Utility User Guide
4