
Users guide
127 Intel® RAID Software User Guide
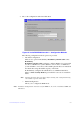
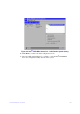
8.2.2.5 Scan Devices Option
When you select the Scan Devices option on the Main screen, the Intel
®
RAID BIOS
Console 2 checks the physical and virtual drives for any changes of the drive status. The
Intel
®
RAID BIOS Console 2 displays the results of the scan in the physical and virtual
drive descriptions.
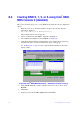
8.2.2.6 Virtual Drives Screen
You can access the virtual drives screen by clicking on a virtual drive in the virtual drive
list on the main screen. The upper right section of the screen displays the virtual drives
that currently exist. The Virtual Drives screen provides options to:
• Initialize the virtual drives: The Slow Initialize option initializes the selected virtual
drive by writing zeroes to the entire volume. You should initialize each new virtual
drive that you configure.
Warning: Initializing a virtual drive deletes
all information on the physical drives
that compose the virtual drive.
• Check consistency (CC): This option verifies the correctness of the redundancy
data and is available for arrays and disk groups using RAID 1, 5, 6, 10, 50, or 60. If
a difference in the data is found, the Intel
®
RAID BIOS Console 2 assumes that the
data is accurate and automatically corrects the parity value.
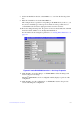
• Display the virtual drive properties: Through the Properties option, you can:
— Display the virtual drive properties (such as RAID level, virtual drive size, and
stripe size
).
— Display the read, write, Access, Disk Cache, BGI (Background Initi
alization),
and I/O policies.
— Change the read, write, Access, Disk Cache, BGI, and I/O policies.
— Select Write Through, Write Back with BBU, or
Always Write Back.
— Start initialization.
— Start a consistency check.
After setting any property, click Go to
perform the selected operation. Click Change to
apply any policy changes.
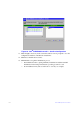
8.2.2.7 Physical Drives Screen
This screen displays the physical drives for each channel or port. From this screen, you
can rebuild the physical arrays or disk groups, or view the properties for the physical drive
you select.
• Click Reset to return to the configuration that existed before you made any
changes.
• Select Properties and click Go to view the properties. An unconfigured drive can be
made into a hot spare from the Properties screen.