
Users guide
135 Intel® RAID Software User Guide
8.5 Creating RAID 10, RAID 50, and RAID 60
using Intel
®
RAID BIOS Console 2
RAID 10, RAID 50, and RAID 60 require setting up multiple RAID arrays/disk groups.
1. When the server boots, hold the <Ctrl>
key and press the <G> key when the
following is displayed:
Press <Ctrl><G> to enter the RAID BIOS Console
After you press <Ctrl>+<G>, the Controller Selection screen appears.
2. Select a controller and click St
art to begin the configuration.
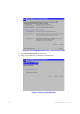
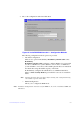
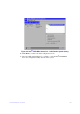
3. Select Custom Configur
ation and click Next (see Figure 65).
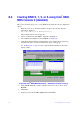
4. At the Virtual Drive Definition (VD Defini
tion) screen, hold down the <Ctrl> key
and click each drive you want included in the first array.
— For RAID 10, use two drives.
— For RAID 50, use at least three drives.
— For RAID 60, use at least three drives.
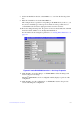
5. Click Add T
o Array, and then click Accept DG in the right pane to confirm.
The first group of drives appears as a disk group in the right pane. These drives are
no longer availabl
e in the left pane.
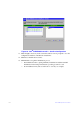
6. From the drives that are available in the left p
ane, choose an additional group of
drives and again click Add To Array, and click Accept DG to confirm.
Each disk group must contain the identic
al quantity and size of drives.
Multiple drive groups are now displayed in th
e right pane. You can add up to eight
arrays to the right pane for either RAID 10, RAID 50, or RAID 60.