
Users guide

191 Intel® RAID Software User Guide
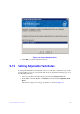
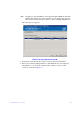
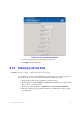
Figure 117. Changing RAID Level
5. When everything is acceptable, click Finish
to accept the new configuration.
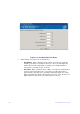
A Reconstruct operation begins on the virtual disk. You can monitor the progress of
the reconstruction in
the Group Show Progress window. Select Manage -> Show
Progress.
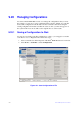
9.17 Removing a Drive or Changing the RAID
Level of a Virtual Disk
You can use Intel
®
RAID Web Console 2 to remove a physical disk drive from a virtual
disk. In order to do this, you must be logged on to the system in All Access mode.
Warning: Be sur
e to back up the data on the virtual disk before you change its capacity.
1. Select a Drive Group icon and start the Mo
dify Drive Group, as described in the
previous section.
2. Click Remove Dr
ive.
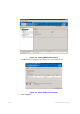
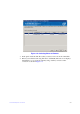
Note: Depend
ing on current RAID level, the targeted migrated RAID level and the
available Unconfigured Good drive numbers, pop-up window may appear to
allow selection among Add drives, Remove drives, and Migrate RAID level.
The following screen appears: