
Users guide


Intel® RAID Software User Guide 44
For each configuration method, a list of available physical drives is displayed.
These drives are in the READY state. If you select a physical drive in the list,
information about each drive is displayed.
5. Use the arrow keys to move to a drive and
press the space bar to add it to the array.
Note: The utility limits each drive to
the size of the smallest drive.
The status for each selected drive that is added to an
array changes status from
READY to ONLIN A[array#]-[drive#]. For example, ONLIN A00-01 means array
0, disk drive 1.
6. (Optional) Create a global hot-spare drive by highlighting a drive that
is marked
READY and press the <F4> key. Then select Yes from the pop-up menu.
7. Repeat step 5 and step 6 to create a second array if nee
ded. When you have selected
drives for all desired arrays, press the <F10> key.
8. Select an array by highlighting it. Press the <Ente
r> key to set the properties.
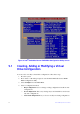
9. The virtual drive configuration screen is displayed, This scree
n shows the
following:
— Virtual drive number
— RAID level
— Virtual drive size
— Number of stripes in the physical array
— Stripe size
— State of the virtual drive
— Access Policy
To set these options, highlight a property a
nd press the <Enter> key. The available
parameters for that property are displayed for the selection.
10. Select a RAID level: Select 0, 1, or 10 depending upon number of drives and the
purpose.
11. Consider whether you need to override the default virtual drive size. By default, all
ava
ilable space in the array is assigned to the current virtual drive. For RAID 10
arrays, only one virtual drive can be defined for the entire array.
Note: If you cr
eate an SSD virtual drive and set the access policy to ‘Read-only', it is
strongly recommended that you reboot the system for the changes to take
effect, or else, you will still have access to create files, and delete them.
12. (Optional) Change the defaul
t Write Cache and Read Ahead policies. See Setting
the Write Cache and Read Ahead Policies.
13. When you have finished defining the current virtual drive, select Acc
ept and press
the <Enter> key.
14. Repeat step 8 through step 13 for all virtual drives.
15. Save the configuration when prompted, and press
any key to return to the Main
Menu.