
Users guide
47 Intel® RAID Software User Guide
3. Press the <F10> key and select Y to confirm. As the rebuild process begins, the
drive indicator shows REBLD.
4. When the rebuild is complete
, press any key to continue.
5.4.1 Auto Rebuild and Auto Resume
To ensure data protection, enable Auto Rebuild and Auto Resume so that drives are
automatically re-created to maintain redundancy.
• In a pre-boot environment, auto rebuild starts only when you enter the BIOS utility.
Note: Hot-plug suppor
t is not available in the pre-boot environment. For the system
BIOS or the Intel
®
Embedded Server RAID BIOS Configuration utility to
detect the physical drive, insert the drive when the system is off.
• When the operating system is running, the auto rebuild starts if the system has a
hot-spare drive or if you replace the failed drive with a new drive.
The Auto Rebuild and Auto Resume options are
available in the Intel
®
Embedded Server
RAID BIOS Configuration utility from the menu that is displayed after you select Objects
| Adapter.
5.5 Checking Data Consistency
The Check Consistency feature can be used on RAID 1 or RAID 10 drives to verify the
data consistency between the mirrored drives. It can be set to only report or to both report
and automatically fix the data.
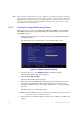
1. From the Main Menu, select Check Consisten
cy and press the <Enter> key.
A list of configured virtual drives is displayed.
2. Use the arrow keys to choose the desired drive. Press
the space bar to select the
virtual drive to check for consistency. (RAID 1 or 10 only)
3. Press the <F10> key.
4. At the prompt, select Ye
s and then press the <Enter> key.
If the Report and Fix/Report options are not shown, select Main Menu | Objec
ts |
Adapter | ChkCons and set Report only or Fix\Report.
5.6 Viewing and Changing Device Properties
You can view adapter, virtual drive, and physical drive properties. You can also change
some adapter properties and the Write Cache and Read Ahead for Virtual Drives.
1. From the Main Menu select Objects.