
Users guide
Intel® RAID Software User Guide 54
This disk is the Secondary disk in the volume.
6. Press C to create the volume.
A menu window appears.
7. From the menu options, select Save changes then exit
this menu.
A message appears briefly, and then the SAS3 BIOS
CU returns to the Adapter
Properties window. Initialization of the new volume continues in the background.
Note: T
o create a second Integrated Mirroring volume, repeat these instructions starting with
step 2. Alternatively, follow the instructions in the f
ollowing section to create an
Integrated Mirroring Enhanced or Integrated Mirroring + Striping volume.
Note: See the
instructions in Section 6.2.3, Managing Hot Spare Disks, if you want to create one
or two global hot spares.
6.2.2.2 Creating an Integrated Mirroring Enhanced or Integrated
Mirroring + Striping Volume
Integrated Mirroring Enhanced volumes contain three physical disks to ten physical disks.
Data is written to a disk and is mirrored on an adjacent disk. Integrated Mirroring +
Striping volumes can have a minimum of four physical disks and a maximum of 10
physical disks, in even numbers. In an Integrated Mirroring Enhanced or Integrated
Mirroring + Striping volume, the data is both mirrored and striped.
Follow these steps to create an Integrated Mirroring Enhanced (RAID 1E) or Integrated
Mirroring + Striping (RAID 10) volume with the SAS3 BIOS CU. The steps begin with
the Adapter List window that appears when the configuration utility starts.
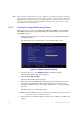
1. On the Adapter List window, use the arrow keys to
select an Intel SAS-3 adapter,
and then press Enter.
The Adapter Properties window appears, as shown in Figure 10.
2. Use the arrow keys to select RAID
Properties, and then press Enter.
The Select New Volume Type window appears.
3. Select Cr
eate RAID 1E/10 Volume.
The Create New Volume window appears.
4. Move the cursor to the RAID Disk c
olumn and select a line that has a No entry in
this column, which indicates that the disk is not already part of the volume you are
creating. To add the disk to the new volume, change the No to Yes by pressing the
space bar.
Caution: The SAS3 BIOS
CU deletes all existing data from the disks drives when you
select them to use for a mirrored volume.
5. Move the cursor to another line and press
the space bar to add another disk to the
volume.
If you select an odd number of disks, the SA
S3 BIOS CU creates an Integrated
Mirroring Enhanced volume. If you select an even number of disks, it creates an