
Users guide
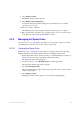
65 Intel® RAID Software User Guide
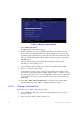
6.3.3.3 Deleting a Volume
Caution: Before you delete a volume, be sure to back up the data.
Follow these steps to delete a selected volume:
1. In the Adapter List window, use the arrow keys to select an Intel S
AS adapter.
The Adapter Properties window appears.
2. Use the arrow keys to select R
AID Properties, and then press Enter.
The Select New Volume Type window appears.
3. Select V
iew Existing Volume.
The View Volume window appears. If necessary, press Alt + N to switch to another
volume
on this adapter.
4. Select Ma
nage Volume.
The Manage Volume window appears.
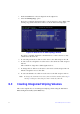
5. Select Delete V
olume.
A menu window appears.
6. Either press Y to delete the volume, or pres
s N to cancel the deletion process.
After a pause, the utility deletes the volume.
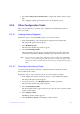
6.3.3.4 Locating Disk Drives in a Volume
Use the SAS3 BIOS CU to locate and identify a specific physical disk drive in a disk
enclosure by flashing the drive’s LED. Alternatively, use the SAS3 BIOS CU to flash the
LEDs of all the disk drives in a RAID volume if they are in a disk enclosure.
When you add a disk drive to a new mirrored volume, the LED on the disk drive starts
flashing. The LED stops flashing when you finish creating the volume.
To locate disk drives by flashing their LEDs, follow these steps:
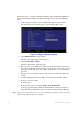
1. Select the desired SAS-3 controller on
the Adapter List window and press Enter.
The Adapter Properties window appears.
2. Highlight SA
S Topology, and press Enter.
The SAS Topology window appears.
3. Select the disk in the Device Identifier co
lumn, and press Enter.
The LED on the disk flashes until you press a key to stop it.
4. To identify all the disk drives in a volume, sel
ect the volume in the left column of
the SAS Topology window, and press Enter.
The LEDs flash on all disk drives in the volume until you press a key to stop them.