DIGI-P122/P123 Installation and Operation Guide Rev 140814 8001 Terrace Ave Suite 201 Middleton, WI 53562 Phone: 608-831-0880 Toll-Free: 866-462-8649 Fax: 608-831-1833
DIGI-P122 / DIGI-P123 Installation Guide Important Safety Instructions 2 Please make sure you have read and completely understand all instructions in this manual before operating this equipment. Keep these instructions in a safe, accessible place for future reference. Heed all warnings. Follow all instructions. Do not use this apparatus near water. Clean only with a dry cloth.
DIGI-P122 / DIGI-P123 Installation Guide Table of Contents Overview ......................................................................................................................................... 5 Package Contents................................................................................................................ 5 Front Panel .......................................................................................................................... 6 Rear Panel ........................
DIGI-P122 / DIGI-P123 Installation Guide OSD (On Screen Display) Commands ................................................................................ 19 Firmware Update .......................................................................................................................... 20 Troubleshooting ............................................................................................................................ 21 Unit does not power on ............................................
DIGI-P122 / DIGI-P123 Installation Guide Overview The Intelix DIGI-P122/P123 allows the integration of multiple analog and digital devices into a high-definition environment. The DIGI-P122/P123 allows selection of twelve different sources, and will simultaneously scale the selected video to HDMI, VGA, and HDBaseT outputs. The unit features four HDCP compliant HDMI inputs, four VGA inputs, and four analog video inputs.
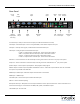
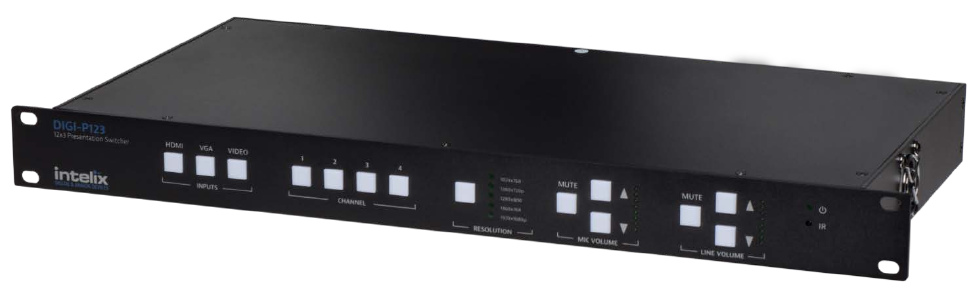
DIGI-P122 / DIGI-P123 Installation Guide Front Panel Resolution Selector Button and Indicator Integrated Rack Ears Input Type Selector Buttons Input Channel Selector Buttons Mic Volume and Mute Button / Indicators Power LED/ IR Receiver Line Volume and Mute Button / Indicators Resolution Selector Button and Indicator – Sets the resolution for the output. All video input signals will be scaled to this resolution. Power LED/IR Receiver – Power LED will indicate whether the unit is on.
DIGI-P122 / DIGI-P123 Installation Guide Rear Panel VGA Inputs Line Level VGA Output Output HDBaseT Output (DIGIP123 only) HDMI Output HDMI Inputs Video Inputs RS232 Port VGA Audio Inputs TCP/IP Speaker Port Outputs USB Microphone Port Audio Input 110-240 VAC Input Line Level Output – Always-on stereo line level output (mix of Mic and selected Source audio) VGA Output – Scaled VGA output. If source is encrypted HDMI, no video will be output from this port.
DIGI-P122 / DIGI-P123 Installation Guide IR Remote The included IR remote performs all of the functions available on the front panel of the DIGI-P122/P123, and also allows acces to the setup menu. Installation Instructions Shelf Mounting Instructions Attach the supplied rubber feet to the bottom of the unit. Rack Mounting Instructions The DIGI-P122/123 requires one rack unit (1 RU) of space. At least 2 inches of free air space is required on both sides of the DIGI-P122/123 for proper side ventilation.
DIGI-P122 / DIGI-P123 Installation Guide Front Panel and IR Remote Operation Basic Switching To select an input from the front panel: 1. Press the Input Type button for the input you wish to select (HDMI, VGA, VIDEO) 2. Press the Input Channel button for input you wish to select (1,2,3,4) To select an input from the IR remote: 1. Point the IR remote at the IR window on the front panel of the DIGI-P122/123 2. Press the Source Select button on the remote that corresponds to the input you wish to select.
DIGI-P122 / DIGI-P123 Installation Guide To change the volume of the MIC or LINE audio from the IR remote: 1. Point the IR remote at the IR window on the front panel of the DIGI-P122/123. 2. Press the + or - buttons to raise or lower the volume, respectively. To make a large change, you can press and hold the button until it reaches an appropriate level. CAUTION: Increasing volume level too much can cause distortion or feedback, damage speakers, and/or cause hearing loss.
DIGI-P122 / DIGI-P123 Installation Guide EDID Management HDMI An essential part of operation is the EDID table, which is transmitted to the source via HDMI cable from any HDMI input on the switcher. The DIGI-P122/123 units feature a dynamic EDID mode for the HDMI inputs only. The preferred native timing of the EDID will match the output resolution that the DIGI-P122/123 is set to.
DIGI-P122 / DIGI-P123 Installation Guide TCP/IP Setup and Control IP Address Setup via Web Browser Configuring the TCP/IP port is done via a web browser interface. A crossover cable is required for the initial setup. The default IP address is printed on a sticker on the side of the DIGI-P122/123. 1. Configure the computer to use the same network prefix as the IP address assigned to the DIGI-P122/123. For example, the IP address of the DIGI-P122/123 is 192.168.0.178.
DIGI-P122 / DIGI-P123 Installation Guide 6. Click the “Setup” button to enter the configuration menu. 7. Select the “Network” tab 8. Enter the new settings provided by your network administrator: a. Enter the new IP address. b. Enter the new Subnet Mask. c. Press the “Save” button. a b c 9. Enter the new IP address into your browser URL bar to re-establish communications.
DIGI-P122 / DIGI-P123 Installation Guide Access the Web Browser with Defined IP Address 1. Remove the crossover cable between the computer and the DIGI-P122/123. 2. Restore the computer to the previous network settings. 3. Connect the computer and the DIGI-P122/123 to the network. 4. Using Internet Explorer, enter the IP address for the matrix to access the browser interface. Additional Options in Web Browser 1. Operation Page: a.
DIGI-P122 / DIGI-P123 Installation Guide 3. Interface Tab a. Title Bar Label: You may enter a name in this field. It will appear in the black top bar on the Login and Operation pages. b. Button Labels: Enter names in these fields to identify the type of input that is connected to the DIGI-P122/123. Examples might be “Bluray”, “Wallplate 1”, or “AppleTV”. 4. Audio/Video Tab: a. Output Resolution: You may change the output resolution from this screen by clicking on one of the radio buttons.
DIGI-P122 / DIGI-P123 Installation Guide RS232 and TCP/IP Commands RS232 Settings: 9600 baud, 8 Data bits, 1 Stop bit, Parity = None TCP/IP Settings: User defined IP address, port 4001 = Carriage return (Hex 0D) = Line Feed (Hex 0A) Switching Commands Description HDMI 1 input select HDMI 2 input select HDMI 3 input select HDMI 4 input select VGA 1 input select VGA 2 input select VGA 3 input select VGA 4 input select Command Response 0701% 0702% 0703% 0704% 0705% 0706% 0707% 0708% Composite
DIGI-P122 / DIGI-P123 Installation Guide Description Aspect Mode – Output 16:9 Aspect Mode – Output 4:3 Aspect Mode – Set zoom mode (cycle) Command Response 0662% 0663% 0608% Ratio: 16:9 Ratio: 4:3 Aspect Ratio: [xxxxxxx] [xxxxxxx] can be: 4:3 Full Wide Screen Subtitle Freeze: Enable Freeze Image – Enable 0655% Freeze Image – Disable 0656% Freeze: Disable VGA Auto-adjust 0606% Non-VGA: Not Support VGA: VGA Adjustment Set brightness at
DIGI-P122 / DIGI-P123 Installation Guide Audio Commands Description Mute LINE Unmute LINE LINE volume up, [xx] ranges at 00~100 LINE volume down, [xx] ranges at 00~100 Set LINE Volume to [xx], [xx] ranges at 00~100 Mute MIC Unmute MIC MIC volume up, [yy] ranges at 00~60 MIC volume down, [yy] ranges at 00~60 Set MIC Volume to [yy], [yy] ranges at 00~60 Mute ALL Unmute ALL Get the current volume level, ranges at Command Response 0600% 0601% LINE Mute On LINE Mute Off 0602% LINE Volum
DIGI-P122 / DIGI-P123 Installation Guide OSD (On Screen Display) Commands Description Volume Bar display enable Volume Bar display disable Command 0646% 0647% Response Volume Bar: Display Volume Bar: No Display Volume Bar: Display OR Get Volume Bar display status Display on-screen source - Enable Display on-screen source - Disable 0651% 0644% 0645% On-screen source display status Enable on-screen icon for Line Mute/Unmute Disable on-screen icon for Line Mute/Unmute Enable on
DIGI-P122 / DIGI-P123 Installation Guide Firmware Update The DIGI-P122/P123 supports firmware updating in the field by USB thumb drive. The operation is as follows: 1. Connect the DIGI-P122/123 output to a display with a HDMI or VGA cable. 2. Apply power to the DIGI-P122/123. 3. Copy the file “MT23ATV.bin” to a USB flash disk. (The “MT23ATV.bin” file is provided/authorized by Intelix engineering department) 4. Insert the USB thumb drive into the USB port on the DIGI-P122/123 5.
DIGI-P122 / DIGI-P123 Installation Guide Troubleshooting Unit does not power on Verify power outlet is active. Verify continuity in power cable. Unit does not respond to front panel buttons Front panel is locked – send RS232 command 0605% No video from VGA output Check VGA cable. HDMI source may be encrypted (Bluray player, etc.) This is normal, encrypted sources cannot be converted to HD analog. Switcher output may be an incompatible video format – change output resolution.
DIGI-P122 / DIGI-P123 Installation Guide Stereo input sounds strange (no vocals, etc.) The line level connector of the MIC input is balanced. If you are trying to input a stereo source, both the Left (+) and Right (+) must be connected to the (+) terminal on the DIGI-P122/123, while the ground should be connected to the (-) and the ground. Better still – use a summing adapter (RDL TX-J2 comes to mind). No video from HDBaseT output Verify the green link LED on the HDBaseT card is lit solid.
DIGI-P122 / DIGI-P123 Installation Guide Technical Specifications DIGI-P122 Input Connections HDMI Inputs VGA Inputs Composite Video 1 YPbPr 2 (Component Video) S-Video 3 Composite Video 4 Microphone Input (Line Level) Microphone Input (Mic Level) Control (Front Panel) Control (Rear Panel) Power Input Firmware Upgrade Technical Specifications Four (4) HDMI type A Four (4) HD15-F, Four (4) 3.
DIGI-P122 / DIGI-P123 Installation Guide Audio Performance RCA/3.5mm Input Signal Level RCA/3.
DIGI-P122 / DIGI-P123 Installation Guide DIGI-P123 Input Connections HDMI Inputs VGA Inputs Composite Video 1 YPbPr 2 (Component Video) S-Video 3 Composite Video 4 Microphone Input (Line Level) Microphone Input (Mic Level) Control (Front Panel) Control (Rear Panel) Power Input Firmware Upgrade Technical Specifications Four (4) HDMI type A Four (4) HD15-F, Four (4) 3.
DIGI-P122 / DIGI-P123 Installation Guide Audio Performance RCA/3.5mm Input Signal Level RCA/3.
DIGI-P122 / DIGI-P123 Installation Guide This page intentionally left blank.
DIGI-P122 / DIGI-P123 Installation Guide Thank you for your purchase. Please contact us with your questions and comments. Intelix 8001 Terrace Ave, Ste 201 Middleton, WI 53562 Phone: 608-831-0880 Toll Free: 866-462-8649 Fax: 608-831-1833 www.intelix.com intelix@intelix.