FLX-44 Installation and Operation Guide Rev 140814 8001 Terrace Ave Suite 201 Middleton, WI 53562 Phone: 608-831-0880 Toll-Free: 866-462-8649 Fax: 608-831-1833
FLX-44 Installation Guide 2
FLX-44 Installation Guide Important Safety Instructions »» Please completely read and verify you understand all instructions in this manual before operating this equipment. »» Keep these instructions in a safe, accessible place for future reference. »» Heed all warnings. »» Follow all instructions. »» Do not use this apparatus near water. »» Clean only with a dry cloth.
FLX-44 Installation Guide Table of Contents Product Overview ��������������������������������������������������������������������������������������������������������������������������������������������� 6 Package Contents ��������������������������������������������������������������������������������������������������������������������������������������������� 7 Front and Rear Panels ���������������������������������������������������������������������������������������������������������������������������
FLX-44 Installation Guide Front Panel and IR Remote Operation ������������������������������������������������������������������������������������������������������������� 19 Basic Routing ���������������������������������������������������������������������������������������������������������������������������������������������������� 19 Advanced Routing ��������������������������������������������������������������������������������������������������������������������������������������������� 19 IR Remot
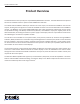
FLX-44 Installation Guide Product Overview The Intelix FLX-44 is a four input by four output HDBaseT/HDMI matrix switcher. The Intelix FLX-44 matrix improves the ease of installation similar to previous Intelix HDMI matrix switchers. The FLX-44 features HDBaseT twisted pair extension for each output, and simultaneous HDMI on the first two outputs, allowing the same signal to be routed to the HDMI connector and a remote destination with an HDBaseT receiver.
FLX-44 Installation Guide Package Contents Please verify the following items are in the shipping box prior to installation of the FLX-44. FLX-44 Matrix Switcher 1 ea Shelf Feet with Screws 4 ea Rack Ears with Screws 2 ea 48V DC 1.
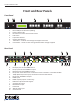
FLX-44 Installation Guide Front and Rear Panels Front Panel 1 2 3 4 5 IR 1 FLX-44 1. 2. 3. 4. 5. 6. 7. 8.
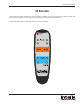
FLX-44 Installation Guide IR Remote The included IR remote performs all of the functions available on the front panel of the FLX-44. Please see page 19 for information on controlling the matrix from the front panel and the IR remote. The remote control requires two AAA batteries, which are included.
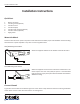
FLX-44 Installation Guide Installation Instructions Quick Start 1. 2. 3. 4. 5. 6. 7. Mount the matrix Connect ground (optional) Connect sources Connect displays Connect audio outputs (optional) Connect control (optional) Apply power Mount the Matrix At least 2 inches of free air space is required on both sides of the FLX-44 for proper side ventilation. Avoid mounting the FLX-44 near a power amplifier or any other source of significant heat.
FLX-44 Installation Guide Connect Sources Connect the source devices to HDMI inputs using HDMI cables that are less than or equal to 5 meters in length. For source devices that are further away, an HDMI extension device will be required to complete the connection. Connect Displays HDMI Outputs Connect the display devices to HDMI outputs using HDMI cables that are less than or equal to 5 meters in length. For display devices that are further away, it is highly recommended to utilize the HDBaseT outputs.
FLX-44 Installation Guide Connect Audio Outputs L L+ If the analog audio outputs are to be used in the installation, connect the Left, Right, and ground reference wires to the removable 3-pole terminal block. LRR R+ Insert the removable 3-pole terminal block to the appropriate output zone terminal. Connect IR Control The FLX-44 has an advanced bidirectional IR control protocol through the HDBaseT output port, which allows for the control of the sources, displays, and matrix.
FLX-44 Installation Guide Remote Display Control via IR An IR signal may be passed to a remote display location through the HDBaseT connection. There are two possible IR input connections for controlling a remote display: IR In for an individual output zone and IR All In for global IR signal distribution. Zone Control via IR Insert the TRS 3.5 mm plug of the DIGIB-EYE to the IR input port (IR IN) of the matrix for the output zone of the display device to control. Global Control via IR Insert the TRS 3.
FLX-44 Installation Guide Connect RS232 Control In addition to traditional RS232 control, the FLX-44 has an advanced RS232 control mechanism which allows RS232 tunneling and routing through the HDBaseT output port to control remote devices. Intelix recommends using the DIGI-HD60C-R for installations which require RS232 extension. See page 27 for all available control commands for the FLX-44. Matrix Control via RS232 The RS232 control port requires a standard straight-through serial cable for operation.
FLX-44 Installation Guide Insert the removable three-pole terminal block into the RS232 tunneling port for the output zone which requires remote RS232 control. Remote RS232 Control via RS232 Routing The FLX-44 has the logic to pass RS232 commands to remote devices through the DE9 RS232 port. Please see page 29 for more information on how to implement this feature in an installation.
FLX-44 Installation Guide Connect TCP/IP (Ethernet) Control The FLX-44 may be controlled via Ethernet with a third party control system or through a web browser interface. Additionally, the FLX-44 has an advanced RS232 control mechanism which will transmit RS232 commands through the HDBaseT output port to control remote devices with a simple command string. Intelix recommends using the DIGI-HD60C-R for installations which require RS232 extension.
FLX-44 Installation Guide Crossover Cable Connection 1. 2. Configure the computer to use the same network prefix as the IP address assigned to the matrix. For example, the IP address of the matrix is 192.168.0.178. Set the computer to use a static IP address within the same network range, such as 192.168.0.42. Connect the network crossover cable to the computer and to the TCP/IP port on the FLX-44.
FLX-44 Installation Guide Apply Power Plug the power supply into the power input port on the rear of the matrix. Connect the IEC power cable into the power supply. The matrix will turn on once the IEC cable is plugged into AC power. LCD Panel Boot-up Information While the matrix is booting up, the front LCD panel will show the IP address of the matrix and the current version of firmware. After five seconds, it will show Intelix FLX-44. The backlight will go dark after five seconds.
FLX-44 Installation Guide Front Panel and IR Remote Operation Basic Routing To set a route using the front panel of the FLX-44: 1. Press the desired input button (source). 2. Press the desired output button (display). 3. Press the TAKE button. All the selected buttons will flash then go dark indicating a routing change. To route video and audio from input 2 to output 4: Press input 2. Press output 3. Press TAKE. Advanced Routing To route video and audio from input 3 to all outputs: 1. Press input 3. 2.
FLX-44 Installation Guide IR Remote Operation The buttons on the IR remote are identical to the buttons on the front panel of the FLX-44. The IR routing command sequences are identical to the front panel command sequences. The Standby button will send the matrix to a low power state. Pressing the Standby button a second time will restore the FLX-44 to full power.
FLX-44 Installation Guide Web Browser Control End User Login Open a web browser and go to the IP address of the FLX-44. The default IP address is 192.168.0.178. Select User from the UserName drop-down. Enter the password to gain control of the matrix. The default password is “123456”. Press the Enter key on your keyboard or tablet to go to the matrix control screen. Matrix Control Click the input to output route and the button will turn green once the route has been changed.
FLX-44 Installation Guide Administrator Login Open a web browser and go to the IP address of the FLX-44. The default IP address is 192.168.0.178. Select Administrator from the UserName drop-down. Enter the password to gain control of the matrix. The default password is “admin”. Press the Enter key on your keyboard or tablet to go to the matrix control screen. Matrix Control and Setup Access Click the input to output route and the button will turn green once the route has been changed.
FLX-44 Installation Guide Web Browser Customization When changes are made on a setup tab, the Save button must be pressed for the changes to take effect. Users Tab The Users setup screen provides options to change the Administrator and User passwords. The front panel can also be locked to prevent tampering from this screen. Interface Tab The Interface setup screen features options to customize the end user’s experience with the matrix.
FLX-44 Installation Guide HDCP and EDID Configuration Tab The Configuration setup screen has options to turn on and off the HDCP compliance flag for an input, which is ideal for laptops with signals going to a video conferencing system. The EDID from a display can be copied to an input. A Full copy will copy all the video and audio capabilities of the display. A Hybrid copy will copy the video capabilities of the display and specify PCM two channel audio, which is ideal when using the analog audio outputs.
FLX-44 Installation Guide Network Tab (IP Address) The Network setup screen features DHCP or Static IP settings for the matrix. This screen also shows the current version of software in the matrix.
FLX-44 Installation Guide EDID Management The stock EDID for the inputs of the FLX-44 is 1280x1024 (computer video input) and 1080p with stereo audio (consumer video input). In order to change the EDID information for an input, the EDID copy command will need to be sent to the matrix via RS232 or TCP/IP or managed through the web browser setup interface (see page 24). EDIDMyyBxx. EDIDHyyBxx.
FLX-44 Installation Guide RS232 and TCP/IP Commands RS232 Settings: 9600 baud, 8 Data bits, 1 Stop bit, Parity = None TCP/IP Settings: User defined IP address (default IP address: 192.168.0.178), port 8080 There is either a period (.) or a semicolon (;) at the end of each command. These characters must be present for the command to process correctly. There are no spaces between any of the characters in the command string.
FLX-44 Installation Guide Preset Commands Description Save the current routing as a preset. Values range from 0 through 9 Recall preset x Clear preset x Command Savex. Response Save to Fx Recallx. Clearx. Recall From Fx Examples: Save4. Recall4. Clear4. Save the current routing as preset 4.
FLX-44 Installation Guide HDCP Commands Description Turn HDCP Compliance off for input xx Turn HDCP Compliance on for input xx Command /%I/xx:0. /%I/xx:1. Response /%I/xx:0. /%I/xx:1. Example: Turn HDCP Compliance off for input 4 /%I/04:0. Remote RS232 Control via Routing The FLX-44 has the logic to pass RS232 commands to remote devices through the TCP/IP or DE9 RS232 ports.
FLX-44 Installation Guide Troubleshooting Matrix does not power on »» Verify power outlet is active. »» Verify continuity in power cable. Cannot view 3D content »» »» »» »» Copy EDID from output to input. Verify display is 3D compatible. Verify source device can output 3D content. Verify twisted pair cable does not exceed 40 meters. Cannot hear surround sound audio »» Copy EDID from output to input. »» Verify output can broadcast surround sound audio.
FLX-44 Installation Guide Technical Specifications I/O Connections HDMI Inputs HDMI Outputs HDBaseT Outputs IR Inputs IR All In IR Outputs IR Eye RS232 Tunnel Audio Outputs 48V DC Power Control, Rear Panel Control, Front Panel Four (4) HDMI Type A Receptacle (1 per input) Two (2) HDMI Type A Receptacle (Outputs 1 and 2 only) Four (4) 8P8C port (Shielded RJ45) (1 per output) Four (4) 3.5 mm jack (TRS) One (1) 3.5 mm jack (TRS) Four (4) 3.5 mm jack (TS) (1 per output) One (1) 3.
Thank you for your purchase. Please contact us with your questions and comments. Intelix 8001 Terrace Ave, Ste 201 Middleton, WI 53562 Phone: 608-831-0880 Toll Free: 866-462-8649 Fax: 608-831-1833 www.intelix.com intelix@intelix.