SKYPLAY-MX Installation and Operation Guide Rev 130412
SKYPLAY-MX Installation Guide Important Safety Instructions Please completely read and verify you understand all instructions in this manual before operating this equipment. Keep these instructions in a safe, accessible place for future reference. Heed all warnings. Follow all instructions. Do not use this apparatus near water. Clean only with a dry cloth.
SKYPLAY-MX Installation Guide THE MAINS PLUG OF THE POWER CORD MUST REMAIN READILY ACCESSIBLE. Do not defeat the safety purpose polarized or grounding-type plug. A polarized plug has two b lades with one wider than the other. A grounding-type plug has two blades and a third grounding prong. The wide blade or the third prong is provided for your safety. If the provided plug does not fit into your outlet, consult an electrician for replacement of your obsolete outlet.
SKYPLAY-MX Installation Guide Table of Contents Important Safety Instructions ......................................... 2 Overview ......................................................................... 6 Package Contents SKYPLAY-MX-S ............................... 7 Package Contents SKYPLAY-MX-R ............................... 7 SKYPLAY-MX-S ............................................................. 8 SKYPLAY-MX-R............................................................. 9 IR Remote..............
SKYPLAY-MX Installation Guide FCC Statement .............................................................. 24 FCC Radiation Exposure Statement .............................. 25 Caution Statement ........................................................
SKYPLAY-MX Installation Guide Overview The Intelix SKYPLAY-MX improves upon the existing wireless HDMI by ensuring source to destination compatibility with full HDCP-compliance. The SKYPLAYMX wireless distribution is designed specifically for professional grade audio-visual installations. The SKYPLAY-MX distributes HDMI high-definition audio and video up to 100 feet in both point-to-point pointto-many, and many-to-point configurations.
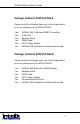
SKYPLAY-MX Installation Guide Package Contents SKYPLAY-MX-S Please verify the following items are in the shipping box prior to installation of the SKYPLAY-MX-S. 1 ea 1 ea 1 ea 1 ea 1 ea 1 ea SKYPLAY-MX-S Wireless HDMI Transmitter IR Emitter Desktop Stand HDMI Cable 5V DC Power Supply SKYPLAY-MX Installation and Operation Guide Package Contents SKYPLAY-MX-R Please verify the following items are in the shipping box prior to installation of the SKYPLAY-MX-R.
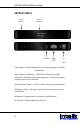
SKYPLAY-MX Installation Guide SKYPLAY-MX-S Pairing Button Status Indicators IR Output HDMI Input 5v Input Pairing Button – Recessed button for use when pairing a Transmitter and Receiver. Status Indicator “Network” – LED will be on when successfully connected. LED will be blinking during pairing. LED will flash rapidly indicating an error has occurred. Status Indicator “Video” – LED is on when video is being transmitted.
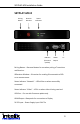
SKYPLAY-MX Installation Guide SKYPLAY-MX-R Pairing Button Receiver Window Status Indicators USB Port (Firmware Update) HDMI Output 5v Pairing Button – Recessed button for use when pairing a Transmitter and Receiver. IR Receiver Window – IR receiver for sending IR commands to OSD or to remote source. Status Indicator “Network” – LED will be on when successfully connected. Status Indicator “Video” – LED is on when video is being received. USB Port – For use with firmware update only.
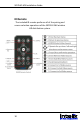
SKYPLAY-MX Installation Guide IR Remote The included IR remote performs all of the pairing and source selection operations of the SKYPLAY-MX wireless HD distribution system.
SKYPLAY-MX Installation Guide Installation Instructions Shelf Mounting Instructions Mount the SKYPLAY-MX in the desktop stand with the vent holes down. Proper orientation will result in the power cable being down near the base and will ensure proper passive ventilation. Improper mounting can cause the device to overheat and temporarily malfunction.
SKYPLAY-MX Installation Guide Setup and Pairing Point-to-Point To pair a receiver and transmitter: 1. Mount the transmitter and the receiver in the desktop stand for proper ventilation. (See Shelf Mounting Instructions) 2. Connect an HDMI cable from the HD Source to the SKYPLAY-MX-S transmitter. 3. Connect an HDMI cable from the SKYPLAY-MX-R receiver to the HD display. 4. Power on both the transmitter and receiver. 5. Point the IR remote at the SKYPLAY-MX-R receiver and Press the “Add” button. 6.
SKYPLAY-MX Installation Guide Point-to-Many The SKYPLAY-MX-S supports the ability to connect up to 4 receivers at a time. In order to setup point-to-many installations it is easiest to pair one receiver to the transmitter at a time. 1. 2. 3. 4. 5. 6. 7. 8. 9. 10. 11. 12. 13. 14. 15. Mount the transmitter and all of the receivers in their desktop stand for proper ventilation. (See Shelf Mounting Instructions) Connect an HDMI cable from the HD Source to the SKYPLAY-MX-S transmitter.
SKYPLAY-MX Installation Guide Multiple Transmitters on a Receiver (Many-To-Point) To pair additional transmitter to a receiver: 1. Mount the transmitter and the receiver in the desktop stand for proper ventilation. (See Shelf Mounting Instructions) 2. Connect an HDMI cable from the HD Source to the SKYPLAY-MX-S transmitter. 3. Connect an HDMI cable from the SKYPLAY-MX-R receiver to the HD display. 4. Power down other SKYPLAY-MX devices for ease of installation. 5.
SKYPLAY-MX Installation Guide EDID Management The SKYPLAY-MX automatically handles EDID management. The transmitter will request the EDID for all of the active connections. The transmitter then finds the highest compatible signal type for all active wireless connections. The transmitter then uses this as the system EDID for the source to properly output a supported signal type.
SKYPLAY-MX Installation Guide On-Screen Menu The SKYPLAY-MX generates an On-Screen Display (OSD) for handling the pairing and status of the device. Overview of OSD The On-Screen Display allows users to Add, Remove and Rename Sources. There is also a Status area for additional information. Adding Sources To add a new Video Source, refer to the Setup and Pairing section of the installation manual.
SKYPLAY-MX Installation Guide 1. 2. Using the IR Remote hit the “Menu” button. Arrow down to the “Remove Video Source” selection. 3. 4. Press “OK”. Choose the source to remove using the “Up” and “Down” arrow buttons. 5. 6. Press “OK”. Confirm Removing of the selected source by using the “OK” button, or cancel the selection by using the “Exit” button.
SKYPLAY-MX Installation Guide 18 7. A screen will appear showing that the remove operation is in progress. 8. You have removed the source and now are at the Main Menu.
SKYPLAY-MX Installation Guide Renaming Sources To rename a source, follow the instructions below: 1. Using the IR Remote hit the “Menu” button to bring up the OSD menu. 2. Arrow down to the “Modify Video Source Name” selection. Press “OK”. Choose the source to rename using the “Up” and “Down” arrow buttons. 3. 4.
SKYPLAY-MX Installation Guide 5. 6. Press “OK” to select the source. Use the “Left” and “Right” buttons to change the current position of the cursor. Use the “Up” and “Down” buttons to change the character in the current cursor position. 7. Press “OK” to save the modified name. Quick Source Selection The IR Remote allows for source selection without having to enter the OSD for sources 1-3. To use the Quick Selection Feature hit the “1”, “2” or “3” button at the bottom of the IR Remote.
SKYPLAY-MX Installation Guide Troubleshooting SKYPLAY-MX will not pair Verify power outlet is active. Verify continuity in power cable. Verify that both transmitter and receiver are powered on. Verify that pairing units are the only SKYPLAY-MX devices currently powered on. Distance issue – bring the transmitter (TX) and receiver (RX) closer together, reduce the amount of solid walls between the TX and RX. No Signal at TV Verify that both the transmitter and receiver are powered on.
SKYPLAY-MX Installation Guide Distance issue – bring the transmitter (TX) and receiver (RX) closer together, reduce the amount of solid walls between the TX and RX. No Audio Verify the mute and audio volume setting on the TV. Audio format setting on the source is incompatible with system. Change the source to output PCM 2.0, DTS or Dolby Digital. IR Remote Issues Verify the IR emitter is plugged into the transmitter. Verify the remote batteries.
SKYPLAY-MX Installation Guide Technical Specifications Technical Specifications I/O Connections HDMI Input (SKYPLAY-MX-S) One (1) HDMI Type A Receptacle Connector HDMI Output (SKYPLAY-MX-R) IR Repeater (SKYPLAY-MX-S) 5V DC Power (Both) One (1) HDMI Type A Receptacle Connector One (1) 2.5mm (3/16”) TS Male Connector One (1) 5.5mm Outside Diameter, 2.
SKYPLAY-MX Installation Guide FCC Statement This equipment has been tested and found to comply with the limits for a Class B digital device, pursuant to part 15 of the FCC rules. These limits are designed to provide reasonable protection against harmful interference in a residential installation. This equipment generates, uses and can radiate radio frequency energy and, if not installed and used in accordance with the instructions, may cause harmful interference to radio communications.
SKYPLAY-MX Installation Guide FCC Radiation Exposure Statement This equipment complies with FCC RF radiation exposure limits set forth for an uncontrolled environment. This transmitter must not be co-located or operating in conjunction with any other antenna or transmitter. This equipment complies with Part 15 of the FCC Rules.
SKYPLAY-MX Installation Guide Thank you for your purchase. Please contact us with your questions and comments. Intelix 8001 Terrace Ave, Ste 201 Middleton, WI 53562 Phone: 608-831-0880 Toll Free: 866-462-8649 Fax: 608-831-1833 www.intelix.com intelix@intelix.