4-Port Broadband Router user manual Model 524537 INT-524537-UM-0309-02
introduction Thank you for purchasing the INTELLINET NETWORK SOLUTIONS™ 4-Port Broadband Router, Model 524537. Combining a router, firewall and four-port Fast Ethernet switch, this handy device lets you experience fast speeds as you surf the Web, download music or photos, and play online games. A DHCP server that automatically assigns IP addresses to users on the LAN — plus UPnP that supports gaming — makes this the perfect router for the home network.
table of contents section page 1 Hardware Installation..................................................................................................... 5 1.1 Rear Panel Ports & Jacks.................................................................................... 5 1.2 Front/Top Panel LEDs.......................................................................................... 5 2 Network Settings..............................................................................................
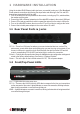
1 hardware installation Using the included RJ45 Ethernet cable (and more, as needed), make your 4-Port Broadband Router network connections by following the steps below and referring to the Port and LED descriptions (presented from left to right). 1. Turn off all devices to be incorporated into the network, including any PCs, switches/hubs, the modem and the router. 2. Connect the LAN or Ethernet network port of the cable/DSL modem to the router’s WAN port. 3.
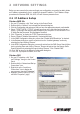
2 network settings Before you can connect to the router and begin your configuration, you need to be able to obtain an IP address automatically; that is, establish a dynamic IP address. The IP Address Setup procedures for Windows 98SE, Me, 2000, XP and Vista are presented here. 2.1 IP Address Setup Windows 98SE / Me 1. On your PC’s desktop, click “Start” and go to the Control Panel. 2. Double-click the “Network” icon to display the Network dialog box. 3.
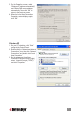
5. On the Properties screen, select “Obtain an IP address automatically” and “Obtain DNS server address automatically,” then click “OK” to return to the previous screen. 6. When the Local Area Connection Properties screen displays again, click “OK.” Windows XP 1. On your PC’s desktop, click “Start” and go to the Control Panel. 2. Double-click the “Network and Internet Connections” icon, then click “Network Connections” and double-click “Local Area Connection.” 3.
4. On the Internet Protocol (TCP/IP) Properties screen, select “Obtain an IP address automatically” and “Obtain DNS server address automatically”; then click “OK” to return to the Local Area Connection Properties screen. 5. When the Local Area Connection Properties screen displays again, click “OK.” Windows Vista 1. On your PC’s desktop, click “Start” and go to the Control Panel. 2. Click “View Network Status and Tasks”; then click “Manage Network Connections.” 3.
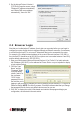
5. On the Internet Protocol Version 4 (TCP/IPv4) Properties screen, select “Obtain an IP address automatically” and “Obtain DNS server address automatically”; then click “OK.” 2.2 Browser Login Now that you’ve obtained an IP address, there’s just one more step before you can begin to configure your router. As this device is configured through an Ethernet connection, it’s necessary to confirm that the host PC is set on an IP subnetwork that can be accessed by the router.
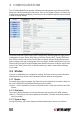
3 configuration This 4-Port Broadband Router provides a Web-browser management mode that uses the Webbased user interface presented in this section. Once you’ve logged in (Section 2.2 above), the Configuration homepage will display, from which you can navigate through the utility as needed to enter or change settings. On the left-hand side of each screen is the Function Menu, which presents the eight primary Configuration sections: Status, WAN Setup, LAN Setup, Routing, NAT, Firewall, DDNS and Misc.
3.2 WAN Setup The 4-Port Broadband Router allows one of four Internet-LAN connection types, which can be selected on this screen: Dynamic IP, PPPoE, Static IP and PPTP. Select the preferred — or, depending on the Internet service provider (ISP), the required — option to display the corresponding configuration screen. The default setting is Dynamic IP. 3.2.1 Dynamic IP Host Name — This is typically optional, but may be required by some ISPs.
MAC address on the router. It is recommended that you not change the default MAC address unless it’s required by your ISP. MTU — Enter a value for the largest packet size to be permitted for network transmission. The default value of 1496 is recommended. Primary DNS — Enter the primary address assigned by your ISP. NOTE: This is optional. Secondary DNS — Enter the secondary address assigned by your ISP. NOTE: This is optional. Apply — Click “Apply,” then “Save” to set and save any changes. 3.2.
Default Physical Address — The default MAC address is set to the WAN’s physical interface MAC address on the router. It is recommended that you not change the default MAC address unless it’s required by your ISP. MTU — Enter a value for the largest packet size to be permitted for network transmission. The default value of 1496 is recommended. Apply — Click “Apply,” then “Save” to set and save any changes. 3.2.4 PPTP User Name — Enter the PPTP username provided by your ISP.
Server IP Address — Enter the PPTP server address provided by your ISP. WAN Connection Type: The two options are “DHCP” or “Static IP.” Select “Static” if your ISP assigned you the IP address, and enter it here. Primary DNS — Enter as directed by your Internet service provider. Secondary DNS — Enter as directed by your Internet service provider Physical Address Clone — You can click “MAC Clone” to copy the MAC address of your PC so that it’s also the MAC address of this device (if required by your ISP).
DHCP Lease Time — Specify how long (in seconds) an IP address is valid for a computer before a new IP address is issued. Normally, there is no need to change this value. In the DHCP IP Address Reserving panel, you can reserve IPs for a specific computer. Auto Setup — Select to assign a particular IP to your computer.
Apply — Click “Apply,” then “Save” to set and save any changes. 3.5.3 Virtual Server Setup This screen lets you specify some services to be visible by outside users. The router can detect an incoming service request and forward it to the specific local computer to handle it. For example, a user can assign a PC in the LAN to act as a Web server inside and expose it to the outside network. An outside user can browse inside the Web server directly while it is protected by NAT.
Forward Protocol — Enter the incoming (inbound) port or port range for this type of application (e.g., 2300-2400, 47624). NOTE: Individual port numbers are separated by a comma (e.g., 47824, 5776). Forward Port — Select the inbound port protocol type: “TCP” or “UDP.” Add — Click after filling in the fields to add the rule and display the Current Trigger-Port Table, which shows the valid trigger rules in the router. To remove a listing from the table, select it and click “Delete.
the Internet (by selecting “Permit” or “Deny” from the drop-down menu. NOTE: Enter the 12-digit MAC address in this format: XX-XX-XX-XX-XX-XX (with the hyphens). Add — Click after filling in the fields to add the rule and display the Current MAC Filtering Table, which shows the valid MAC filtering rules in the router. To remove a listing from the table, select it and click “Delete.” Apply — Click “Apply,” then “Save” to set and save any changes. 3.6.
3.6.3 URL Filtering Configuration This screen lets you enter keywords specific to the site in these fields. The router will block access to sites that use these keywords. Input Filtering Keyword — Enter whatever keyword you want to block access to. You can even use asterisks and question marks, which act as “wild card” symbols: The asterisk (*) will substitute for multiple characters; the question mark (?) will substitute for a single character.
3.8.1 Login ID & Password Setup The factory-set default password is “guest.” You can change the default password to ensure that someone can’t adjust your settings without your permission. Every time you change your password, record it and keep it in a safe place: If you forget it, you’ll need to reset the router to the factory defaults. (See Section 1.1 regarding the “Default” button for resetting the device.) New Password — Enter your new password.
3.8.5 WAN Link Status & Setup WAN Link Setup — Select the desired mode from the drop-down menu, which will then display to the right of “WAN Link Status.” The default setting is “Auto.” Apply — Click “Apply,” then “Save” to set and save any changes. 3.8.6 Restore Default / Restart System Restore Default — Click to restore the router’s configuration to its factory default settings. The router will present a confirmation message, then restart automatically. Restart System — Click to reboot the router. 3.
4 specifications • Firewall: - URL filter - MAC address filter - Connection filtering: limits access to the General Internet of PCs in the LAN based on a • LAN ports: 4 RJ45 10/100 Mbps data ports time schedule • LAN ports with Auto MDI/MDI-X • Supports UPnP (Universal Plug and Play) • WAN port: 10/100 Mbps RJ45 connector • Supports DHCP (client/server) • Certifications: FCC Class B, CE Mark • Supports PPPoE (DSL), DHCP (cable/DSL) .
INTELLINET NETWORK SOLUTIONS™ offers a complete line of active and passive networking products. Ask your local computer dealer for more information or visit www.intellinet-network.com. Copyright © INTELLINET NETWORK SOLUTIONS All products mentioned are trademarks or registered trademarks of their respective owners.