UNC-W10 Wireless Network IP Camera User’s Guide V1.
WIRELESS NETWORK IP CAMERA User’s Guide FCC Compliance Statement The users manual or instruction manual for an intentional or unintentional radiator shall caution the user that changes or modifications not expressly approved by the party responsible for compliance could void the user's authority to operate the equipment. NOTE: This equipment has been tested and found to comply with the limits for a Class B Digital Device, pursuant to Part 15 of the FCC Rules.
WIRELESS NETWORK IP CAMERA User’s Guide Important Notice 1. Camera surveillance laws may differ for each country. Please contact the local authorities to avoid any surveillance law violations. 2. Please note that the CMOS lens that comes with the Wireless Network IP Camera can be damaged permanently if the camera lens is exposed to direct sunlight. If your application demands prolonged exposure to sunlight, you should consider equipping it with a sun visor. 3.
WIRELESS NETWORK IP CAMERA User’s Guide TABLE OF CONTENTS PRODUCT OVERVIEW 5 ABOUT WIRELESS IP NETWORK CAMERA MAIN FEATURES AND BENEFITS SYSTEM REQUIREMENTS 5 6 7 PHYSICAL DESCRIPTION 9 CONTENTS TOP VIEW AND DESCRIPTION REAR VIEW AND DESCRIPTION 9 10 11 INSTALLATION SUMMERY 12 ASSIGNING IP ADDRESS & ACCESSING NETWORK IP 13 CAMERA’S HOMEPAGE ASSIGNING IP ADDRESS ASSIGNING IP ADDRESS BY USING IP INSTALLER CONNECTING NETWORK IP CAMERA TO PC USING IP INSTALLER ASSIGNING IP ADDRESS BY USING HYPER TERM
WIRELESS NETWORK IP CAMERA User’s Guide CONFIGURING ADMINISTRATION TOOLS ADMINISTRATION MENU’S OVERVIEW IMAGE CONFIGURATION NETWORK CONFIGURATION WIRELESS CONFIGURATION USER CONFIGURATION EVENT TRIGGER CONFIGURATION TIME CONFIGURATION SYSTEM CONFIGURATION 31 32 33 35 39 43 44 48 49 PTZ CONTROL 51 APPENDIX 52 A. TECHNICAL SPECIFICATIONS B. FAQ C. TROUBLE SHOOTING D. UTILIZING IP ADDRESSES ON LOCAL NETWORK INTRODUCTION IP CONSTRUCTION AND NETWORK CLASS C CLASS NETWORK E.
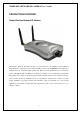
WIRELESS NETWORK IP CAMERA User’s Guide PRODUCTION OVERVIEW About Wireless Network IP Camera The Wireless Network IP Camera is able to connect directly to the Ethernet or Fast Ethernet network and also supported by the wireless transmission based on the IEEE802.11b standard.
WIRELESS NETWORK IP CAMERA User’s Guide Main Features and Benefits Convenient Operation The Wireless Network IP Camera is a standalone system with built-in CPU requiring no special hardware or software such as PC frame grabber cards. The Wireless Internet Camera supports both Active X mode for Internet Explorer and JAVA mode for Internet Explorer and Netscape Navigator. Therefore, all that is required is a common web browser, such as Microsoft Internet Explorer 4.x or above.
WIRELESS NETWORK IP CAMERA User’s Guide security settings in combination with an organization’s Internet firewall, normally implements data protection. The Administrator can decide whether individuals, groups, or the whole world may access the camera. The Wireless Network IP Camera supports multi-user password protection Compression and Performance With an adaptive frame rate dependent on the image and lighting conditions, the Wireless Network IP Camera delivers JPEG images at up to 30 images per second.
WIRELESS NETWORK IP CAMERA User’s Guide System Requirement Network 10Base-T Ethernet or 100Base TX Fast Ethernet Wireless Local Area Network IEEE802.11b Wireless LAN Recommended PC or Notebook to Access the wireless Network IP Camera. System requirement: CPU : Pentium II, 266 MHz or above Memory Size : 32 MB (64MB recommended) VGA card resolution : 800x600 or above Web Browser: Internet Explore 5.
WIRELESS NETWORK IP CAMERA User’s Guide PHYSICAL DESCRIPTION Contents Carefully remove all items from the package.
WIRELESS NETWORK IP CAMERA User’s Guide Top view and Description Network Activity LED Image Capture LED Operating status LED Image Capture LED (Red): The Image Capture LED flashes when users are accessing the camera, it flashes once when an image is being captured or saved. Operating Status LED (Green): This LED indicates the Wireless Network IP Camera’s operating status.
WIRELESS NETWORK IP CAMERA User’s Guide Rear View and Description Antenna Connector Network Connector RS 232 Connector GPIO Connector Power Connector LAN/ WLAN-LAN/ WAN Power Connector: Only use the AC Adapter provided by your dealer to avoid any possible damage from electric shock. Network Connector: Connect 10baseT Ethernet or 100base TX Fast Ethernet cable.
WIRELESS NETWORK IP CAMERA User’s Guide INSTALLATION SUMMERY 1. Connect Ethernet and Power to the Wireless Network IP Camera. 2. Install and launch the “IP-Installer” 3. Assign an IP address and network settings 4. Securely mount the Wireless Network IP Camera. 5.
WIRELESS NETWORK IP CAMERA User’s Guide ASSIGNING IP ADDRESS & ACCESSING WIRELESS NETWORK IP CAMERA’S HOMEPAGE Assigning IP Address To access the Wireless Network IP Camera, you need to assign an appropriate network IP address. IMPORTANCE • Please use the newly assigned IP address, do NOT use any occupied IP address or the default or example IP address. • It is highly recommended that you assign an IP address before placing the Wireless Network IP Camera in a remote place or remote network.
WIRELESS NETWORK IP CAMERA User’s Guide Assigning IP address by using IP installer Connecting Wireless Network IP Camera to PC 1. Connecting with direct cable (Non Crossover UTP cable). Used when connecting the Wireless Network IP Camera to a switch, hub or router. Connect Wireless Network IP Camera to a PC through a 2. Connecting with Crossover UTP Cable. Use the crossover cable to directly connect the Wireless Network IP Camera to a PC.
WIRELESS NETWORK IP CAMERA User’s Guide Using IP Installer To install an IP address, you should use the IP Installer provided with Wireless Network IP Camera. You can download its program through the web site (http://intellinet-network.com) Note : System required for IP installer; Microsoft Windows9X/NT/2000 ① Execute the IP Installer after the Network IP Camera completes its booting (wait until the operating LED blinks every second).
WIRELESS NETWORK IP CAMERA User’s Guide Configurations” button. The message shows up if all the information is set up properly. Then click the “OK” button. NOTE After changing Network Configuration, It will take a little time to reboot the Wireless Network IP Camera so that you may access the Wireless Network IP Camera’s Homepage.
WIRELESS NETWORK IP CAMERA User’s Guide Assigning IP Address by using Hyper Terminal You can assign an IP address by using Hyper Terminal. In this case, you should configure Hyper Terminal first Configuring Hyper Terminal Hyper Terminal is a basic program for Windows 9x/NT/2000. A PC can communicate with external devices through the serial port by using this program.
WIRELESS NETWORK IP CAMERA User’s Guide ③ Configure bit/sec as 19200 and leave other settings at the default values. ④ The panel shows up like thus image when configured properly.
WIRELESS NETWORK IP CAMERA User’s Guide Assigning IP Address Follow these steps to assign an IP address using Hyper Terminal 1. Execute “Hyper Terminal” on your PC 2. Connect RS232 Cable to the serial port of PC that you have selected in Chapter 4.3.1 Configuring Hyper Terminal and the Wireless Network IP Camera serial port while Hyper Terminal is executed. 3. Supply power to the Wireless Network IP Camera. 4. A count down will start with the message “Press any key to stop auto-boot.” 5.
WIRELESS NETWORK IP CAMERA User’s Guide Here, inet on ethernet (e), host inet (h) and gateway inet (g) values are network configuration values. You should change these values in most case. If you don’t know what value you should assign, refer to the network administrator. Inet on ethernet (e) is IP address and subnet mask address of Wireless Network IP Camera. IP address and subnet mask addresses are separated by colon (:). For example, IP address is represented by decimal numbers delimited by dot (.
WIRELESS NETWORK IP CAMERA User’s Guide 7. Type ‘c’ key to change the network configuration in [Boot] prompt. If you type ‘c’ key, Wireless Network IP Camera shows you the information you can change its values and the current assigned values. You can change as the following figure. 8. When you terminate hyper-terminal program after you changed network configuration, hyper-terminal program asks you whether you save the session. If you save the session, you can re-use the hyper-terminal.
WIRELESS NETWORK IP CAMERA User’s Guide Accessing Wireless Network IP Camera Homepage After assigning Wireless Network IP Camera an IP address, you may access Wireless Network IP Camera and monitor real-time image on Internet. You may configure Wireless Network IP Camera within its own pages through any standard Web browser on local or remote network. Starting Web Browser Start your web browser by entering your Wireless Network IP Camera’s IP address. And then you can see a build-in homepage.
WIRELESS NETWORK IP CAMERA User’s Guide 1. ID and Password If you key in a user ID and password, you can access the camera to monitor real-time video. With administrator’s ID and password, you can access real-time video with administrator’s authority. The default value of both user ID and password are “admin” and the administrator may change it at the Administrator Menu. Each ID and Password must be composed of no more than 10 bytes (e.g. 10 English letters).
WIRELESS NETWORK IP CAMERA User’s Guide Active-X installation manually If Active-X program fails to be installed automatically, you may install it manually. The manual installation program is to be downloaded by clicking ‘here’ as follows: Note: If you have any problem when you install ActiveX, visit http://www.intellinetnetwork.com/driver/NetCam.exe to download and install ActiveX manually. Please follow the instructions to install Active-X manually.
WIRELESS NETWORK IP CAMERA User’s Guide Java Applet viewer is for a user who access Wireless Network IP Camera through a computer that does not Utilize MS Windows (OS) such as Macintosh computer, etc. Java Applet viewer is run with java virtual Machine that is installed on User’s computer. Macintosh and Unix System The Wireless Network IP Camera Active-X program is based on MS windows OS. Therefore it is impossible to access Wireless Network IP Camera and monitor real time image through default viewer.
WIRELESS NETWORK IP CAMERA User’s Guide Wireless Network IP Camera’s Homepage Having completed the login procedure, you now see the Wireless Network IP Camera homepage 1. Connected Client It show the number of multi access users. (100 multi users can be accessed simultaneously.) 2. Administrator Menu This button is to access the administration menu.
WIRELESS NETWORK IP CAMERA User’s Guide 4. Save, Stop save, snap shot, show only image ① Save, stop save Users can save real time images from Wireless Network IP Camera on PC. Press ‘save’ button then select folder that you want to save images. (The image is saved as an AVI file.) Once it starts to save images, “Saving” message and Xvid Status appear. To stop saving, press “stop, Save” button. (Saving Mode) (Xvid Status) NOTE You may see the saved image by Window Media Player or Real Player.
WIRELESS NETWORK IP CAMERA User’s Guide ② Snap Shot To save only one image, press “snap shot” button and then select a folder. Save the image as JPG file. (Default file name dedicate the date and time) ③ Show only image When you want to see only video panel, Press “show only image” 5. Frame rate You may choose image transmission speed. If you choose ‘Fastest”, you will get images at the fastest frame rate. The transmission speed depends on your network line’s capacity and PC’s performance 6.
WIRELESS NETWORK IP CAMERA User’s Guide ADJUSTING THE CAMERA LENS Adjusting the Focus In order for the Focus Assistant to access the full focusing range for your application environment, simply turn the lens in the clockwise or counter clockwise direction; unless you want to replace the lens, it should not be unscrewed more than 1.0mm. *Adjust the camera focus while reviewing the picture quality on your Web browser. Lens 1.
WIRELESS NETWORK IP CAMERA User’s Guide Replacing the Lens Because Wireless Network IP Camera is designed with a CS-Mount, the lens supplied with your product can be replaced with any standard C or CS lens, typically used within the surveillance industry. Follow the instructions below to replace the supplied lens with any C or CS type lens: 1. Unscrew Wireless Network IP Camera lens turning the lens in the anti clockwise 2. C-lens only: Attach the new lens to a C-CS Adapter 3.
WIRELESS NETWORK IP CAMERA User’s Guide CONFIGURING ADMINISTRATION TOOLS You can control the configurations of Wireless Network IP Camera by Administrator’s Tool. Only authorized user can access administrator tool. If non-authorized users try to access it, you may see the caution message “You are not an administrator”. You may control all configurations for Wireless Network IP Camera. Press “Administrator Menu”.
WIRELESS NETWORK IP CAMERA User’s Guide Administration Menu’s Overview The table below provides a one-step overview of the Administrations Tools: Image Configuration To configure compression rate, image size, brightness, contrast, etc.
WIRELESS NETWORK IP CAMERA User’s Guide Image Configuration Example of Wireless Network IP Camera definable image attributes using the Focus Assistant: 1. Compression rate The file size of JPEG-compressed image depends upon the actual content of the image. Images containing much detail will generate larger files. Image quality is controlled through the level of compression; where, high compression yields small files, while low compression maintains higher image quality at the expense of larger files.
WIRELESS NETWORK IP CAMERA User’s Guide 2. Image size You may choose the image size VGA(640x480) or QVGA(320x240) and 160*120 Large sizes of image (VGA) yields lower frame rate, while small size maintains higher frame rate 3. Vertical Flip To turn the image view upside down 4. Horizontal Flip To switch the image view right from left 5. Brightness mode, Brightness As a number is higher, image looks brighter. (Input digits from 0 to 255) 6. Contrast As a number is higher, contrast becomes clearer.
WIRELESS NETWORK IP CAMERA User’s Guide Network Configuration This screen defines the network type and addresses of the Wireless Network IP Camera. Here you can configure the Camera’s IP address, the DNS server address, and the Server IP address. Each configuration takes just a few seconds for booting after pressing “Submit”. 1. Set IP Address, Subnet mask, gateway address. To set the IP address, Subnet mask, and gateway address manually, you may select “manually” in combo box.
WIRELESS NETWORK IP CAMERA User’s Guide NOTE If you select “DHCP”, you may see the rebooting message “Now the Network Camera is rebooting to apply the changes...” on Web Browser. After completing rebooting, Operating Status LED blinks once per second. (The message may not be changed at all so you must check whether the Operating Status LED blinks.) To select DHCP, you must have DHCP server in the network. Otherwise, the IP address will be rebooted automatically as the previous IP address.
WIRELESS NETWORK IP CAMERA User’s Guide 7. ETSP port number To set the port number for ETSP (Event Trigger Setting Program). (Default is “11000” and users can select from 8000 to 65535. (For the detail of ETSP, please refer to the ETSP manual.) 8. 1st, 2nd DNS server address To map between IP address and domain name, you should enter you DNS server address. If a user set the DNS server into camera, users can configure SMTP server, FTP server, NTP server with its domain name.
WIRELESS NETWORK IP CAMERA User’s Guide IP address is when you want to access your network over the internet. The solution to the dynamic IP address problem comes in the form of a dynamic DNS service. (Please refer to the “APPENDIX” for the details.) 12. ID, password Enter the ID and Password to find the registered IP Network Camera in DDNS server. 13. Host Name Enter the Host Name to find the registered IP Network Camera in DDNS server. 14. DDNS manual update You can update the DDNS service manually. 15.
WIRELESS NETWORK IP CAMERA User’s Guide Wireless Configuration This screen is used to configure wireless setting to match with your Access Pointer for the wireless network connection. Wireless Setup 1. Use the connection Mode to determine the type of wireless communication for the Wireless Network IP Camera. There are two choices of infrastructure mode and Adhoc mode. The default setting for the connection mode is Infrastructure. 2.
WIRELESS NETWORK IP CAMERA User’s Guide Security settings: Wireless network communications are easily intercepted. WEP (Wired Equivalent Privacy) is an encryption method specified by the IEEE 802.11b standard to make any intercepted communications extremely difficult to interpret by unauthorized parties. Encryption (WEP): Intellinet IP camera adopts ASCII input format as a default WEP key format. ASCII format causes each character you type to be interpreted as an eight-bit value.
WIRELESS NETWORK IP CAMERA User’s Guide Wireless Network IP Camera is to be connected under Infrastructure mode. Your PC/ Notebook’s encryption code also needs to be setup the same with the Wireless Internet Camera’s encryption code under either Infrastructure mode or Ad-hoc mode. The default setting for the Encryption Key is “Disable” therefore, to secure the wireless transmission be sure to Enable the Encryption Key by entering the relevant data.
WIRELESS NETWORK IP CAMERA User’s Guide 42
WIRELESS NETWORK IP CAMERA User’s Guide User Configuration This screen is used to configure IDs and Passwords for an administrator and up to 5 users. 1. User Account There is one administrator account and 5 user accounts. Account names can be changed. 2. Password If you want to open your Wireless Network IP Camera to everyone, you may not change default user’s ID and Password, However you should change administrator’s ID and Password with unique Ones of yours. 3.
WIRELESS NETWORK IP CAMERA User’s Guide Event Trigger Configuration This screen is used to designate an Email address or FTP server to receive captured images by setting SMTP or FTP settings. You may connect external devices such as infrared Sensor or Alarm Sensor to use with the provided terminal block (please refer to Appendix F – The I/O Connector). 1. Trigger Condition This is to select option how to send an event signal to Wireless Network IP Camera.
WIRELESS NETWORK IP CAMERA User’s Guide ② Motion Detection from…… This is to detect motion from camera by S/W data comparison. When you select “Motion detection”, the Wireless Network IP Camera detects a motion triggered by camera lens. To detect motion the camera compares a previous image from present image. When the motion is detected, the camera recognizes the data changing through comparing the previous image data with present one.
WIRELESS NETWORK IP CAMERA User’s Guide 2. Image capture option This is to configure image capture option when an event is triggered. ① Before Event You may set the starting time to capture image before event is triggered. (Input limitation is from 0 to 21 seconds.) ② After Event You may set the finishing time to capture image after event is triggered. (Input limitation is from 0 to 21 seconds.) ③ Image capture frame rate Set the frame rate from 1 to 15fps when the image is being captured.
WIRELESS NETWORK IP CAMERA User’s Guide 3. Trigger Output This is to configure digital output states and control script. Wireless Network IP Camera sends captured image via E-mail or FTP server when connected external sensors detect events. ① External devices signal output This is to supply voltage to output port when events are triggered. (This option is only activated when you select “Activation of digital output” option in previous “Trigger Condition” option.
WIRELESS NETWORK IP CAMERA User’s Guide Time Configuration This screen is to configure date and time. 1. Synchronized with NTP server The Wireless Network IP Camera automatically configures Date & Time through the NTP (Network Time Protocol) server. The NTP Server is based on Greenwich time. Select NTP server, IP address and Time zone to set the date and time automatically, then press, “SUBMIT”.
WIRELESS NETWORK IP CAMERA User’s Guide NOTE Wireless Network IP Camera does NOT support RTC(Real Time Clock), in case you choose “Set manually” option, Wireless Network IP Camera reinstate as default value “2001/01/01 00:00:00”. To configure Date & Time, it must be reconfigured.
WIRELESS NETWORK IP CAMERA User’s Guide System Configuration This screen is used to configure camera name, location, and image sensor oscillator for frequency, PTZ control and System information for Wireless Network IP Camera. 1. Camera name This is to configure camera name for the front-page view. Camera name should be composed within 15 bytes. 15 bytes are equal to 15 bytes English characters. 2. Camera location This is to configure camera location for the front-page view.
WIRELESS NETWORK IP CAMERA User’s Guide User can access the camera image via HTTP directly. 5. Image file name (max 10 characters) Set the image file name. 6. PTZ control This is to configure PTZ control mechanism of Wireless Network IP Camera. You may select PTZ control enable or disable. 7. PTZ controller Section This is to choose the PTZ controller connecting to the Wireless Network IP Camera. 8. System Information This is to check system information for Wireless Network IP Camera.
WIRELESS NETWORK IP CAMERA User’s Guide PTZ CONTROL This screen is to control PTZ function. This PTZ control box may be activated only if PTZ external devices are connected to Wireless Network IP Camera and configure PTZ control enable in System Configuration screen. Zoom In Up Zoom Out Right Right Focus In Down Focus Out NOTE All function is working while you pressing button. For example, while you are pressing the right button, Wireless Network IP Camera is moving to right.
WIRELESS NETWORK IP CAMERA User’s Guide APPENDIX A. Technical Specifications Image Resolution: 640x480, 320x240, 160x120 Standard JPEG Compression – 10 levels of compressions Network 10baseT Ethernet or 100baseTX Fast Ethernet Twisted pair category 5 cables, Standard RJ45 connector Supporting protocol: TCP/IP, UDP, PING, ARP, FTP, TFTP, and HTTP Configuring is achieved by private setup program and Web server built in administration page.
WIRELESS NETWORK IP CAMERA User’s Guide Under 6W power consumption System Requirements Operating systems: Windows 9x, Windows NT/2000, Linux, Unix, Mac, etc. Internet Explorer 4.0 or higher. JAVA applet for no PC user (Mac or Unix) I/O Connector D-sub 9pin RS232 connector 1 Input to trigger the camera on external events.
WIRELESS NETWORK IP CAMERA User’s Guide B. Frequently Asked Question (FAQ) Asks for the features 1. What is a Network IP camera? A Network IP Camera is a stand-alone device which allows a user to view live, full motion video from anywhere on a computer network, even over the Internet, using a standard web-browser. 2. Are all Network IP cameras the same? No, some network cameras have an embedded OS (operating system) as well as an embedded Web server.
WIRELESS NETWORK IP CAMERA User’s Guide 7. What additional software is required? Networking IP Cameras with an embedded Operating System (OS) should not need any additional software. 8. How does the built-in motion detection work? It very simply compares what it sees now to what it saw in the last frame and based on a sensitivity you select will trigger an event.
WIRELESS NETWORK IP CAMERA User’s Guide C. Trouble Shooting This appendix provides useful information to help you to resolve any difficulty you might have with your Wireless Network IP Camera. Fault symptoms, possible causes and remedial actions are provided within a quick reference table.
WIRELESS NETWORK IP CAMERA User’s Guide The Power LED is not The IP address constantly lit located within different subnet Other problems is Run the PING utility (as described in PINGing Your a IP Address, on page 39), If the utility returns “no response” or similar, the diagnosis is probably correct – you should then proceed as follows In Windows 95/98 or Windows NT, check the IP address for your Wireless Network IP Camera is within the same subnet as your workstation: 1.
WIRELESS NETWORK IP CAMERA User’s Guide Direct exposure to extreme sunlight or halogen light may cause serious damage to the CMOS sensor. Reposition your Wireless Network IP Camera into a more shaded location immediately. Note: damage caused to Wireless Network IP Camera through over exposure to direct sunlight or halogen light is not covered under the product warranty. Focus has not been Adjusting the camera manually till the image views correctly adjusted clear.
WIRELESS NETWORK IP CAMERA User’s Guide D. Utilizing IP Addresses on Local Network Introduction Access to the Internet is achieved via Internet IP addresses. Currently, IP addresses are limited. There are 5 classes of networks, and each network contains IP addresses. A network can only hold a limited number of IP addresses. The number of IP addresses depends on the network class. The 5 classes are labeled “A” through “E” with the most common one being the “C” class network.
WIRELESS NETWORK IP CAMERA User’s Guide C Class Network 1. Features of Addresses IP address: The three-digit number in room ‘X4’ is for the Host ID. The number ranged from 0 to 255. Among the numbers, 0 is used for Network ID, 1 is used for Router IP (Gateway address) and 255 are used for Broadcast address. The number from 2 to 244 are IP addresses that can be assigned to Wireless Network IP Camera, PC etc. Network ID: Identifies a network. Generally the first number assigned is Network ID.
WIRELESS NETWORK IP CAMERA User’s Guide ③ To use as three sub-networks (1/4 + 1/4 + 1/2) Sub-Network ID: xxx.xxx.xxx.0 Gateway Address: xxx.xxx.xxx.1 Subnet Mask: 255.255.255.192 Broadcast Address: xxx.xxx.xxx.63 IP Addresses: xxx.xxx.xxx.2 – xxx.xxx.xxx.62 Sub-Network ID: xxx.xxx.xxx.64 Gateway Address: xxx.xxx.xxx.65 Subnet Mask: 255.255.255.192 Broadcast Address: xxx.xxx.xxx.127 IP Addresses: xxx.xxx.xxx.66 – xxx.xxx.xxx.126 Sub-Network ID: xxx.xxx.xxx.128 Gateway Address: xxx.xxx.xxx.
WIRELESS NETWORK IP CAMERA User’s Guide IP Addresses: xxx.xxx.xxx.130 – xxx.xxx.xxx.190 Sub-Network ID: xxx.xxx.xxx.192 Gateway Address: xxx.xxx.xxx.193 Subnet Mask: 255.255.255.192 Broadcast Address: xxx.xxx.xxx.255 IP Addresses: xxx.xxx.xxx.194 – xxx.xxx.xxx.
WIRELESS NETWORK IP CAMERA User’s Guide E. Updating Firmware CAUTION This process to update the current firmware is already installed into your Wireless Network IP Camera If you are to begin the process, follow the instruction as manual. And during the process, do not give physical shock nor disconnect network and power. Otherwise, your Wireless Network IP Camera can be damaged seriously, which may result inappropriate operation or operation failure.
WIRELESS NETWORK IP CAMERA User’s Guide ① Confirm that the Wireless Network IP Camera is connected to your PC. (As long as you can access your Wireless Network IP Camera Homepage, you can process upgrading) ② Execute the newly updated firmware. ③ Enter Camera’s IP address, Upgrade port number, Admin ID and Password configured on the Network Configuration page. And then press “start upgrade” button. You may see the upgrading status.
WIRELESS NETWORK IP CAMERA User’s Guide F. The I/O Connector The I/O Connector provides the physical interface to a digital output, and a single digital photocoupled input that is used for connecting a variety of external alarm devices to the Wireless Network IP Camera; including, IR-sensors, switches and alarm relay. In combination with the configurable alarm facilities, you can quickly develop a variety of security applications that are triggered on time – or alarm based – events.
WIRELESS NETWORK IP CAMERA User’s Guide G. RS 232 CABLE The Serial Connector In absence of a local network connection, the RS232 serial connector provides a physical interface for connecting a PTZ devices or computer to Wireless Network IP Camera. This means that Wireless Network IP Camera can operate as a standard unit -independent of any computer network. Users can connect to Wireless Network IP Camera by external mode.
WIRELESS NETWORK IP CAMERA User’s Guide H. Dynamic Domain Name Server (DDNS) Your internet Service Provider (ISP) provides you at least one IP address which you use to connect to the Internet. The address you get may be static, meaning it never changes, or dynamic, meaning it’s likely to change periodically. Just how often it changes, depends on your ISP.
WIRELESS NETWORK IP CAMERA User’s Guide How to use ODS DDNS service 1. Get access to ODS homepage (www.ods.org). 2. In case you didn’t register your ID, you should select ‘REGISTER’ menu and then register your ID/ Password. Otherwise, you just login with registered ID/Password. 3. After you register ID/Password normally, you can see ‘Manage’ page.
WIRELESS NETWORK IP CAMERA User’s Guide If you want to use normal DDNS service among many services, you should fill in the blanks in a check box and then click “Add Host” button. ① Host: write name you want. ② Domain: Select domain you want. ③ Type: Select ‘A’ (‘A’ is normal) ④ Target: Write initial IP of equipment but just write any IP address that is in the form of “xxx.xxx.xxx.xxx” ⑤ TTL Priority: Do NOT select. This is option. If you want to select “intellinet.dyndns.
WIRELESS NETWORK IP CAMERA User’s Guide How to use DynDNS DDNS server 1. Get access to Dyndns homepage (www.dyndns.org). 2. In case you didn’t register your ID, click “Sign Up Now” and then register your ID. Otherwise, you just login with registered ID.
WIRELESS NETWORK IP CAMERA User’s Guide 3. Click “Add Host”, and then go to the next page.
WIRELESS NETWORK IP CAMERA User’s Guide 4. Enter Domain name you want and just leave other items, and then Click “Add Host” button to register. If you want to know detail of each field, please refer to FAQ of each homepage. 5. You may see this page that shows setting information.
WIRELESS NETWORK IP CAMERA User’s Guide DDNS registration for the Wireless Network IP Camera 1. After you set ODS or DynDNS successfully, you should move administration -> network configuration. 2. In DDNS Registration item, select DDNS server (ODS or Dyndns) you want. Enter ID/Password that you registered and fill domain name that you set in each homepage. (ex: intellient.ods.org) Before DDNS setting, you should register ID/ Password and domain name in ODS or Dyndns DDNS service. 3.
WIRELESS NETWORK IP CAMERA User’s Guide I. High Speed Solutions This information is to help you access high-speed Internet services such as xDSL or a cable modem connection. However, most high-speed Internet Services provide you with some external IP addresses, there are several practical issues that should be considered.
WIRELESS NETWORK IP CAMERA User’s Guide Another solution is to use one of several small routers/firewalls currently available on the market. These provide the necessary NAT functionality and allow complete independence for your PC, which can be switched off or rebooted without affecting the image transmission from your Wireless Network IP Camera.
WIRELESS NETWORK IP CAMERA User’s Guide J. Reinstating the Factory Default Settings This information explains instructions in detail on how to set the default settings in the Wireless Network IP Camera. In certain circumstances it may become necessary to restart or reinstate the Factory Default settings for your Wireless Network IP Camera: This is performed by pressing the Reset Button, or using Hyper Terminal Setting.
WIRELESS NETWORK IP CAMERA User’s Guide NOTE Reinstating the original default settings will cause all parameters (Including IP address) to be reset. Factory default setting Administrator ID: admin Administrator Password: admin Guest ID: guest Guest Password: guest IP Address: 192.168.1.221 Subnet Mask Address: 255.255.255.0 Gateway Address: 192.168.1.1 Server IP Address: 192.168.1.
WIRELESS NETWORK IP CAMERA User’s Guide K. Glossary of Terms ActiveX – A control (or set of rules) used by a browser. ActiveX controls are often downloaded and installed automatically as required. ARP – Address Resolution Protocol. A method for finding a host's Ethernet address from its Internet address. The sender broadcasts an ARP packet containing the Internet address of another host and waits for it (or some other host) to send back its Ethernet address.
WIRELESS NETWORK IP CAMERA User’s Guide HTML - A markup language used to structure text and multimedia documents and to set up hypertext links between documents, used extensively on the World Wide Web. HTTP - A protocol used to request and transmit files, especially WebPages and WebPages components, over the Internet or other computer network. Intranet - A privately maintained computer network that can be accessed only by authorized persons, especially members or employees of the organization that owns it.
WIRELESS NETWORK IP CAMERA User’s Guide track of the individual packets of information and IP contains the rules for how the packets are actually sent and received. URL – Uniform Resource Locator. An “address” on the network. WAN – Wide–Area–Network. A communications network that uses such devices as telephone lines, satellite dishes, or radio waves to span a larger geographic area than can be covered by a LAN. Wizard – A program designed specifically to guide the user through a procedure.
WIRELESS NETWORK IP CAMERA User’s Guide www.intellinet-network.