RACKMOUNT CONSOLE KVM SWITCH QUICK INSTALLATION GUIDE MODELS 521796, 521871, 523561 & 523578 INT-521796/521871/523561/523578-QIG-0307-01
INTRODUCTION Thank you for purchasing the INTELLINET NETWORK SOLUTIONS™ Rackmount Console KVM Switch, Model 521796 (15” LCD, 8-port); Model 521871 (15” LCD, 16-port); Model 523561 (17” LCD, 8-port); or Model 523578 (19” LCD, 8-port). With a keyboard mouse, LCD panel and KVM switch module housed in an industrystandard 19” 1U- or 2U-height rack drawer, the console saves you up to a third of the space needed for a rack cabinet.
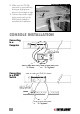
CONSOLE ASSEMBLY Parts Three-Section Console: A. 1U slide drawer touchpad and LCD monitor. with keyboard, B. 1U or 2U KVM Switch Module. C. Rear bracket and extension kit. Rear Bracket and Extension Kit: Each Rackmount Console KVM Switch features a rear bracket and extension kit, which includes two pieces of rear brackets and two pieces of extensions. The enclosed kit fits cabinet depths of 67.5 – 80.5 cm (26 5/8 – 31 5/8”), as measured between the inside of a rack cabinet’s front and rear uprights.
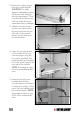
2. Remove the safety stopper from the console drawer. CAUTION: The safety stopper is designed to prevent the drawer from sliding out during transportation: Once it’s removed, the drawer may slide out when tilted and cause serious injury or damage. 3. Slide the console drawer into the rack cabinet from the front and insert the two slide rails of the console drawer into the sleeves of the rear brackets. 4. Fasten the console drawer to the outside of the front vertical uprights using the four screws provided.
6. Attach the extensions (from the rear bracket and extension kit) to both sides of the KVM switch module. NOTE: For a 2U module (Model 521871), the extensions are mounted to the lower half of the module. In the inset at right, you can also see that the wider lip is the top of the plastic extension. 7. The rear brackets, extensions and slide rails need to fit tightly. As shown above-left, slide the rear brackets onto the extensions.
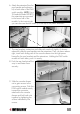
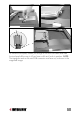
10. Make sure the CEN36 connector is secured firmly, leaving a slight gap as shown in the image at right. connectors are firmly mated 11. Connect the power supply to the power jack on the KVM switch module to complete the installation.
Console Panel The console panel of the Rackmount Console KVM Switch is located along the top of the keyboard. The image below represents the console panel for Models 521796 and 521871. 5 4 6 7 8 9 10 The image below represents the console panel for Models 523561 and 523578. KVM Control and Status Indicators: NOTE: This section is effective only when a KVM switch module is connected. 1. Computer Selection Pad — Press one of these buttons to select a computer.
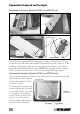
Replaceable Keyboard and Touchpad Replaceable Keyboard (Models 523561 and 523578 only): Triangular mark The keyboard is replaceable for language change or maintenance. Tilt it up, locate the mini-USB cable underneath the keyboard and gently unplug it. While installing a keyboard, make sure that you extend just enough of the cable to keep the keyboard flat inside the tray. NOTE: The triangular mark on the miniUSB connector must face out, as shown in the magnified image above.
Triangular mark To install the touchpad, extend just enough of the mini-USB cable and slide the touchpad all the way in till you hear a click as it locks in position. NOTE: The triangular mark on the mini-USB connector must face out, as shown in the magnified image.
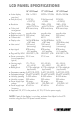
LCD PANEL SPECIFICATIONS • Active display area (mm) • Pixel pitch (mm) • Resolution • Color pixel arrangement • Display mode • Brightness (cd/m^2) • Contrast ratio • Display color 15” LCD Panel 17” LCD Panel 19” LCD Panel 304.1 x 228.1 337.92 x 270.336 376.32 x 301.056 0.297 (H) x 0.297 (V) 1024 x 768 @ 60/70/75 Hz RGB vertical strip 0.264 (per triad) x 0.264 1280 x 1024 @ 60/70/75 Hz RGB vertical strip 0.294 (H) x 0.
NOTES 11
www.intellinet-network.com Are you completely satisfied with this product? Please contact your INTELLINET NETWORK SOLUTIONS™ dealer with comments or questions. Copyright © INTELLINET NETWORK SOLUTIONS All products mentioned are trademarks or registered trademarks of their respective owners.