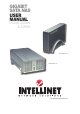
Gigabit SATA NAS user manual Models 505888 & 505895 Model 505888: 1.
Thank you for purchasing the INTELLINET NETWORK SOLUTIONS™ Gigabit SATA NAS, Model 505888 (1.5 TB) or Model 505895 (3 TB). Either model provides an easy solution for home and office users who require the benefits of the 3 S’s: speed, streaming and abundant storage space. You can install a SATA hard drive — up to 1.5 TB for Model 505888 and up to 3 TB for Model 505895 — for extremely fast access to data storage on your network. If more space is needed, you can connect two additional USB HDDs.
table of contents section page 1 HARDWARE............................................4 1.1 Model 505888 / 1.5 TB.....................4 1.1.1 System Requirements................4 1.1.2 Front Panel.................................4 1.1.3 Quick Setup................................4 1.1.4 Hard Drive Installation................5 1.2 Model 505895 / 3 TB........................6 1.2.1 System Requirements................6 1.2.2 Front Panel.................................6 1.2.
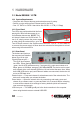
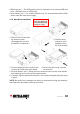
1 hardware 1.1 Model 505888 / 1.5 TB 1.1.1 System Requirements • Computer with Internet browser and network access for setup • Switch or router with one free Ethernet port for the NAS • One 3.5” SATA-I or SATA-II hard drive with 20 GB – 1.5 TB (1.5 Gbps) 1.1.2 Front Panel Two LEDs are positioned behind the frontpanel grille: Blue indicates power is on; red indicates data access. NOTE: This unit doesn’t feature an On/Off switch.
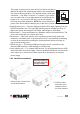
USB device port — This USB type-A port is for connection to an external USB hard drive, USB flash drive or USB printer. Power adapter jack — For external USB devices, it’s recommended that the USB drives have their own power supply. 1.1.4 Hard Drive Installation 1. Remove the 3 screws from the chassis bottom. (Disengage the unit from the stand if it’s attached.) CAUTION! Handle the device very carefully, as some metal edges may be sharp or rough. 2.
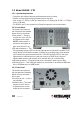
1.2 Model 505895 / 3 TB 1.2.1 System Requirements • Computer with Internet browser and network access for setup • Switch or router with one free Ethernet port for the NAS • One or two 3.5” SATA-I or SATA-II hard drives (1.5 Gbps) with 20 GB – 1.5 TB per drive (3 TB total) • For RAID 0 and 1, two hard drives of identical capacity are recommended 1.2.2 Front Panel The buttons and jacks on the front panel are detailed below from top to bottom.
FAN The jumper is placed on J4 at the factory (as shown at right) so FAN that the fan speed will automatically adjust to the temperature CONNECTION of the device during operation. (The thermal .sensor needs to be connected — see Step 5 of section 1.2.4 .below.) If you prefer, J5 you can set the fan to run at high speed by re-positioning the J4 JUMPER jumper to J5; or you can set the fan to run at low speed by THERMAL SENSOR CONNECTION removing the jumper altogether.
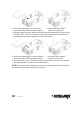
3. Set the first hard drive in the enclosure 4. Secure the drive using 2 and connect the SATA and power cables. screws on each side. 5. Using the tape provided, attach the thermal probe (black and white wire) to the first hard drive. Choose a location between the two drives so the probe won’t be damaged during the installation of the second drive. 6. Set the second hard drive in the enclosure 7. Secure the drive using 2 and connect the SATA and power cables. screws on each side. 8.
2 QUICK INSTALLATION 2.1 Connections & Configuration Following is a quick installation procedure to get you up and running. For further details on each of the settings, refer to subsequent sections in this manual. 1. Install one or two hard drives. Note: Without installing and formatting a drive first, the other functions of the Gigabit SATA NAS will not be available. 2. Connect the Ethernet cable from your network router or switch to the device. 3.
When using Gigabit SATA NAS as a USB drive, eject the external drive from your system, then remove the power adapter from the AC outlet. 2.2.2 Model 505895 / 3 TB To turn the power on, first connect the power adapter to the Gigabit SATA NAS, then plug it into an AC outlet. Press the Power switch. The blue backlight LED will turn on, and the unit will start to boot up. It will take about a minute for the device to go online and be ready. During bootup, the OS LED will be blinking.
3 SYSTEM SETUP / LOGging IN To configure your network drive, open your Web browser, enter the IP address, then use the Web configuration interface for further setup. Options for identifying your device’s IP address once it’s connected to the network are described below. 3.1 PC Login Open the INTELLINET_nas.exe utility on the included CD. This will list the device automatically and allow you to access the Web configuration interface with a simple click of your mouse.
6. When the Step 2: IP Settings screen displays, you can define the name for your device and set up the IP configuration. Selecting “Automatically obtain an IP address (DHCP)” is recommended. When set, click “Next” to continue. 7. When the Step 3: Date and Time screen displays, you can set up the date and time. Select your time zone from the drop-down menu, set the date and the time, then click “Next” to continue. 8.
9. The setup wizard will remind you that the previous settings will now be updated with the new configuration. Click “OK” to finish the setup wizard. Once you’ve identified the IP address (as confirmed above on the Step 4 screen), you can simply enter that into the URL address field of your Web browser to access the Web configuration interface of your device. Note: This option may not work on a Mac. 3.
3. Enter “intellinet.” This is the default name of the Gigabit SATA NAS: If it’s been changed and you don’t know the current correct name, reset the device first to re-establish the default settings. 4. After entering the previous command and pressing the key, it should return an IP address, followed by the name you just entered. intellinet intellinet intellinet 5. Open your Web browser and enter the IP address from the previous step to access the Web configuration interface.
3. Select “Bonjour” and browse for “intellinet.” Click on it to display the Login screen. intellinet 4. The default login is “admin” for both username and password.
4 web configuration Open your Web browser, enter the IP address of your Gigabit SATA NAS (refer to Section 3: System Setup / Logging In) and log in. The default login is “admin” for both the username and the password. The initial screen that displays presents four primary menu options: Basic, Control Panel, Personal Information and Log Out. Basic — The settings in this menu are aimed at the user who wants to quickly set up the LAN disk and share files on the local network.
• Mac users, follow the setup wizard step below to quickly prepare your network drive for file sharing. 1. Select your preferred language for the Web interface from the drop-down list. 2. Set a new password for the Web configuration interface (not required, but strongly recommended). 3. If you prefer a different hostname for your NAS, you can change the name here; otherwise, simply use the default name. 4.
also create a private folder for that user and set the quota limit. If there are other users already set up, they can be added to the user account management. 3. If desired, configure the permissions to the shared folder and add or remove other users. 2 4.1.1.3 Add Group This screen lets you quickly add a new group. 1. Enter the group name. 2. Configure which members will be included in this group by adding or removing them from the list. 3.
4.2 Control Panel 4.2.1 Users and Groups In this section, the administrator can manage the users and groups for the NAS. Start by adding your users first, then create the groups and assign the members to their groups. Note: These settings only apply to the network drive, not when the drive is connected to the computer directly via USB. 4.2.1.1 User Management In this section, you can see all existing users for the NAS and manage them by adding or removing them from the list.
adding or removing them from the list. Groups are not required to grant access to the Gigabit SATA NAS, but they’ll help the administrator manage multiple users and easily share a folder among a group of people. Existing Groups — Lists the current groups of the Gigabit SATA NAS. Adding Groups — To add a new group, clear the form by clicking “Clear Form” and enter a new group name. Once done, click “Save” to create the new group.
set a limit for the disk space. For security reasons, the guest access can also be disabled. 4.2.2.2 Share Management In this section, you can manage the shares and access rights. Existing Shares — Lists the current shares on the NAS. Adding Shares — To add a new share, clear the form by clicking “Clear Form” and enter a new share name. Once done, click “Save” to create the new group.
Select the new group from the existing shares list; then, depending on how you share the files, click “Windows, FTP Access” or “NFS Access” and add the users or groups that will have access to this share. You can allow access for all users or define each user and group separately. Names with an “@” for the first letter are groups. Modifying Shares — Select the share from the existing shares list and modify the access rights by clicking “Windows, FTP Access” or “NFS Access” for further settings.
4.2.3.1 LAN Settings In this section, you can define the hostname for the NAS and set up the IP configuration. Selecting “Obtain IP/DNS address automatically” is recommended. When selecting a hostname, make sure to use a unique name and not one that has already been used on the local network. If required, you can also set the individual addresses yourself. If you need help in manually filling in these fields, contact your network administrator.
from the drop down list. If the default address at time.windows.com doesn’t work, find a new one and try again or turn off the NTP server and set the time manually. 4.2.3.3 Turn Off Server In this section, you can restart the server or turn off the NAS via the Web browser. Make sure that nobody is accessing the device when you restart it or turn it off. Click “Restart” to restart the server. The system will restart and automatically prompt you for the login when it’s ready.
4.2.4 Network Service In this menu, you can enable or disable network services like the DHCP server, Bonjour and the BitTorrent download service. 4.2.4.1 DHCP Server In this section, you can enable and set up the DHCP server. In general, there is already a DHCP server on the local network, so you don’t need to enable this; but if required, enable it and configure the addresses. Once you’ve set everything up, click “Save” to start the DHCP server and save the settings. 4.2.4.
4.2.4.3 BitTorrent In this section, you can manage your torrents and add new downloads to the queue. Before you add the first job, set a limit for the download and upload speed based on your network’s bandwidth. After changing the settings, click “Save” to apply the new configuration. NOTE: If there is no hard drive installed or if the drive isn’t formatted, this menu is not available. To start downloading files, you need to download a torrent file from the Internet first, then upload it to the NAS.
4.2.5 Maintenance In this menu, you can format the hard drive(s), upgrade the firmware and manage the configuration settings. 4.2.5.1 Disk Utility This utility can be used to format the hard drive(s) and view related disk information. Encryption — The Gigabit SATA NAS supports 128-bit loop-AES encryption for the EXT2 file system. When enabled, the drive needs to be formatted again, and you’ll be prompted for a password (which has to be exactly 20 characters). File System (Model 505888 / 1.
Detail — Click “Detail” to see additional disk information. If the drive supports S.M.A.R.T, it will also report the disk’s health status. HDD Power Management — To save power and reduce heat, you can let the hard disk spin down if not used for a certain amount of time. Enter a time in minutes and click “Save” to apply the new setting. NOTE: The “disk spin down” function might not work properly for some WD hard drives due to the lack of the E3h command. 4.2.5.
hard drives fails, it can be replaced and the data rebuilt. JBOD — Used to combine two hard drives of different capacity into a single, larger hard drive. If you’re using two identical drives, RAID 0 is recommended instead. Note: Creating the RAID system can take awhile, depending on drive capacity. Do not turn off power or interrupt the system in any other way during this process! The use of the EXT2 file system for optimum performance and functionality is recommended.
4. Depending on capacity, rebuilding can take awhile. Do not turn off the power or interrupt the system in any other way. The HDD LED will be on while the RAID array is being rebuilt.
5. When the procedure is complete, the HDD LED will turn off and the disk status will show that the system is ready. Note: Clicking “Remove system data” or “Remove raid system” will erase all data! Only use these if you need to set up a different RAID system. 4.2.5.3 Firmware Upgrade In this section, you can check the current firmware version and upgrade if a new one is available. Download the latest firmware and store it on your computer, then browse for the *.gz file, select it and start the upgrade.
Note: Never turn off your device during the firmware upgrade procedure, as this may damage it. If for any reasons (e.g., power supply failure during the firmware upgrade) the procedure fails, you may not be able to operate your device anymore. 4.2.5.4 Save Configuration For backup and before every firmware upgrade, you can use this function to save the current configuration. Click “Save” and save the “config.tar” file on your computer. 4.2.5.
4.2.5.6 Factory Reset Clicking “Factory Reset” will restore all settings to their default configuration. First, however, save your current configuration in case you want to restore it again later. Note: When “Factory Reset” is clicked, all users, groups and other configurations will be lost. The files inside the shared folders won’t be erased, but only the administrator will have access to them via an SMB connection, unless the same share name is set up again and access is granted for new users.
4.3 Personal Information 4.3.1 Account In this menu, you can change your admin password and the menu language for the configuration interface. An overview of disk usage and a share list are also presented.
5 network storage To access the data on the Gigabit SATA NAS via the network connection, you can use either FTP or SMB. Before you can access the shared folders, you need to set up your users, groups and shares (see Section 3). 5.1 File Access on a PC 5.1.1 FTP Open Windows Explorer and enter “ftp://” followed by the IP address of the Gigabit SATA NAS. Add the username and password in front of the IP address with “@” in between; for example: ftp://demo:demo@192.168.11.21.
5.1.2 Windows Explorer Open Windows Explorer and enter “\\” followed by the IP address of the Gigabit SATA NAS; for example: “\\192.168.11.21.” All available folders and shares on the NAS will display, which you can then access directly. You can copy files to the network storage as if it were a folder on your local drive. Depending on the bandwidth, you can also directly play and open the files, although transferring the data to your local drive first is recommended. Gigabit SATA NAS 5.1.
2. Follow the setup wizard on-screen instructions and fill in the path to your NAS. When entering the IP address, also add the folder; for example, “\\192.168.11.21\ public.” Alternatively, you can find the shares by clicking “Browse” to locate the folder. 3. Once the drive’s been mapped, you can find and access it under My Computer. This link will still be there even after rebooting your operating system if you’ve selected “Reconnect at logon.
5.1.4 Disconnecting a Network Drive When you don’t need a mapped network drive anymore, disconnecting it is recommended. It is also necessary to disconnect a temporary network drive when you try to log in with a new password but have not restarted the computer first. 1. Double-click on My Computer, go to the Tools menu and select “Disconnect Network Drive….” 2. Select any temporary or mapped network drives you want to remove, then click “OK.
5.2 File Access on a Mac 5.2.1 SMB To mount and access the network storage, open your Finder, click “Go” and choose “Network.” Browse for your network drive and click on it to access the folder. Or use the “Connect to Server” command. 1. Click “Go” and choose “Connect to Server.” 2. Enter “smb://” followed by the IP address of your Gigabit SATA NAS, or click “Browse” to locate the folder on your network. Click “Connect” once the server address has been entered. 3. When prompted, choose a folder.
5.2.2 FTP The FTP utility on the Mac will be able to read the data on the network drive, but you can’t upload new data to the drive. To do that, you need to install a dedicated FTP application, which can either be a free utility or a professional shareware program. 1. Click “Go” and choose “Connect to Server.” 2. Enter “ftp://” followed by the IP address of your Gigabit SATA NAS. Click “Connect” once the server address has been entered. 3. When prompted, choose a folder.
6 Additional features 6.1 UPnP The Gigabit SATA NAS supports UPnP v1.0. To access the device on a PC, go to My Network Places, where the NAS will be listed as a UPnP device. You can select it and access the configuration page. Note: There’s no need to configure anything: This function is turned on by default and other devices will be able to recognize it automatically. 6.
6.2.1 iTunes When the iTunes support for Bonjour is enabled, the Gigabit SATA NAS will appear as a shared music folder in your iTunes library. Store your MP3 files in the music folder of the Gigabit SATA NAS and play them over the network. 1. Make sure the support for iTunes in the Bonjour menu is enabled. 2. Store your MP3 files in the music folder of the NAS. The folder’s already been created in “/public/music.
3. Start iTunes and the Gigabit SATA NAS will appear as a shared device. 6.3 USB Drive USB drives connected to the network drive can be shared and accessed on the network. Plus, instead of a network drive, the NAS can be used as a USB drive. 6.3.1 Sharing a USB Drive A USB drive with the file system FAT32 or NTFS that is connected to the NAS can be shared and accessed over the network via SMB or FTP.
Connect the USB drive to the Gigabit SATA NAS and go to My Network Places. The external drive will show up as “usb1,” and you can access it to transfer files without further login. Before disconnecting it, go to the Disk Utility menu and click “Unmount” to eject the drive. Note: To access the USB drive via FTP, leave the “md1” directory and you’ll find the “usb1” folder in the root directory. 6.3.2 The NAS as a USB Drive (Model 505888 / 1.
USB drive. When connected directly to the computer via USB, all data can be accessed and modified! Note: The Gigabit SATA NAS has to be turned off to change it from acting as a USB drive to a network drive and vice versa. When both USB and Ethernet cables are connected, the USB connection has priority and the NAS will act as a USB drive until disconnected and restarted. 6.
Printing via the shared network printer will be slower than when the printer is connected directly to the USB port on the computer. After you click “Print,” wait for the printer to receive the data. 1. Connect your USB printer to the USB host port on the Gigabit SATA NAS and turn both devices on. 2. Log in to make sure the printer server is enabled and the printer has been recognized. Once these initial steps are complete, refer either to Section 6.5.1: Installation on a PC or Section 6.5.
4. When the Local or Network Printer screen displays, select “A network printer…” and click “Next.” 5. When the Specify a Printer screen displays, select “Connect to this printer…” and click “Next.” 6. When the Browse for Printer screen displays, find the Gigabit SATA NAS in the Shared Printers list, select “lp” and click “Next.
7. When the next screen displays, select your printer from the list or browse for the corresponding driver on your local drive. Click “OK” to complete the procedure. Your printer is now set up. 6.5.2 Installation on a Mac 1. Go to Applications and open the Printer Setup Utility in the Utilities folder.
2. When the Printer Browser screen displays, click “More Printers.” 3. Use the Windows Printing and the Workgroup drop-down menus to display the Gigabit SATA NAS in the window. Select it and click “Choose.
4. When prompted, enter a name and password — either as an administrator or user — and click “OK.” 5. Select the lp printer from the list, then find the corresponding printer model to install the correct printer driver. Click “Add.” 6. A Printer List screen should display with your selectionin the list, indicating that your printer is now set up.
6.6 BitTorrent Used in conjunction with its built-in BitTorrent client, the Gigabit SATA NAS can be set to download media files from the Internet and have them saved directly to the internal SATA hard drive. You can then turn off your computer. The BitTorrent client on the NAS uses the TCP protocol and ports 6881-6889. Make sure those ports are not blocked by your router: If necessary, set up port forwarding so that the traffic for those ports is forwarded to your NAS.
The file is now being downloaded (as indicated by the updated information in the Percentage and Download columns below) and, if you like, you can turn off your computer. Remember to start the download process again if the Gigabit SATA NAS has been turned off or rebooted before the file has been downloaded completely. Once the file has been downloaded, you can delete it from the download list and access the media file on your Gigabit SATA NAS. All files will be stored in the “/public/btdownload” folder.
7 glossary BitTorrent — This is a peer-to-peer (P2P) file distribution client application, and also refers to its related file-sharing protocol. BitTorrent is designed to distribute large amounts of data widely without incurring the corresponding consumption in costly server and bandwidth resources. EXT2 — The ext2, or second extended, file system is a file system found mostly on Linux operating systems. This is the recommended file system for the Gigabit SATA NAS network drive.
8 Frequently asked questions Q: Why aren’t some of the functions and menus available? A: The functions of the Gigabit SATA NAS require that a hard drive be installed. Make sure you have a hard drive installed and that it is formatted, preferably using EXT2. Q: I lost my password. What do I do? A: Press the Reset button and hold it for 5 seconds to reset the NAS to its default settings. The default login is “admin”/”admin.
Q: Which file system is recommended for the internal hard drive? A: If the device is mainly used as network drive, using the EXT2 file system is recommended. When the drive is also often used as a USB drive, the most suitable file system will depend on the operating system. NTFS is most suitable for Windows, and FAT32 offers the best compatibility. Q: Why doesn’t the connected the USB cable show up on my computer? A: If the device is currently used as a network drive, it has to be restarted first.
9 specifications Model 505888 / 1.5 TB Standards • IEEE 802.3 (10Base-T Ethernet) • IEEE 802.3ab (Twisted Pair Gigabit Ethernet) • IEEE 802.3u (100Base-TX Fast Ethernet) General • LAN: RJ45 10/100/1000 Mbps data port • USB: one Hi-Speed USB 2.0 USB type-A port for external USB hard drive, USB flash drive or USB printer • USB: one USB type-B port for host connection to computer when using the device as an external USB HDD • Data throughput: up to 25 MBps (FTP, read) • Internal hard drive: – Design: 3.
• Disk space usage (quota) management • Supported network clients: Windows, Linux, Mac OS Environmental • Dimensions: 237 (l) x 137 (w) x 42 (h) mm (9.33 x 5.39 x 1.54 in.) • Weight: 1.65 kg (3.6 lbs.) • Operating temperature: 5 – 40°C (41 – 104°F) • Operating humidity: 5 – 90% RH, non-condensing • Storage temperature: -20 – 70°C (-4 – 158°F) Power • External power adapter: 12 V DC, 2.0 A • Power consumption: – 12.4 Watts maximum with HDD active – 1.
• • • • iTunes server: – iTunes version mt-daapd-0.2.4 – Maximum connection limit: 8 FTP server max. connection limit: 8 Samba server: – Version samba-3.0.
safety & compliance statements FCC Part 15 This equipment has been tested and found to comply with the limits for a Class B digital device, pursuant to Part 15 of Federal Communications Commission (FCC) Rules. These limits are designed to provide reasonable protection against harmful interference in a residential installation.
recycling of materials will help to conserve natural resources. For more detailed information about recycling of this product, please contact your local city office, your household waste disposal service or the shop where you purchased this product. In countries outside of the EU: If you wish to discard this product, please contact your local authorities and ask for the correct manner of disposal.
INTELLINET NETWORK SOLUTIONS™ offers a complete line of active and passive networking products. Ask your local computer dealer for more information or visit www.intellinet-network.com. Copyright © INTELLINET NETWORK SOLUTIONS All products mentioned are trademarks or registered trademarks of their respective owners.