HI-SPEED USB 2.
FCC Certifications This Equipment has been tested and found to comply with the limits for a Class B digital device, pursuant to part 15 of the FCC Rules. These limits are designed to provide reasonable protection against harmful interference when the equipment is operated in a commercial environment. This equipment generates, uses, and can radiate radio frequency energy and, if not installed and used in accordance with the instruction manual, may cause harmful interference to radio communications.
1. Unpacking Information Thank you for purchasing the USB to Gigabit Ethernet adapter. Before you start, please verify that your package contains the following items: 1. One USB to Gigabit Ethernet Adapter. 2. One driver & manual CD 2. Overview 2.1 Introduction This USB to Gigabit Ethernet adapter is a cost-effective solution that converts a USB port into a 10/100/1000 Base-T Ethernet port.
2.2 Key Features Complies with IEEE 802.3 10BASE-T standard Complies with IEEE 802.3u 100BASE-TX standard Complies with IEEE 802.3ab 1000BASE-T standard Compliant with USB 1.1 and 2.0 standards Complies with IEEE 802.3x Flow Control Supports full/half duplex operation Plug and Play Installation Support hot inserting and swapping Automatically negotiates 10/100/1000 Mbps connection rate Support drivers for Windows 7/2003/XP/ Vista/Linux/Mac FCC, CE Class B 2.
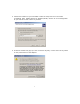
3. Installing the USB to Gigabit Ethernet Adapter 3.1 System Requirements Pentium 166 MMX or above processor-based PC Available USB port Microsoft Windows 7/2003/XP/Vista or Linux or Mac CD-ROM Drive 3.2 Hardware Installation Before installation, check if there is an available active USB port. To check this, go to My Computer > Control Panel > System, then click the Device Manager tab to check if the Universal Serial Bus controller is displayed, as shown below.
3.2.1 Connect the Adapter to your PC 1. Plug the USB adapter into your PC. 2. Windows will detect the new hardware automatically and prompt you for the driver. For driver installation, refer to the chapter “Software Installation.” 3.3 Software Installation After attaching the USB to Gigabit Ethernet adapter to your PC or laptop, the auto-detection for new hardware will be activated automatically.
2. Insert the provided driver CD. Select “Include this location in the search,” then click “Browse.
3. Choose the location of your CD-ROM. Locate the setup.exe file in the folder “D:505932_USB_ Gigabit_Ethernet_Adapter\WinXP,” where “D” is the designation of your CD drive. Click “Next” to proceed. 4. A caution window may pop up. Click ”Continue Anyway.” There won’t be any effect on the performance of the adapter.
5. Click “Finish” to complete the installation and activate the adapter.
3.3.2 Windows Vista setup 1. When the Found New Hardware box appears, close this window. 2. Go to Start Control Panel Hardware and Sound Device Manager. 3. Double-click the “AX178” icon.
4. Click the “Reinstall Driver” button. 5. Select “Browse my computer for driver software.
6. Click the “Browse” button and select Computer your CD-ROM drive “D:505932_USB_ Gigabit_Ethernet_Adapter\Vista,” where “D” is the designation of your CD drive. Click “OK” to proceed. 7. Click “Next” to begin the installation. 8. Wait a few moments while it installs the driver. 9. Click the “Close” button to finish the installation.
3.3.3 Windows 7 Setup 1. Locate the setup.exe file on the included setup CD in the folder “D:505932_USB_ Gigabit_Ethernet_Adapter\Win7,” where “D” is the designation of your CD drive. Double-click the setup icon to begin the installation, then follow the on-screen instructions. When the “Preparing to Install” screen displays, wait a few moments while the installation continues.
2. After the installation is complete, click the “Finish” button.
3.3.4 MAC OS Setup 1. Insert the CD driver into the CD-ROM drive. Go to Computer > CD ROM > “505932_ USB_ Gigabit_Ethernet_Adapter” > Mac. 2. Double-click and run the installation package. 3. When the Welcome screen displays, click “Continue.” 4. When the Select a Destination interface displays, select an install location and click “Continue.
5. Click “Go Back” to change the install location or click “Install” and continue.
6. If prompted, enter your User Name and Password and click “OK.” 7. Click “Continue Installation.
8. Wait a few moments for the installation. 9. After the driver is successfully installed, click “Restart” and the computer will reboot automatically.
4. Product Specifications Standards Interface Cable Connections Network Data Rate Jumbo Frame LED indications Max Power Consumption Temperature Humidity Operation System Emission Weight IEEE802.3, 10BASE-T IEEE802.3u, 100BASE-TX IEEE802.3ab, 1000BASE-T IEEE802.3x Flow control USB 1.1/ 2.0 1*10/100/1000 Mbps RJ-45 port 1*USB type A male connector UTP Category 3,4,5,5e 1000Mbps, 100Mbps, 10Mbps 9k bytes 1* 1000M Link/ACT 1* 10/100M Link/ACT 1* Power 1.