Network IP Camera User’s Guide R1.
NETWORK IP CAMERA User’s Guide FCC Compliance Statement Caution: Any changes or modifications not expressly approved by the party responsible for compliance could void the user’s authority to operate the equipment. NOTE: This equipment has been tested and found to comply with the limits for a Class A digital device, pursuant to part 15 of the FCC Rules. These limits are designed to provide reasonable protection against harmful interference when the equipment is operated in a commercial environmental.
NETWORK IP CAMERA User’s Guide Important Notice 1. Camera surveillance laws may differ for each country. Therefore, please contact the local region first to avoid any surveillance law violations and to apply for authorized purposes only. 2. Network IP Camera is for indoor use. Therefore note that the CMOS lens assembled to the product can be damaged permanently if the camera lens is exposed to direct sunlight. When you place Network IP Camera under the glaring light, we recommend using an iris lens.
NETWORK IP CAMERA User’s Guide TABLE OF CONTENTS 1 PRODUCTION OVERVIEW 6 1.1 ABOUT NETWORK IP CAMERA 6 1.2 MAIN FEATURES AND BENEFITS 7 2 PHYSICAL DESCRIPTION 8 2.1 CONTENTS 8 2.2 TOP VIEW AND DESCRIPTION 9 2.3 REAR VIEW AND DESCRIPTION 10 3 INSTALLATION SUMMARY, CONNECTING & PLACING 11 3.1 INSTALLATION SUMMARY 11 3.2 CONNECTING & PLACING 11 4 ASSIGNING IP ADDRESS & ACCESSING NETWORK IP CAMERA’S HOMEPAGE 12 4.1 ASSIGNING IP ADDRESS 12 4.2 ASSIGNING IP ADDRESS BY USING IP INSTALLER.
NETWORK IP CAMERA User’s Guide 5.1 ADJUSTING THE FOCUS 29 5.2 REPLACING THE LENS 30 6 CONFIGURING ADMINISTRATION TOOLS 31 6.1 ADMINISTRATION TOOLS OVERVIEW 32 6.2 IMAGE CONFIGURATION 33 6.3 NETWORK CONFIGURATION 35 6.4 ADMIN, USER CONFIGURATION 35 6.5 EVENT TRIGGER CONFIGURATION 41 6.6 TIME CONFIGURATION 45 6.7 SYSTEM CONFIGURATION 46 7 PTZ CONTROL 48 APPENDIX 48 A. TECHNICAL SPECIFICATIONS 49 B. FAQ 51 C. TROUBLE SHOOTING 54 D.
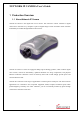
NETWORK IP CAMERA User’s Guide 1 Production Overview 1.1 About Network IP Camera Network IP Camera is the digital web server camera. This innovative camera combines a digital camera and a network savvy computer to put live digital images on-line and make remote locations immediately accessible through standard web browsers.
NETWORK IP CAMERA User’s Guide 1.2 Main Features and Benefits Convenient Operation Network IP Camera does NOT need the extra S/W such as a PC frame grabber nor interact with any other server. The only software needed is Microsoft Internet Explorer 4.x or above and Netscape Network IP Camera 4.x, which has web browser. The only step has to take is to assign a valid IP address.
NETWORK IP CAMERA User’s Guide Complimentary Software IP installer – for quick installation of multiple units Multi-Viewer (for 4 camera View) Active X control (required for Microsoft Internet Explorer) Java Applet for use with Internet Explorer when Active X cannot be used. 2 Physical Description 2.1 Contents Check all items packed inside the box as below.
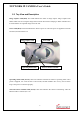
NETWORK IP CAMERA User’s Guide 2.2 Top View and Description Image Capture LED (Red): This LED indicates the status of image capture. Image Capture LED flashes while users are seeing the images from Network IP Camera’s homepages. When it flashes once, it means that the one captured image sent to the user. Power LED (Red): This LED indicates the status of power on. After the power is supplied to Network IP Camera, this Red LED is on.
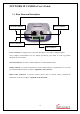
NETWORK IP CAMERA User’s Guide 2.3 Rear View and Description Network Connector RS 232 Connector Power Connector GPIO Connector Power Connector: To supply power to Network IP Camera. Use it with AC Adapter together. You are highly recommended to use AC Adapter provided by your dealer to avoid any possible damage from electric shock. Network Connector: To connect 10baseT Ethernet or 100Fast Ethernet cable. GPIO Connector: To connect external devices such as infrared Sensor or Alarm Sensor etc.
NETWORK IP CAMERA User’s Guide 3 Installation summary, Connecting & Placing 3.1 Installation Summary Connect Ethernet and Power to Network IP Camera on local network for configurations Install a Installation program “IP-Installer” for Network IP Camera in to a PC on local network Assign an IP address to Network IP Camera and configure administrator’s conditions Place Network IP Camera for your purpose, and re-connect power and Ethernet Adjust the Focus 3.
NETWORK IP CAMERA User’s Guide 4 Assigning IP Address & Accessing Network IP Camera’s Homepage 4.1 Assigning IP Address To able to access Network IP Camera, you should assign an appropriate IP Address firstly. Important • Must use the newly assigned IP address, do NOT use occupied IP address, and not use the default or example IP address . • It is highly recommended to assign IP address before you place Network IP Camera on remote place or remote network.
NETWORK IP CAMERA User’s Guide -NOTEIP addresses with any connection If the camera system is connected to the Internet, IP addressing is a potential problem. There are two types of IP address, static and dynamic. Internet access through an ISP (Internet Service Provider) usually means a dynamic IP address, and a static IP address is much more desirable for a camera system. With a static IP address the camera system can be located and viewed by any browser by typing the IP address as the location to open.
NETWORK IP CAMERA User’s Guide 4.2 Assigning IP address by using IP installer. 4.2.1 Connecting Network IP Camera to PC At first, you need to install an IP installation program (IP Installer.exe) on your PC that is connected on the same local network as Network IP Camera.
NETWORK IP CAMERA User’s Guide 4.2.2 IP Installer To install an IP address, you should use the IP Installer provided with Network IP Camera. You can download its program through the web site (http://intellinet-network.com) Note: System required for IP installer; Microsoft Windows9X/NT/2000 4.2.3 Staring a IP Installer Firstly, install an IP-Installer program on your PC that is connected on the same local network as Network IP Camera. And click it.
NETWORK IP CAMERA User’s Guide ④ Enter the IP address, Gateway address, Subnet Mask address, DNS Server address and Server IP address that is assigned from network administrator in blank of “New IP address”, Gateway Address and others. (When the addresses are not assigned properly, you cannot access Network IP Camera remotely. Even on the local network, you are not able to access if you do not assign an IP address to Network IP Camera properly).
NETWORK IP CAMERA User’s Guide 4.3 Assigning IP Address by using Hyper Terminal In case you do NOT assign IP address by using IP Installer, you can assign IP address by using Hyper Terminal. In this case, you should configure Hyper Terminal condition first. 4.3.1 Configuring Hyper Terminal Hyper Terminal is a basic program for Windows 9x/NT/2000. PC can communicate with external devices through the serial port by using this program.
NETWORK IP CAMERA User’s Guide ③ Configure bit/sec as 38400 and leave others as default values. ④ The panel shows up like on the right side when you configure properly.
NETWORK IP CAMERA User’s Guide 4.3.2 Assigning IP Address Follow the below steps to assign IP address by using Hyper Terminal ① Execute “Hyper Terminal” on your PC ② Connect RS232 Cable to the serial port of PC that you have selected in ‘4.3.1 Configuring Hyper Terminal’ and Network IP Camera serial port while Hyper Terminal is executed. ③ Supply the power to Network IP Camera.
NETWORK IP CAMERA User’s Guide Here, inet on ethernet (e), host inet (h) and gateway inet (g) values are network configuration values. You should change these values in most case. If you don’t know what value you should assign, refer to the network administrator. Inet on ethernet (e) is IP address and subnet mask address of Network IP Camera. IP address and subnet mask addresses are separated by colon (:). For example, IP address is represented by decimal numbers delimited by dot (.) like ‘192.168.1.27’.
NETWORK IP CAMERA User’s Guide Gateway inet (g) is the gateway address of Network Camera. ⑥ Type ‘c’ key to change the network configuration in [Network IP Camera Boot] prompt. If you type ‘c’ key, Network IP Camera shows you the information you can change its values and the current assigned values. You can change as the following figure. ⑦ When you terminate hyper-terminal program after you changed network configuration, hyperterminal program asks you whether you save the session.
NETWORK IP CAMERA User’s Guide 4.4 Accessing Network IP Camera Homepage After assigning Network IP Camera an IP address, you may access Network IP Camera and monitor real-time image on Internet. You may configure Network IP Camera within its own pages through any standard Web browser on local or remote network. 4.4.1 Starting Web Browser Start your web browser by entering your Network IP Camera’s IP address. And then you can see a build-in homepage. Example) http://211.111.168.163/ 4.4.
NETWORK IP CAMERA User’s Guide 1) ID and Password To verify registered Network IP Camera users, there is a Login page. If you are to connect to camera, you should follow the Login procedures. If you key in user’s ID and password, you may access to a viewer to monitor real-time images. With administrator’s ID and password, you may access to a real-time image viewer with administrator’s authority.
NETWORK IP CAMERA User’s Guide Active-X installation manually If Active-X program fails to be installed automatically, you may install it manually. The manual installation program is to be downloaded by clicking ‘here’ as follows: Note: If you have any problem when you install ActiveX, click here to download and install ActiveX manually Please follow the instruction to install Active-X manually. ① Click “here” ② When the panel appears, press “open” if you want to install right away.
NETWORK IP CAMERA User’s Guide 4) Java Applet for Macintosh or Unix System user. Java Applet viewer is for a user who access Network IP Camera through a computer that does not Utilize MS Windows (OS) such as Macintosh computer, etc. Java Applet viewer is run with java virtual Machine that is installed on User’s computer. Macintosh and Unix System Network IP Camera Active-X program is based on MS windows OS.
NETWORK IP CAMERA User’s Guide 4.4.3 Network IP Camera’s Homepage Having accessed the login page procedure above, you may see the camera homepage. 1) Administrator Menu This button is to access administration page. However, only the user who has authority as an administrator can access the page with administrator’s ID and Password. (Refer to Chapter 6. ‘Configuring Administration Menu’) 2) FAQ A lot of questions and answers are provided here for troubleshooting.
NETWORK IP CAMERA User’s Guide 3) Save, Stop save, snap shot, show only image ① Save, stop save Users can save real time images from Network IP Camera on PC. Press ‘save’ button then select folder that you want to save images. (The image is saved as an AVI file.) Once it starts to save images, “Saving” message appears. To stop saving, press “stop Save” button. You may see the saved image by Window Media Player or Real Player.
NETWORK IP CAMERA User’s Guide ③ Show only image When you want to see only video panel, press “show only image” 4) Camera Name You can set a camera name or any text. Please refer to “Chapter6.7 System Configuration”. 5) Location This shows where the camera is located. Please refer to “Chapter 6.7 System Configuration”. 6) Connected Client This shows the number of client who is connected to Network IP Camera simultaneously. The number “ /32”represent maximum concurrent user.
NETWORK IP CAMERA User’s Guide 5 Adjusting the Camera Lens 5.1 Adjusting the Focus In order for the Focus Assistant to access the full focusing range for your application environment, you now turn the lens in the clockwise or anti clockwise direction; unless you want to replace the lens, it should not be unscrewed more than 1.0mm apart from the Fixed Lens assembly. *Adjust the camera focus while reviewing the picture quality on your Web browser. Lens 1.0mm max 1.
NETWORK IP CAMERA User’s Guide 5.2 Replacing the Lens Because Network IP Camera is designed with a CS-Mount, the lens supplied with your product can be replaced with any standard C or CS lens, typically used within the surveillance industry. Follow the instructions below to replace the supplied lens with any C or CS type lens: 1. Unscrew Network IP Camera lens turning the lens in the anti clockwise 2. C-lens only: Attach the new lens to a C-CS Adapter 3. Screw the new lens onto Network IP Camera.
NETWORK IP CAMERA User’s Guide 6 Configuring Administration Tools You can control the configurations of Network IP Camera by Administrator’s Tool. Only authorized user can access administrator tool. If non-authorized users try to access it, you may see the caution message “ You are not administrator”. You may control all configurations for Network IP Camera. Press “Administrator Menu”.
NETWORK IP CAMERA User’s Guide 6.1 Administration Menu’s Overview The table below provides a one-step overview of the Administrations Tools: Image Configuration To configure compression rate, image size, brightness, contrast, etc.
NETWORK IP CAMERA User’s Guide 6.2 Image Configuration This page is to focus the camera using the focus Assistant and define image attributes for your Network IP Camera. ① Compression rate The file size of JPEG-compressed image depends upon the actual content of the image. Images containing much detail will generate larger files.
NETWORK IP CAMERA User’s Guide ② Image size You may choose the image size VGA(640x480) or QVGA(320x240) and 160*120 Large sizes of image (VGA) yields lower frame rate, while small size maintains higher frame rate ③ Vertical Flip To turn the image view upside down ④ Horizontal Flip To switch the image view right from left ⑤ Brightness mode You may select “Auto” and “Manual” ⑥ Brightness As a number is higher, image looks brighter.
NETWORK IP CAMERA User’s Guide 6.3 Network Configuration This page is to define network type and addresses of the Network IP Camera. You can configure Camera’ S IP, DNS server address and DILS registration, etc. Each configuration takes few seconds for booting after press “Submit”. ① Set IP Address, Subnet mask, gateway address. To set the IP address, Subnet mask, and gateway address manually, you may select “manually” in combo box.
NETWORK IP CAMERA User’s Guide To set DHCP, you may select ‘using DHCP’. When selecting “using DHCP”, the IP address, Subnet mask address and Gateway address may not be activated at all. Under DHCP selection, the IP address may be sent to an email address whenever IP address is changed. Users in a local network area may check the IP address through IP installer. NOTE If you select “DHCP”, you may see the rebooting message “Now the Network Camera is rebooting to apply the changes...” on Web Browser.
NETWORK IP CAMERA User’s Guide ⑦ 1st, 2nd DNS server address To map between IP address and domain name, you should enter you DNS server address. If a user set the DNS server into camera, users can configure SMTP server, FTP server, NTP server with its domain name. DNS (Domain Name System) DNS (Domain Name System) is to map between IP address and domain name. Every network device on the world has its IP address to be connected on Internet.
NETWORK IP CAMERA User’s Guide The value of “Access ID and Password” is a password to identify the ownership of you the Network IP Camera at the DILS server. With this ID & Password, you can find you registered camera from DILS server. ⑮ Status This is to state “Fail” or “Success” for your DILS registration. SUBMIT Send configured data by user to the Network IP Camera.
NETWORK IP CAMERA User’s Guide 6.4 Admin, User Configuration This page is to configure IDs and Passwords of an administrator and 5 users. (1) User Account There are one administrator’s account and 5 user’s accounts. Account name can be changed. (2) Password If you want to open your Network IP Camera to everyone, you may not change default user’s ID and Password, However you should change administrator’s ID and Password with unique Ones of yours.
NETWORK IP CAMERA User’s Guide (3) Access rights Administrator may give or forfeit users’ right of viewing control. With default setting Administrator has all authority of configuration and normal user doesn’t have any right except one who can access login page to see the image defaulted “guest” for ID and Password. ID and Password Limitation It is very important to compose any ID or Password within 10 bytes’ limit. 10 bytes are equal to 10 English characters.
NETWORK IP CAMERA User’s Guide 6.5 Event Trigger Configuration This page is to designate Email address or FTP server to receive captured images by setting SMTP or FTP setting. You may connect external devices such as infrared Sensor or Alarm Sensor etc. use with provided terminal block. Refer to chapter “F. I/O Connector ” (1) Trigger Condition This is to select option how to send an event signal to Network IP Camera.
NETWORK IP CAMERA User’s Guide Alarm sensor etc. ② Motion Detection from…… This is to detect motion from camera by S/W data comparison. When you select “Motion detection”, the Network IP Camera detects a motion triggered by camera lens. To detect motion the camera compares a previous image from present image. When the motion is detected, the camera recognizes the data changing through comparing the previous image data with present one.
NETWORK IP CAMERA User’s Guide (2) Image capture option This is to configure image capture option when an event is triggered. ① Before Event You may set the starting time to capture image before event is triggered. (Input limitation is from 0 to 255 seconds.) ② After Event You may set the finishing time to capture image after event is triggered. ③ Image capture frame rate Set the frame rate from 1 to 15fps when the image is being captured.
NETWORK IP CAMERA User’s Guide Image capture option limitation Configuration for image capture option affects memory capacity. If you configure this option to excess memory size, the Warning message “ Not enough memory…” appears. The total image capture frame rate must be limited 45 fps due to memory size. (Before event time + After event time) x Image capture frame rate must be under 45.
NETWORK IP CAMERA User’s Guide 6.6 Time Configuration This page is to configure date and time. (1) Synchronized with NTP server Network IP Camera Date & Time automatically through NTP (Network Time Protocol)server. NTP Server is based on Greenwich time. Select NTP server, IP address and Time zone to set the date and time automatically, then press, “SUBMIT”.
NETWORK IP CAMERA User’s Guide 6.7 System Configuration This page is to configure camera name, location, and image sensor oscillator for frequency, PTZ control and System information for Network IP Camera. (1) Camera name This is to configure camera name for the front-page view. Camera name should be composed within 15 bytes. 15 bytes are equal to 15 bytes English characters. (2) Camera location This is to configure camera location for the front-page view.
NETWORK IP CAMERA User’s Guide (3) Set image sensor oscillator for This option is to select image sensor oscillator according to the frequency. If you select incorrect, the image would be poorly lighted. This function is only to be activated if the version of your camera is over the version of firmware 0030-102. (4) PTZ control This is to configure PTZ control mechanism of Network IP Camera. You may select PTZ control enable or disable.
NETWORK IP CAMERA User’s Guide 7 PTZ control This page is to control PTZ function. This PTZ control box may be activated only if PTZ external devices are connected to Network IP Camera and configure PTZ control enable in System Configuration page.
NETWORK IP CAMERA User’s Guide Appendix A. Technical Specifications Image Resolution: 640x480, 320x240 Standard JPEG Compression – 10 levels of compressions Network 10baseT Ethernet or 100baseTX Fast Ethernet Twisted pair category 5 cables, Standard RJ45 connector Supporting protocol: TCP/IP, UDP, PING, ARP, FTP, TFTP, and HTTP Configuring is achieved by private setup program and Web server built in administration page.
NETWORK IP CAMERA User’s Guide Under 6W power consumption System Requirements Operating systems: Windows 9x, Windows NT/2000, Linux, Unix, Mac, etc. Internet Explorer 4.0 or higher. JAVA applet for no PC user (Mac or Unix) I/O Connector D-sub 9pin RS232 connector 1 Input to trigger the camera on external events.
NETWORK IP CAMERA User’s Guide B. FAQ Frequently Asked Question (FAQ) Asks for the features 1. What is Network IP Camera? Network IP Camera is a built-in web server camera. Network IP Camera is consisted of 3 components as Camera Module, Web server, and networking device. Network IP Camera captures, processes, and transmits digital through network. As Network IP Camera itself operates as a Web Server, it does not require other dedicated server connection as PC does.
NETWORK IP CAMERA User’s Guide Asks for the Installing and Running Network IP Camera 1. What network Line can be used with Network IP Camera? All network lines (except telephone lines) can be used, although telephone lines may be used through PCs to connect to Network IP Camera remotely. Network limes such as xDSL, cable modem. that use dynamic IP addresses require a different installation process than a dedicated line that has a static IP address. 2.
NETWORK IP CAMERA User’s Guide 7. How can a user see the images sent from Network IP Camera using Internet Explorer? If a user wants to see the real-time images of Network IP Camera using Internet Explorer browser, install Network IP Camera Active-X control. The Active-X control is used in the live image viewer. When you access login page in Network IP Camera Homepage, The Active-X Control is downloaded automatically. 8.
NETWORK IP CAMERA User’s Guide C. Trouble Shooting This appendix provides useful information to help you to resolve any difficulty you might have with your Network IP Camera. Fault symptoms, possible causes and remedial actions are provided within a quick reference table.
NETWORK IP CAMERA User’s Guide The Power LED is not The IP address constantly lit located within different subnet Other problems is Run the PING utility (as described in PINGing Your a IP Address, on page 39), If the utility returns “no response” or similar, the diagnosis is probably correct – you should then proceed as follows In Windows 95/98 or Windows NT, check the IP address for your Network IP Camera is within the same subnet as your workstation: 1.
NETWORK IP CAMERA User’s Guide Direct exposure to extreme sunlight or halogen light may cause serious damage to the CMOS sensor. Reposition your Network IP Camera into a more shaded location immediately. Note: damage caused to Network IP Camera through over exposure to direct sunlight or halogen light is not covered under the product warranty. Focus has not been Adjusting the camera manually till the image views correctly adjusted clear.
NETWORK IP CAMERA User’s Guide D. Utilizing IP Addresses on Local Network Introduction What we utilize to access to the Internet are done via Internet IP addresses increasingly. Currently, IP addresses are limited. There are 5 classes’ of networks, and each network contains IP addresses. A network can only hold a limited number of IP addresses. The number of IP addresses depends on the network class. The 5 classes are labeled “A” through “E” with the most common one being the “C” class network.
NETWORK IP CAMERA User’s Guide C Class Network 1) Features of Addresses IP address: The three-digit number in room ‘X4’ is for the Host ID. The number ranged from 0 to 255. Among the numbers, 0 is used for Network ID, 1 is used for Router IP (Gateway address) and 255 are used for Broadcast address. The number from 2 to 244 are IP addresses that can be assigned to Network IP Camera, PC etc. Network ID: Identifies a network. Generally the first number assigned is Network ID.
NETWORK IP CAMERA User’s Guide Sub-Network ID: xxx.xxx.xxx.0 Gateway Address: xxx.xxx.xxx.1 Subnet Mask: 255.255.255.192 Broadcast Address: xxx.xxx.xxx.63 IP Addresses: xxx.xxx.xxx.2 – xxx.xxx.xxx.62 Sub-Network ID: xxx.xxx.xxx.64 Gateway Address: xxx.xxx.xxx.65 Subnet Mask: 255.255.255.192 Broadcast Address: xxx.xxx.xxx.127 IP Addresses: xxx.xxx.xxx.66 – xxx.xxx.xxx.126 Sub-Network ID: xxx.xxx.xxx.128 Gateway Address: xxx.xxx.xxx.129 Subnet Mask: 255.255.255.128 Broadcast Address: xxx.xxx.xxx.
NETWORK IP CAMERA User’s Guide Sub-Network ID: xxx.xxx.xxx.192 Gateway Address: xxx.xxx.xxx.193 Subnet Mask: 255.255.255.192 Broadcast Address: xxx.xxx.xxx.255 IP Addresses: xxx.xxx.xxx.194 – xxx.xxx.xxx.
NETWORK IP CAMERA User’s Guide E. Updating Network IP Camera’s newly upgraded Program Caution This process is to update the current firmware that is already installed into your Network IP Camera with a newly updated Firmware. If you are to begin the process, follow the instruction as manual. And during the process, do not give physical shock nor disconnect network and power. Otherwise, your Network IP Camera can be damaged seriously, which may result inappropriate operation or operation failure.
NETWORK IP CAMERA User’s Guide ③Press the “Firmware Open” button to load the newly updated firmware in the directory and then loads it. ④Enter Camera’s IP, Upgrade port number, Admin ID and Password configured on Network Configuration page. And then press “start upgrade” button. You may see the upgrading status. Upgrading levels are divided into 4 steps from Transferring Firmware to Verifying flash memory. (Each step are indicating on progress bar) ④When completing upgrading, successful message appears.
NETWORK IP CAMERA User’s Guide F. The I/O Connector Provides the physical interface to a digital output, and a single digital photo-coupled input that is used for connecting a variety of external alarm devices to Network IP Camera; including, IR-sensors, switches and alarm relay. In combination with the configurable alarm facilities, you can quickly develop a variety of security applications that are triggered on time – or alarm based – events.
NETWORK IP CAMERA User’s Guide G. RS 232 CABLE The Serial Connector In absence of a local network connection, the RS232 serial connector provides a physical interface for connecting a PTZ devices or computer to Network IP Camera. This means that Network IP Camera can operate as a standard unit -independent of any computer network. Users can connect to Network IP Camera by external mode.
NETWORK IP CAMERA User’s Guide H. High Speed Solutions This page is to help you to access to high-speed Internet services: such as xDSL or a cable modem connection. However, a most high-speed Internet Services provide you with some external IP address, there are several practical issues that should be considered when developing your application.
NETWORK IP CAMERA User’s Guide ROUTERS AND FIREWALLS Another solution is to use one of several small routers/firewalls currently available on the market. These provide the necessary NAT functionality and allow complete independence for your PC, which can be switched off or rebooted without affecting the image transmission from your Network IP Camera.
NETWORK IP CAMERA User’s Guide I. Reinstating the Factory Default Settings This page explains instructions in detail on how to set the default settings in Network IP Camera. In certain circumstances it may become necessary to restart or reinstate the Factory Default settings for your Network IP Camera: This is performed by pressing the Reset Button, or using Hyper Terminal Setting. Follow the instructions below to reinstate the product factory default settings By pressing Reset button.
NETWORK IP CAMERA User’s Guide Factory default setting Administrator ID: admin Administrator Password: admin Guest ID: guest Guest Password: guest IP Address: 192.168.1.221 Subnet Mask Address: 255.255.255.0 Gateway Address: 192.168.1.1 Server IP Address: 192.168.1.
NETWORK IP CAMERA User’s Guide J. Glossary of Terms ActiveX – A control (or set of rules) used by a browser. ActiveX controls are often downloaded and installed automatically as required. ARP – Address Resolution Protocol. A method for finding a host's Ethernet address from its Internet address. The sender broadcasts an ARP packet containing the Internet address of another host and waits for it (or some other host) to send back its Ethernet address.
NETWORK IP CAMERA User’s Guide HTML - A markup language used to structure text and multimedia documents and to set up hypertext links between documents, used extensively on the World Wide Web. HTTP - A protocol used to request and transmit files, especially WebPages and WebPages components, over the Internet or other computer network. Intranet - A privately maintained computer network that can be accessed only by authorized persons, especially members or employees of the organization that owns it.
NETWORK IP CAMERA User’s Guide TCP/IP - Transmission Control Protocol/Internet Protocol. The wide-area-networking protocol that makes the Internet work. TCP/IP is used on many networks, including the Internet. TCP keeps track of the individual packets of information and IP contains the rules for how the packets are actually sent and received. URL – Uniform Resource Locator. An “address” on the network. WAN – Wide–Area–Network.