Version 1.0 Intenso Video Scooter Bedienungsanleitung Seite 1-19 DE Manual Page 1-17 GB Istruzioni per l’uso Pagina 1-18 IT Notice d’utilisation Page 1-18 FR Instrucciones de uso Página 1-18 ES Manual de instruções Página 1-18 PT Instrukcja obsługi Strona 1-18 PL инструкция по эксплуатации Стр.
Inhalt Hinweise ........................................................................................................................................................ 4 1. Geräteüberblick ......................................................................................................................................... 5 2. Packungsinhalt ........................................................................................................................................... 5 3.
(1) Aufnahme ........................................................................................................................................... 14 (2) Wiedergabe ........................................................................................................................................ 15 f) Datei Explorer ..................................................................................................................................... 15 g) Einstellungen ..........................
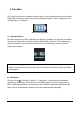
Hinweise Lesen und beachten Sie die Bedienungsanleitung nebst Warnungen und Hinweisen vor der ersten Nutzung des Produkts. Vor der ersten Benutzung des Gerätes achten Sie bitte darauf, dass Sie den Akku vollständig aufladen. Vermeiden Sie einen harten Aufprall des Gerätes. Verwenden Sie das Gerät nicht in extrem kalten, heißen, feuchten oder staubigen Gebieten. Setzen Sie es ebenfalls keinen direkten Sonnenstrahlen aus. Stellen Sie keine offenen Lichtquellen, wie z.B.
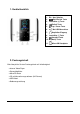
1. Geräteüberblick 1. Ein / Aus Schalter 2. Pfeil-Zurück Taste 3. Lautstärke (+) Taste 4. 5. Zurück Taste Play / Pause Taste 6. Mini USB Anschluss 7. Kopfhörer Eingang 8. Lautstärke (-) Taste 9. Vorwärts Taste 10. M (Menü) Taste 11. 2.
3. Verbinden mit einem Computer Um Dateien zwischen Ihrem Player und einem Computer auszutauschen, können Sie Ihren Player einfach mit Hilfe des beiliegenden USB Kabels mit Ihrem Computer verbinden. a) Verbinden des Gerätes Um den Player mit einem Computer zu verbinden, stecken Sie den USB 2.0 Anschluss des USB Kabels in einen freien USB Port des eingeschalteten Computers und verbinden Sie den Mini-USB Anschluss des Kabels mit dem Player.
4. Der Akku Der Player hat einen fest verbauten internen Akku. Vor der ersten Benutzung des Gerätes achten Sie bitte darauf, dass Sie den Akku vollständig aufladen. Dieser Vorgang dauert in der Regel bis zu 3 Stunden. Akku vollständig geladen a) Laden des Akkus: Der Akku wird über die USB- Verbindung mit Ihrem PC geladen. Um den Akku aufzuladen, verbinden Sie daher bitte das Gerät über das USB-Kabel mit dem PC. Der Ladevorgang startet automatisch.
c) Nutzung während des Ladevorganges: Sie können den Player während des Ladevorganges nutzen. Drücken Sie dazu einfach ein weiteres Mal auf die Play/Pause Taste und das Gerät wechselt von der Ladestatusanzeige in das Hauptmenü. Auch während der Nutzung können Sie den aktuellen Ladestatus erkennen. In der oberen rechten Ecke wird dieser beispielsweise während der Musikwiedergabe in 3 Stufen angezeigt. Ist der Akku vollständig geladen, sind alle drei Felder fest eingeblendet.
5. Bedienung Hinweis: Bitte achten Sie bitte darauf, dass eine Micro SD Karte im Player eingesetzt ist! a) Allgemeine Bedienung (1) Ein- und Ausschalten des Players Schieben Sie den Ein-/ Ausschalter an der linken Seite des Geräts auf die “ON” Position. Halten Sie danach die Play/Pause Taste für ca. 3 Sekunden gedrückt, um den Player einzuschalten. Um das Gerät in den Standby-Modus zu versetzen, halten Sie die Play/Pause Taste erneut für ca. 3 Sekunden gedrückt.
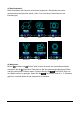
(3) Das Hauptmenü Nach Einschalten des Players erscheint das Hauptmenü. Dies besteht aus sechs verschiedenen Menüpunkten (Musik, Video, Foto, Aufnahme, Datei-Explorer und Einstellungen). Musik Video Aufnahme Datei Foto Einstellungen (4) Navigieren Mit der Vorwärts und Zurück Taste können Sie durch die verschiedenen Menüs navigieren. Mit der Play/Pause Taste können Sie den gewünschten Menüpunkt öffnen oder die gewünschte Funktion starten.
b) Musik (1) Wiedergabe Navigieren Sie im Hauptmenü zum Menüpunkt Music und bestätigen Sie Ihre Auswahl mit der Play/Pause Taste. Es öffnet sich der Wiedergabebildschirm und die Wiedergabe startet automatisch. Um die Wiedergabe zu pausieren oder wieder fortzusetzen, drücken Sie jeweils die Play/Pause Taste. Um einen Titel vor- oder zurück zu springen, drücken Sie die Vorwärts oder Zurück Taste. Um innerhalb eines Titels vor- oder zurück zu spulen, halten Sie diese einfach gedrückt.
(3) A-B Schleife Mit diesem Player ist es möglich, einen beliebigen Zeitabschnitt eines Musikstückes auszuwählen und diesen in einer Schleife dauerhaft zu wiederholen. Drücken Sie während der Wiedergabe des Musikstückes die M Taste, um den Startpunkt (A) der Wiedergabeschleife zu bestimmen. Drücken Sie die M Taste erneut, um den Endpunkt (B) festzulegen. Der ausgewählte Zeitabschnitt wird nun in einer Wiedergabeschleife abgespielt.
(2) Ordnerübersicht Um aus dem Wiedergabebildschirm in die Ordnerübersicht zu gelangen, drücken Sie die Pfeil-Zurück Taste. Navigieren Sie mit der Vorwärts oder Zurück Taste durch die vorhandenen Dateien und Ordner. Bestätigen Sie mit der Play/Pause Taste eine Videodatei, wird diese wiedergegeben. Bestätigen Sie mit dieser Taste einen Ordner, wird dieser geöffnet. Mit der Pfeil-Zurück Taste wechseln Sie in die nächst höhere Ebene Ihrer Ordnerstruktur bis hin zurück zum Hauptmenü.
Um eine Datei zu löschen, navigieren Sie in der Ordnerübersicht zu der gewünschten Datei und drücken Sie die M Taste. Bestätigen Sie nun den Vorgang mit der Taste, um die Datei endgültig zu entfernen. Play/Pause Hinweis: Für weitere Konfigurationsmöglichkeiten öffnen Sie bitte im Hauptmenü den Menüpunkt Setup. e) Aufnahmefunktion (1) Aufnahme Navigieren Sie im Hauptmenü zum Menüpunkt Record und bestätigen Sie Ihre Auswahl mit der Play/Pause Taste.
(2) Wiedergabe Navigieren Sie im Hauptmenü zum Menüpunkt File Explorer und bestätigen Sie Ihre Auswahl mit der Play/Pause Taste. Wählen Sie nun den Ordner VOICE aus. Alle bisher getätigten Aufnahmen werden Ihnen chronologisch angezeigt. Navigieren Sie jetzt zur gewünschten Datei und starten Sie die Wiedergabe mit der Play/Pause Taste. Mit der Pfeil-Zurück Taste wechseln Sie wieder in das Hauptmenü. Hinweis: Für weitere Konfigurationsmöglichkeiten öffnen Sie bitte im Hauptmenü den Menüpunkt Setup.
g) Einstellungen Navigieren Sie im Hauptmenü zum Menüpunkt Setup und bestätigen Sie Ihre Auswahl mit der Play/Pause Taste. (1) Musik Im Menüpunkt Musik finden Sie folgende Einstellungsmöglichkeiten: i. Abspielmodus Legen Sie hier den gewünschten Abspielmodus fest. Spielt den gewählten Titel einmal ab und stoppt dann die Wiedergabe. Titel wiederholen Der gewählte Titel wird wiederholt abgespielt. Wiederholt die Titel in dem ausgewählten Ordner einmal und Ordner einmal stoppt dann die Wiedergabe.
(2) Aufnahme Im Menüpunkt Aufnahme können Sie die Aufnahmequalität festlegen. Sie haben die Wahl zwischen normaler Qualität (32 KBPS) und hoher Qualität (64 KBPS). Beachten Sie, dass die hohe Qualität mehr Speicherplatz beansprucht. (3) Foto Im Menüpunkt Foto können Sie die Anzeigedauer der automatischen Diaschau festlegen. Sie haben die Wahl zwischen: 2 s, 4 s, 6 s, 8 s, und 10 s. (4) Display Im Menüpunkt Display finden Sie folgende Einstellungsmöglichkeiten: i.
(7) System Im Menüpunkt System haben Sie folgende Auswahlmöglichkeiten: i. Information Hier erhalten Sie Informationen über die Firmware Version des Players, den gesamt zur Verfügung stehenden Speicherplatz, den genutzten Speicherplatz (U:) und den freien Speicherplatz (F:) Ihrer Speicherkarte. ii. Werkseinstellungen Mit bestätigen dieser Option setzen Sie den Player wieder auf die Standardeinstellungen zurück. 6. Micro SD Karte Dieser Player besitzt keinen verwenbaren internen Speicher.
7. Technische Daten Dimensionen Gewicht LCD PC Verbindung Akku Frequenzbereich SNR Musik Format Video Format Aufnahmeformat Bildformat Betriebstemperatur Betriebssystem 88 mm (H) x 41 mm (B) x 9.0mm (T) ~30 gr. 4,4 cm (1.8 Zoll) Farbdisplay, Auflösung: 128 x 160 Pixel USB 2.
Table of Contents Table of Contents .............................................................................................................................................. 1 Notes ............................................................................................................................................................. 3 1. Device overview......................................................................................................................................... 4 2.
(2) e. Folder overview ........................................................................................................................... 12 Recording function ............................................................................................................................. 13 (1) Recording ..................................................................................................................................... 13 (2) Playback .............................................
Notes Read and observe the user manual including warnings and notes before the first activation of the product. Please make sure before the first activation of the device that the rechargeable battery is fully charged. Avoid hard collisions of the device. Do not use the device in extremely cold, hot, wet or dusty areas. Also, do not expose it to direct sunlight. Do not put naked light sources such as burning candles near the product. Perform backups regularly to prevent possible data loss.
1. Device overview 1. On / Off Switch 2. Arrow back button 3. Volume (+) button 4. back button 5. Play / pause button 6. Mini USB port 7. Headphohe jack 8. Volume (-) button 9. Forward button 10. M (Menu) button 11. 2.
3. Connecting to a computer In order to exchange files between your player and a computer, you can simply connect your player to the computer using the provided USB cable. a. Connecting the device In order to connect the player to the computer, insert the USB 2.0 port of the USB cable with a free USB port of the activated computer and connect the Mini USB port of the cable with the player. It is now recognised as removable medium and is ready for data transfer with the computer.
4. The rechargeable battery The player has an installed internal rechargeable battery. Make sure before activating the device for the first time that the battery is fully charged. This process usually takes up to 3 hours. Battery fully charged a. Charging the battery: The battery is charged via the USB connection with your PC. To charge the battery, connect the device with the PC using the USB cable. The charging process starts automatically.
c. Usage during the charging process: You can use the player during the charging process. Simply press once more on the Play/Pause button and the device changes from the charging status display into the main menu. You can also view the current charging status during usage. In the upper right corner it is shown in 3 stages, e.g. during playback of music. If the battery is fully charged, all three fields are displayed. If the battery is still charging, the animation is shown here as well.
5. Operation Note: Make sure that a Micro SD card is inserted into the player! a. General operation (1) Switching the player on and off Slide the on / off switch on the left side of the device to the “ON” position. Then press the Play/Pause button for approx. 3 seconds to switch on the player. To set the device into standby mode, press the Play/Pause button again for approx. 3 seconds. If you wish to deactivate the player permanently, slide the button on the left side of the player into “OFF” position.
(3) The main menu After activating the player, the main menu appears. It consists of six different menu items (Music, Video, Photo, Record, File Explorer and Setup). Music Record Video Photo File Setup (4) Navigation With the Forward and Back button, you can navigate through the different menus. With the Play/Pause button you can open the desired menu item or start the desired function. Press the Arrow Back button briefly to return to the previous level.
b. Music (1) Playback Navigate from the main menu to the menu item Music and confirm your selection with the Play/Pause button. A playback screen opens and playback starts automatically. To pause the playback or continue it, press the Play/Pause button. To jump one track forward or back, press the Forward or Back button respectively. To fast forward or rewind within a track, simply keep it pressed. Press the (+) button or (-) button to adjust the volume.
(3) A-B loop It is possible with this player to select any period of a musical piece and set it on repeat in a loop. Press the M button during playback of this musical piece to determine the starting point (A). Press the M button again to determine the end (B). The selected period will now be played in a playback loop. Note: Please open the menu item Setup in the main menu for additional configuration options. c.
(2) Folder overview To reach the folder overview from the playback screen, press the Arrow Back button. Navigate with the Forward or Back button through the existing files and folders. If you confirm a video file with the Play/Pause button it is played back. If you confirm a folder with this button it is opened. With the Arrow Back button you change into the next higher level of your folder structure up to the main menu.
e. Recording function (1) Recording Navigate from the main menu to the menu item Record and confirm your selection with the Play/Pause button. The player is now ready to start an audio recording via the integrated microphone. To do this, simply press the Play/Pause button. The current recording is now displayed on the screen. To pause the current recording or to continue it, press the Play/Pause button again. Press the M button during the recording to save the recording.
f. File Explorer Navigate from the main menu to the menu item File Explorer and confirm your selection with the Play/Pause button. Now, the main directory of your memory card is displayed. Navigate with the Forward or Back button through the files and folders. If you confirm a file with the Play/Pause button, it is played back. If you confirm a folder with this button it is opened. With the Arrow Back button you change into the next higher level of your folder structure up to the main menu.
(1) Music In the menu item Music you can find the following setup options: i. Playback mode Define the desired playback mode here. Track once Repeat track Folder once Repeat folder All once Repeat all Intro Plays back the selected track once and then stops the playback. The selected track is played back repeatedly. Repeats the track in the selected folder once and then stops the playback. Repeats all tracks in the current folder. All songs are played once. Repeats all saved songs.
iii. Eco mode If you activate the Eco mode, the display switches off completely after the preset time. If the Eco mode is deactivated, the display remains illuminated permanently on the lowest level after the preset time. Please note that this significantly reduced the battery life. (5) Sleep Timer In the menu item Sleep Timer you can define a period of time after which the device automatically switches off.
7. Technical data Dimensions Weight LCD PC connection Battery Frequency range SNR Music format Video format Recording format Image format Operating temperature Operating system 88 mm (H) x 41 mm (B) x 9.0mm (T) ~30gr. 4,4 cm (1.8 inch) colour display, resolution: 128 x 160 Pixel USB 2.
Indice Indicazioni ...................................................................................................................................................... 3 1. Panoramica del dispositivo ........................................................................................................................ 4 2. Contenuto della confezione ...................................................................................................................... 4 3. Collegamento a un computer .
e. Funzione di registrazione ................................................................................................................... 13 (1) Registrazione .................................................................................................................................. 13 (2) Riproduzione .................................................................................................................................. 14 f. File Explorer ......................................
Indicazioni Leggere e osservare le presenti istruzioni per l’uso, comprese le avvertenze e le indicazioni da seguire prima del primo utilizzo del prodotto. Prima del primo utilizzo del dispositivo, accertarsi che l’accumulatore sia completamente carico. Evitare forti impatti sul dispositivo. Non utilizzare il dispositivo in zone estremamente fredde, calde, umide o polverose. Non esporlo alla luce diretta del sole. Non collocare vicino al prodotto fonti di luce aperte, come ad es. candele.
1. Panoramica del dispositivo 1. Interruttore 2. Tasto freccia indietro 3. Tasto (+) volume 4. Tasto indietro 5. Tasto play / pausa 6. Porta mini USB 7. Ingresso auricolari 8. Tasto (-) volume 9. Tasto avanti 10. Tasto M (menù) 11. Slot micro SD 2.
3. Collegamento a un computer Per trasferire i dati tra il player e un computer, è possibile collegare il player a un computer semplicemente tramite il cavo USB fornito in dotazione. a. Collegamento del dispositivo Per collegare il player a un computer, inserire il connettore USB 2.0 del cavo USB in una porta USB libera del computer acceso e collegare il connettore mini USB del cavo con il player.
4. L’accumulatore Il player ha un accumulatore interno fisso. Prima del primo utilizzo, accertarsi che l’accumulatore sia completamente carico. Questo processo dura di norma fino a 3 ore. Accumulatore completamente carico a. Carica dell’accumulatore: L’accumulatore si carica tramite il collegamento USB con il computer. Per caricare l’accumulatore, collegare il dispositivo al PC tramite il cavo USB. Il processo di ricarica inizia automaticamente.
c. Utilizzo durante il processo di ricarica: È possibile utilizzare il player anche durante il processo di ricarica. Premere semplicemente un’altra volta il tasto play/pausa e il dispositivo passerà dalla visualizzazione dello stato di carica al menù principale. Anche durante l’utilizzo è possibile consultare lo stato di carica attuale. Ad esempio, durante la riproduzione di un file musicale, lo stato viene visualizzato in tre stadi nell’angolo in alto a destra.
5. Utilizzo Nota: si prega di accertarsi che nel player sia inserita una scheda micro SD a. Utilizzo generale (1) Accensione e spegnimento del player Spostare l’interruttore collocato sul lato sinistro del dispositivo sulla posizione “ON”. Per accendere il player, tenere quindi premuto il tasto play/pausa per ca. 3 secondi. Per impostare il dispositivo nella modalità standby tenere di nuovo premuto il tasto play/pausa per ca. 3 secondi.
(3) Il menù principale Dopo aver acceso il player, verrà visualizzato il menù principale, che consiste di sei voci differenti (musica, video, foto, registrazione, file explorer e impostazioni). Musica Registrazione Video Foto File Impostazioni (4) Navigazione Con il tasto avanti e indietro è possibile navigare tra i vari menu. Con il tasto play/pausa è possibile aprire la voce di menù desiderata o avviare la funzione desiderata.
b. Musica (1) Riproduzione Navigare nel menù principale fino alla voce Music e confermare la scelta con il tasto play/pausa. Si aprirà un’apposita schermata e la riproduzione inizierà automaticamente. Per mettere in pausa e proseguire di nuovo la riproduzione, premere il tasto play/pausa. Per passare a un titolo precedente o successivo, premere il tasto avanti o indietro . Per tornare indietro o andare avanti all’interno di un titolo, tenere premuti i suddetti tasti.
(3) Riproduzione ciclica tra due punti A-B di un brano Con questo player è possibile selezionare un estratto di un pezzo musicale e riprodurlo in modo ciclico. Durante la riproduzione del pezzo musicale, premere il tasto M per determinare il punto iniziale (A). Premere di nuovo il tasto M per stabilire il punto finale (B). Il pezzo selezionato verrà quindi riprodotto in modo ciclico. Nota: Per ulteriori possibilità di configurazione, aprire nel menù principale la voce Setup. c.
(2) Panoramica delle cartelle Per passare dalla schermata della riproduzione musicale alla panoramica delle cartelle, premere il tasto freccia indietro . Navigare tra i file e le cartelle presenti con i tasti avanti o indietro. Confermando un file video con il tasto play/pausa, esso verrà riprodotto. Se si conferma con tale tasto una cartella, quest’ultima si aprirà.
Per eliminare un file, navigare nella panoramica delle cartelle fino al file desiderato e premere il tasto M. Per eliminarlo definitivamente, confermare il processo con il tasto play/pausa. Nota: Per ulteriori possibilità di configurazione, aprire nel menù principale la voce Setup. e. Funzione di registrazione (1) Registrazione Navigare nel menù principale fino alla voce Record e confermare la scelta con il tasto play/pausa. Il player è pronto per registrare un file audio tramite il microfono integrato.
(2) Riproduzione Navigare nel menù principale fino alla voce File Explorer e confermare la scelta con il tasto play/pausa. Selezionare la cartella VOICE per visualizzare tutte le registrazioni effettuate in ordine cronologico. Navigare quindi sul file desiderato e avviare la riproduzione con il tasto tasto play/pausa. Con il tasto freccia indietro è possibile tornare al menù principale. Nota: Per ulteriori possibilità di configurazione, aprire nel menù principale la voce Setup. f.
g. Impostazioni Navigare nel menù principale fino alla voce Setup e confermare la scelta con il tasto play/pausa. (1) Musica Alla voce Musica si trovano le seguenti opzioni di impostazione: i. Modalità di riproduzione Stabilire qui la modalità di riproduzione desiderata. Titolo una volta Ripetere titolo Cartella una volta Ripetere cartella Tutti una volta Riproduci tutti Intro Il titolo selezionato viene riprodotto una volta e poi la riproduzione viene interrotta.
(2) Registrazione Alla voce Registrazione è possibile stabilire la qualità di registrazione. Si può scegliere tra qualità normale (32 KBPS) e alta qualità (64 KBPS). Tenere presente che un’elevata qualità richiederà maggiore spazio di memoria. (3) Foto Alla voce Foto è possibile impostare la durata di visualizzazione dello slideshow. È possibile scegliere tra: 2 s, 4 s, 6 s, 8 s, e 10 s. (4) Display Alla voce Display si trovano le seguenti opzioni di impostazione: i. Durata dell’illum.
(7) Sistema Alla voce Sistema si trovano le seguenti opzioni di impostazione: i. Informazioni Qui si trovano informazioni riguardanti la versione del firmware del player, la memoria totale disponibile, la memoria utilizzata (U:) e la memoria libera (F:) della scheda. ii. Impostazioni di fabbrica Confermando questa opzione, il player verrà impostato nuovamente in base alla configurazione standard. 6. Scheda micro SD Questo player non possiede una memoria interna utilizzabile.
7. Specifiche tecniche Dimensioni Peso LCD Collegamento PC Accumulatore Ambito di frequenza SNR Formato musicale Formato video Formato registrazione Formato immagine Temperatura di funzionamento Sistema operativo 88 mm (H) x 41 mm (B) x 9.0mm (T) ~30 gr. 4,4 cm (1.8 pollici) display a colori, risoluzione: 128 x 160 pixel USB 2.
Table des matières Consignes ....................................................................................................................................................... 3 1. Présentation de l'appareil ....................................................................................................................... 4 2. Contenu de l'emballage .......................................................................................................................... 4 3.
(1) Enregistrement ............................................................................................................................ 13 (2) Lecture ......................................................................................................................................... 14 f. Explorateur de fichiers .......................................................................................................................... 14 g. Paramètres ......................................
Consignes Lisez et suivez ces instructions d'utilisation, y compris tous les avertissements et les instructions à suivre avant la première utilisation du produit. Avant la première utilisation de l'appareil, assurez-vous que la batterie est complètement chargée. Éviter les chocs forts sur l'appareil. Ne pas utiliser l'appareil dans des conditions de froid, de chaleur, d'humidité ou de poussière extrêmes. Ne pas exposer à la lumière directe du soleil.
1. Présentation de l'appareil 1. Interrupteur 2. retour Bouton fléché de 3. Bouton de volume (+) 4. 5. Bouton de retour Bouton de lecture/pause 6. Port mini USB 7. Port casque audio 8. Bouton volume (-) 9. Bouton d'avance 10. Bouton M (menu) 11. 2.
3. Connexion à un ordinateur Pour transférer des données entre le lecteur et un ordinateur, vous pouvez connecter le lecteur à un ordinateur en utilisant simplement le câble USB fourni. a. Raccordement de l'appareil Pour connecter le lecteur à un ordinateur, branchez le connecteur USB du câble USB 2.0 à un port USB libre de votre ordinateur et branchez le connecteur mini-USB du câble au lecteur. Ce dernier sera reconnu comme périphérique amovible et prêt pour le transfert de données avec votre ordinateur.
4. La batterie Le lecteur dispose d'une batterie interne fixe. Avant la première utilisation, assurez-vous que la batterie est complètement chargée. Ce processus prend normalement 3 heures. Batterie entièrement chargée a. Charge de la batterie : La batterie se recharge via la connexion USB avec votre ordinateur. Pour charger la batterie, connectez l'appareil à l'ordinateur via le câble USB. Le processus de charge commence automatiquement.
c. Utilisation pendant le processus de charge : Vous pouvez utiliser le lecteur pendant le processus de charge. Il suffit d'appuyer à nouveau sur la touche principal. lecture / pause et l'appareil passera de l'état de charge au menu Même lorsque vous l'utilisez, vous pouvez voir l'état de charge actuel. Par exemple, lors de la lecture d'un fichier musical, l'état est affiché en trois étapes dans le coin supérieur droit.
5. Fonctionnement Remarque: sVeuillez vous assurer qu'une carte micro SD est insérée dans le lecteur a. Fonctionnement general (1) Activation et désactivation du lecteur Déplacer le commutateur situé sur le côté gauche de l'appareil sur la position «ON». Pour allumer le lecteur, maintenez enfoncé le bouton lecture / pause pendant env. 3 secondes. Pour configurer l'appareil en mode veille, appuyez et maintenez enfoncer le bouton lecture/ pause env. 3 secondes.
(3) Il Le menu principal Après avoir mis le lecteur sous tension, vous verrez le menu principal, qui se compose de six options différentes (musique, vidéos, photos, enregistrements, explorateur de fichier et paramètres). Musique Enregistrement Vidéo Fichier Photo paramètres (4) Navigation Avec le bouton avance et retour, vous pouvez naviguer dans les différents menus. Avec le bouton Lecture / Pause, vous pouvez ouvrir l'option de menu souhaitée ou activer la fonction désirée.
b. Musique (1) Lecture Naviguez dans le menu principal jusqu'à l'option Music et validez votre choix en appuyant sur le bouton Lecture/pause. Ceci ouvrira un écran séparé, et la lecture commencera automatiquement. Pour mettre en pause et reprendre la lecture, appuyez sur le bouton Lecture/pause. Pour passer à un titre précédent ou suivant, appuyez sur le bouton avance ou retour . Pour revenir en arrière ou aller en avant dans un titre, appuyez sur ces touches en les maintenant enfoncées.
(3) Lecture en boucle entre deux points A-B d'une piste Avec ce lecteur, vous pouvez sélectionner un extrait d'un morceau de musique et le lire en boucle. Pendant la lecture du morceau, appuyez sur la touche M pour déterminer le point (A) de départ. Appuyez sur le bouton M pour définit le point de fin (B).Le morceau sélectionné sera alors lu en boucle. Remarque: Pour une autre possibilité de configuration, ouvrir l'option paramètre dans le menu principal. c.
(2) Aperçu des dossiers Pour passer de l'écran de lecture musicale à la liste des dossiers, appuyez sur la flèche de retour .Parcourir les fichiers et dossiers avec les touches d'avance ou retour. Confirmer un fichier vidéo avec la touche Lecture/Pause, et la lecture commencera. Si vous confirmez un dossier avec ce bouton, ce dossier s'ouvrira. Avec la touche fléchée de retour vous pouvez aller au niveau supérieur dans la structure du dossier jusqu'à atteindre le menu principal.
Pour supprimer un fichier, naviguez jusqu'à la liste des dossiers dans le fichier désiré et appuyez sur la touche M. Pour le supprimer définitivement, confirmez le processus en appuyant sur le bouton Lecture/pause. Remarque: Pour une autre possibilité de configuration, ouvrir l'option Setup dans le menu principal. e. Fonction d'enregistrement (1) Enregistrement Naviguer dans le menu principal jusqu'à l'option Record et confirmez la sélection en appuyant sur le bouton Lecture/pause.
(2) Lecture Naviguez dans le menu principal jusqu'à l'option File Explorer et confirmez la sélection en appuyant sur le bouton Lecture/pause. Sélectionnez le dossier VOICE pour afficher tous les enregistrements dans l'ordre chronologique. Ensuite, sélectionnez le fichier souhaité et commencez la lecture en appuyant sur le bouton lecture / pause. Avec la touche fléchée de retour vous pouvez revenir au menu principal.
g. Paramètres Naviguez dans le menu principal jusqu'à l'option Setup et validez la sélection en appuyant sur le bouton Lecture/pause. (1) Musique Dans l'option Musique se trouvent les paramètres de réglage suivants : i. Mode de lecture Réglez ici le mode de lecture souhaité. Titre une fois Répétition du titre Dossier une fois Répétition du dossier Tout une fois Tout lire Intro Le titre sélectionné est lu une fois ensuite la lecture s'arrête. Le titre sélectionné est lu de manière répétée.
(3) Photo Dans l'option Photo, vous pouvez définir la durée d'affichage du diaporama. Vous pouvez choisir entre : 2 s, 4 s, 6 s, 8 s et 10 s. (4) Affichage Sous l'option affichage se trouvent les paramètres de réglage suivants : i. Durée d'éclairage Ici, vous pouvez définir la durée d'éclairage de l'écran. Vous pouvez choisir entre 5 s, 10 s, 15 s, 20 s, 30 s et toujours. ii. Luminosité Ici, vous pouvez régler la luminosité de l'écran selon 5 niveaux. iii.
(7) Système Dans l'option Système se trouvent les paramètres de réglage suivants : i. Informations Ici vous trouverez des informations sur la version logicielle du lecteur, la mémoire totale disponible, la mémoire utilisée (U :) et la mémoire libre (F :) sur la carte. ii. Les réglages d'usine En confirmant cette option, le lecteur sera réinitialisé selon la configuration standard. 6. Carte Micro SD Ce lecteur n'a pas de mémoire interne utilisable.
7. Caractéristiques Dimensions Poids LCD Raccordement au PC Batterie Gamme de fréquence SNR Formats de fichier musicaux Format vidéo Format d'enregistrement Format d'image Température de fonctionnement Système d'exploitation 88 mm (H) x 41 mm (l) x 9.0 mm (T) ~ 30 gr. 4,4 cm (1,8 pouces) écran couleur, résolution : 128 x 160 pixels USB 2.
Índice Observaciones ............................................................................................................................................... 3 1. Vista general del aparato........................................................................................................................... 4 2. Contenido de la caja .................................................................................................................................. 4 3. Conectar a un ordenador ..
(1) Grabación .................................................................................................................................... 13 (2) Reproducción ............................................................................................................................... 14 f) Explorador de archivos ....................................................................................................................... 14 g) Ajustes ...............................................
Observaciones Lea y siga las instrucciones, así como las advertencias y observaciones antes del primer uso del producto. Antes del primer uso, tenga la precaución de cargar completamente la batería. Evite los golpes fuertes en el aparato. No utilice el aparato en lugares extremadamente fríos, calientes, húmedos o polvorientos. Tampoco lo exponga a rayos de sol directos. No coloque focos de luz abiertos, como p.ej. velas encendidas, cerca del producto.
1. Vista general del aparato 1. Interruptor ON / OFF 2. Tecla Volver 3. Tecla Volumen (+) 4. Tecla Retroceder 5. Tecla Play / Pausa 6. Conexión mini USB 7. Entrada auriculares 8. Tecla Volumen (-) 9. Tecla Avanzar 10. Tecla M (Menú) 11. Ranura Micro SD 2.
3. Conectar a un ordenador Para intercambiar datos entre su reproductor y un ordenador, puede conectarlo de forma fácil con el ordenador mediante el cable USB incluido. a) Conectar el aparato Para conectar el reproductor con un ordenador, conecte la conexión USB 2.0 del cable USB en a un puerto USB libre del ordenador encendido y conecte la conexión mini-USB del cable con el reproductor. Éste se reconoce ahora como soporte de datos extraíble y está listo para la transferencia de datos con el ordenador.
4. La batería El reproductor tiene una batería integrada de forma fija. Antes del primer uso del aparato preste atención a que la batería esté completamente cargada. Este proceso dura normalmente hasta 3 horas. Batería completamente cargada a) Cargar la batería: La batería se carga a través de la conexión USB con su ordenador. Para cargar la batería debe conectar por lo tanto el aparato al ordenador mediante el cable USB. El proceso de carga comienza de forma automática.
c) Uso durante el proceso de la carga: Puede utilizar el reproductor durante el proceso de carga. Simplemente pulso una vez más la tecla Play/Pausa y el aparato cambia de la indicación de carga al menú principal. Puede ver el estado actual de carga incluso durante el uso. Por ejemplo, se indica en la esquina superior derecha en 3 niveles durante la reproducción de música. Si la batería está totalmente cargada, los tres campos están marcados de forma fija.
5. Manejo Observación: ¡Por favor preste atención de que haya introducida una tarjeta Micro SD en el reproductor! a) Manejo general (1) Encendido y apagado del reproductor Deslice el interruptor de encendido y apagado en la parte izquierda del aparato en la posición “ON”. Después, mantenga pulsada la tecla Play/Pausa durante unos 3 segundos para encender el reproductor. Para poner el aparato en modo de espera, vuelva a pulsar la tecla Play/Pausa de nuevo durante unos 3 segundos.
(3) El menú principal Una vez encendido el reproductor, aparece el menú general. Este consiste en seis puntos de menú distintos (Música, Vídeo, Foto, Grabación, Explorador de archivos y Ajustes). Música Grabación Video Foto Archivos Ajustes (4) Navegación Puede navegar a través de los diversos menús con las teclas Avanzar y Retroceder. Con la tecla Play/Pausa puede abrir el punto de menú deseado o iniciar la función deseada. Pulse brevemente la tecla Retroceder para volver al nivel anterior.
b) Música (1) Reproducción Navegue en el menú principal al punto de menú Music u confirme la selección mediante la tecla Play/Pausa. Se abre la pantalla de reproducción y la reproducción se inicia automáticamente. Para pausar la reproducción o volver a reanudarla, pulse la tecla Play/Pausa respectivamente. Para saltar a un título posterior o anterior, pulse la tecla Avanzar Retroceder. Para rebobinar hacia delante o hacia detrás dentro de un título, simplemente mantenga pulsada la tecla correspondiente.
(3) Bucle A-B Con este reproductor se puede seleccionar un determinado intervalo de la pieza musical y volver a repetirlo permanentemente en un bucle. Pulse la tecla M durante la reproducción de la pieza musical para determinar el punto de inicio (A) del bucle de reproducción. Vuelva a pulsar la tecla M para determinar el punto final (B). El intervalo seleccionado se reproduce ahora en un bucle de reproducción.
(2) Vista general de carpetas Para acceder desde la pantalla de reproducción a la vista general de carpetas, pulse la tecla Retroceder. Navegue con la tecla Avanzar o Retroceder por los archivos y las carpetas disponibles. Si confirma un archivo de vídeo con la tecla Play/Pausa, este se reproducirá. Si confirma con esta tecla una carpeta, esta se abrirá. Con la tecla Retroceder puede acceder al siguiente nivel más alto de su estructura de carpetas hasta llegar al menú principal.
Para eliminar un archivo, navegue hasta el archivo deseado dentro de la vista general y pulse la tecla M. Confirme el proceso con la tecla definitivamente el archivo. Play/Pausa para eliminar Observación: Para otras posibilidades de configuración, abra el punto de menú Setup en el menú principal e) Función de grabación (1) Grabación Navegue al punto de menú Record del menú principal y confirme su selección con la tecla Play/Pausa.
(2) Reproducción Navegue al punto de menú File Explorer en el menú principal y confirme su selección mediante la tecla Play/Pausa. Seleccione la carpeta VOICE. Se mostrarán todas las grabaciones efectuadas hasta el momento de forma cronológica. Navegue hasta el archivo deseado e inicie la reproducción mediante la tecla Play/Pausa. Pulsando la tecla Retroceder puede volver al menú principal. Observación: Para otras opciones de configuración, abra el punto de menú Setup en el menú principal.
g) Ajustes Navegue hasta el punto de menú Setup en el menú principal y confirme su selección con la tecla Play/Pausa. (1) Música En el punto de menú música podrá encontrar las siguientes posibilidades de ajuste: i. Modo de reproducción Determine aquí el modo de reproducción deseado. Carpeta una vez Reproduce el título seleccionado una vez y para la reproducción después. El título seleccionado se reproduce de forma repetida.
(2) Grabación En el punto de menú grabación puede determinar la calidad de grabación. Puede elegir entre calidad normal (32 KBPS) y calidad alta (64 KBPS). Tenga en cuenta de que la calidad alta ocupa más espacio de memoria. (3) Foto En el punto de menú Foto puede determinar la duración de visualización de los archivos automáticos. Puede elegir entre: 2 s, 4 s, 6 s, 8 s, y 10 s. (4) Pantalla En el punto de menú pantalla puede encontrar las siguientes posibilidades de ajuste: i. Duración de ilum.
(7) Sistema En el punto de menú Sistema encontrará las siguientes posibilidades de selección: i. Información Aquí puede obtener información sobre la Versión del firmware del reproductor, la memoria total disponible, la memoria ocupada (U:) y la memoria libre (F:) de su tarjeta de memoria. ii. Ajustes de fábrica Confirmando esta opción restablecerá los ajustes estándar del reproductor. 6. Tarjeta Micro SD Este reproductor no dispone de memoria interna.
7. Datos técnicos Dimensiones Peso LCD Conexión ordenador Batería Rango de frecuencia SNR Formato música Formato vídeo Formato grabación Formato imagen Temperatura funcionamiento Sistema operativo 88 mm (A) x 41 mm (A) x 9.0mm (F) ~30 gr. Pantalla color 4,4 cm (1.8 pulgadas), resolución: 128 x 160 píxeles USB 2.
Índice Índice ................................................................................................................................................................. 1 Indicações ...................................................................................................................................................... 3 1. geral do aparelho....................................................................................................................................... 4 2.
e) Função de gravação ............................................................................................................................ 13 (1) Gravação ...................................................................................................................................... 13 (2) Reprodução ................................................................................................................................. 14 f) Explorador de Ficheiros ..............................
Indicações Leia e siga o manual de instruções, bem como os avisos e indicações antes da primeira utilização do produto. Antes de utilizar o produto pela primeira vez, certifique-se de que a bateria está totalmente carregada. Evite impactos fortes no aparelho. Não utilize o aparelho em áreas extremamente frias, quentes, húmidas ou com pó. Nunca exponha o aparelho à luz solar direta. Não coloque fontes de luz desprotegidas, por exemplo, velas acesas, na proximidade do aparelho.
1. Geral do aparelho 1. Interruptor para ligar/desligar 2. Botão de seta para retroceder 3. Botão de volume (+) 4. 5. Botão para retroceder Botão play/pausa 6. Ligação mini USB 7. Entrada para auscultadores 8. Botão de volume (-) 9. Botão para avançar 10. Botão M (menu) 11. Ranhura para cartão micro SD 2.
3. Conectar a um computador Para partilhar ficheiros do seu leitor com um computador, pode ligar o seu leitor facilmente ao seu computador através do cabo USB fornecido. a) Conectar o aparelho Para conectar o aparelho, insira a ligação USB 2.0 do cabo USB numa porta USB livre do computador ligado, e insira a ligação mini USB do cabo ao leitor. Este é detetado como unidade de dados removível e está pronto para a transferência de dados com o computador.
4. A bateria O leitor possui uma bateria interna integrada. Antes de utilizar o produto pela primeira vez, certifique-se de que a bateria está totalmente carregada. Por norma, este processo tem uma duração de até 3 horas. Bateria totalmente carregada a) Carregar a bateria: A bateria é carregada através da ligação USB ao seu PC. Para carregar a bateria, ligue o aparelho ao PC através do cabo USB. O processo de carga é iniciado automaticamente. O símbolo de ligação (Connect) surge no ecrã do aparelho.
c) Utilização durante o processo de carga: Pode utilizar o leitor durante o processo de carga. Para tal, basta premir novamente o botão play/pausa e o aparelho muda automaticamente do indicador de estado de carga para o menu principal. Também pode visualizar o estado de carga durante a utilização. Este é exibido, por exemplo, durante a reprodução de música, em 3 níveis no canto superior direito. Se a bateria estiver totalmente carregada, os três campos são exibidos.
5. Operação Nota: Certifique-se de que está inserido um cartão micro SD no leitor! a) Utilização geral (1) Ligar e desligar o leitor Desloque o interruptor para ligar/desligar no lado esquerdo do aparelho para a posição "ON". Mantenha premido o botão play/pausa durante aprox. 3 segundos para ligar o leitor. Para colocar o aparelho no modo standby, mantenha o botão play/pausa premido durante aprox. 3 segundos.
(3) O menu principal Depois de ligar o aparelho surge o menu principal. Este é composto por até seis pontos diferentes (Música, Vídeo, Imagens, Gravação, Explorador de Ficheiros e Definições). Música Vídeo Imagens Gravação Ficheiro Definições (4) Navegação Pode navegar pelos diferentes menus com o botão para avançar e retroceder . Pode abrir o ponto de menu pretendido ou iniciar a função desejada com o botão play/pausa . Prima brevemente o botão de seta para retroceder para retroceder um nível.
b) Música (1) Reprodução Aceda ao ponto de menu Music a partir do menu principal e confirme a sua seleção com o botão play/pausa . É aberto o ecrã de reprodução e a reprodução é iniciada automaticamente. Para pausar ou retomar a reprodução, prima o botão play/pausa . Para avançar ou retroceder uma faixa, prima o botão para avançar ou para retroceder . Para avançar ou retroceder dentro de uma faixa, mantenha este botão premido. Prima o botão (+) ou o botão (-) para regular o volume.
(3) Ciclo A-B Este leitor permite selecionar uma secção de uma música e repeti-la permanentemente em ciclo. Prima o botão M durante a reprodução da música para definir o ponto inicial (A) do ciclo de reprodução. Prima novamente o botão M para determinar o ponto final (B). A secção selecionada será agora reproduzida em ciclo. Nota: Para outras opções de configuração, abra o ponto de menu Setup do menu principal.
(2) Vista de pastas Para passar do ecrã de reprodução para a vista de pastas, prima o botão de seta para retroceder . Navegue pelos ficheiros e pastas existentes com o botão para avançar ou retroceder . Se confirmar um ficheiro de vídeo com o botão play/pausa , este será reproduzido. Se confirmar uma pasta com este botão, a pasta será aberta. Com o botão de seta para retroceder pode aceder ao próximo nível da sua estrutura de pastas até chegar ao menu principal.
Para apagar um ficheiro, navegue até à vista de pastas, selecione o ficheiro pretendido e prima o botão M. Confirme este processo com o botão play/pausa definitivamente o ficheiro. para apagar Nota: Para outras opções de configuração, abra o ponto de menu Setup do menu principal. e) Função de gravação (1) Gravação Aceda ao ponto de menu Record a partir do menu principal e confirme a sua seleção com o botão play/pausa . O leitor está pronto a iniciar a gravação de sons através do microfone integrado.
(2) Reprodução Aceda ao ponto de menu File Explorer a partir do menu principal e confirme a sua seleção com o botão play/pausa . Selecione a pasta VOICE. Todas as gravações efetuadas são apresentadas por ordem cronológica. Aceda ao ficheiro pretendido e inicie a reprodução com o botão play/pausa . Para regressar ao menu principal, prima o botão de seta para retroceder . Nota: Para outras opções de configuração, abra o ponto de menu Setup do menu principal.
g) Definições Aceda ao ponto de menu Setup a partir do menu principal e confirme a sua seleção com o botão play/pausa . (1) Música No ponto de menu Música existem as seguintes opções de ajuste: i. Modo de reprodução Defina aqui o modo de reprodução pretendido. Reproduzir faixa uma vez Repetir faixa Reproduzir pasta uma vez Repetir pasta Reproduzir tudo uma vez Repetir tudo Introdução Reproduz a faixa pretendida uma vez e para a reprodução. A faixa selecionada é repetida.
(2) Gravação No ponto de menu Gravação pode definir a qualidade da gravação. Pode optar entre qualidade normal (32 KBPS) e qualidade elevada (64 KBPS). Tenha em atenção que a qualidade elevada ocupa mais espaço de memória. (3) Imagem No ponto de menu Imagem pode definir a duração da apresentação automática de diapositivos. Pode optar entre: 2 seg., 4 seg., 6 seg., 8 seg., e 10 seg. (4) Ecrã No ponto de menu Ecrã existem as seguintes opções de ajuste: i.
(7) Sistema No ponto de menu Sistema existem as seguintes opções de seleção: i. Informação Aqui pode obter informações sobre a versão de firmware do leitor, a capacidade de memória disponível, a memória utilizada (U:) e a memória livre (F:) do seu cartão de memória. ii. Definições de fábrica Se confirmar esta opção, as definições originais do leitor serão repostas. 6. Cartão micro SD Este leitor não possui uma memória interna utilizável.
7. Dados técnicos Dimensões Peso LCD Ligação a PC Bateria Gama de frequências SNR Formato de música Formato de vídeo Formato de gravação Formato de imagem Temperatura de funcionamento Sistema Operativo 88 mm (A) x 41 mm (L) x 9,0 mm (P) ~30 gr. Ecrã a cores de 4,4 cm (1,8 polegadas), resolução: 128 x 160 pixeis USB 2.
Spis treści Spis treści ........................................................................................................................................................... 1 Informacje ogólne.......................................................................................................................................... 3 1. Widok urządzenia ...................................................................................................................................... 4 2.
(1) Nagrywanie .................................................................................................................................. 13 (2) Odtwarzanie ................................................................................................................................ 14 f) Eksplorator plików .............................................................................................................................. 14 g) Ustawienia ..........................................
Informacje ogólne Przed pierwszym użyciem produktu należy przeczytać i przestrzegać niniejszą instrukcję obsługi. Przed pierwszym użyciem urządzenia należy zwrócić uwagę, aby całkowicie naładować baterię. Należy unikać silnych uderzeń sprzętu. Nie należy używać urządzenia w ekstremalnie zimnych, gorących, wilgotnych lub zakurzonych obszarach. Nie należy również wystawiać urządzenia na bezpośrednie działanie promieni słonecznych. W pobliżu produktu nie wolno stawiać otwartych źródeł ognia, jak np.
1. Widok urządzenia 1. Włącznik / wyłącznik Przycisk strzałka 2. cofnij 3. Przycisk głośności (+) 4. Przycisk wstecz 5. Przycisk play / pauza 6. Złącze mini USB 7. Wejście na słuchawki 8. Przycisk głośności (-) 9. Przycisk dalej 10. Przycisk M (menu) 11. gniazdo do karty Micro SD 2. Zawartość opakowania Proszę sprawdzić zawartość opakowania pod kątem kompletności.
3. Podłączanie do komputera Aby dokonać wymiany danych pomiędzy waszym odtwarzaczem a komputerem, można podłączyć odtwarzacz w łatwy sposób z komputerem za pomocą dołączonego kabla USB. a) Podłączenie urządzenia Aby podłączyć odtwarzacz z komputerem, należy włożyć wtyczkę USB 2.0 kabla USB w wolny port USB włączonego komputera i połączyć wtyczkę mini USB kabla z odtwarzaczem. Odtwarzacz zostanie rozpoznany jako nośnik wymiany danych i jest gotowy do przesyłania danych z komputerem.
4. Bateria Odtwarzacz posiada wbudowaną na stałe baterię wewnętrzną. Przed pierwszym użyciem urządzenia należy zwrócić uwagę, aby bateria była całkowicie naładowana. Proces ten trwa z reguły do 3 godzin. Bateria całkowicie naładowana a) Ładowanie bateri: Baterię ładuje się podłączając odtwarzacz poprzez złącze USB z komputerem. Aby naładować baterię, należy podłączyć urządzenie kablem USB do komputera. Proces ładowania załącza się automatycznie.
c) Używanie podczas procesu ładowania baterii : Można korzystać z odtwarzacza w trakcie procesu ładowania baterii. W tym celu naciśnij po prostu kolejny raz na przycisk ładowania na menu główne. Play/Pause a urządzenie zmieni wyświetlanie statusu Również w trakcie używania można podejrzeć aktualny stan ładowania baterii, który przykładowo podczas odtwarzania muzyki wyświetlany jest w stopniach w prawym górnym rogu. Jeżeli bateria jest w pełni naładowana, wówczas wyświetlają się wszystkie trzy pola.
5. Obsługiwanie Wskazówka: Należy zwrócić uwagę na to, czy karta micro SD jest włożona do odtwarzacza! a) Obsługiwanie ogólne (1) Włączanie i wyłączanie odtwarzacza Włącznik/wyłącznik znajdujący się po lewej stronie urządzenia należy przesunąć do pozycji „ON”. Następnie należy przytrzymać przycisk Play/Pause na około 3 sekundy, aby włączyć odtwarzacz. Aby wprawić urządzenie w tryb oczekiwania standby, należy ponownie przytrzymać przycisk Play/Pause na około 3 sekundy.
(3) Menu główne Po włączeniu odtwarzacza pojawi się menu główne. Składa się ono z sześciu różnych punktów menu (muzyka, video, aparat, nagrywanie, eksplorator plików i ustawienia). Muzyka Nagrywanie Video Pliki Aparat Ustawienia (4) Sterowanie Za pomocą przycisków dalej oraz wstecz można przechodzić przez różne menu. Za pomocą przycisku Play/Pause można otworzyć wybrany punkt menu lub rozpocząć wybraną funkcję. Naciśnij krótko przycisk strzałki cofnij, aby przejść do poziomu wstecz.
b) Muzyka (1) Odtwarzanie Przejdź z menu głównego do punktu menu Music i zatwierdź swój wybór za pomocą przycisku Play/Pause. Otworzy się ekran odtwarzania i odtwarzanie rozpocznie się automatycznie. Aby zrobić przerwę w odtwarzaniu lub ponownie kontynuować odtwarzanie, wciśnij za każdym razem przycisk Play/Pause. Aby przeskoczyć o jeden utwór do przodu lub do tyłu, należy nacisnąć przycisk dalej lub wstecz. Aby przewinąć dany utwór do przodu lub do tyłu, należy po prostu przytrzymać te przyciski.
(3) Pętla A-B Przy pomocy niniejszego odtwarza możliwe jest wybranie dowolnego okresu czasu utworu muzycznego i odtwarzać go stale w pętli. Podczas odtwarzania utworu muzycznego wciśnij przycisk M, aby ustalić punkt rozpoczęcia (A) pętli odtwarzania. Następnie ponownie wciśnij przycisk M, aby ustalić punkt końcowy (B) pętli. Wybrany okres czasu odtwarzany będzie w pętli. Wskazówka: W celu uzyskania więcej możliwości konfiguracji należy w menu głównym otworzyć punkt menu Setup [konfiguracja].
(2) Widok folderów Aby przejść z ekranu odtwarzania do widoku folderów, należy nacisnąć przycisk strzałki cofnij. Za pomocą przycisków dalej lub wstecz, można przeglądać dostępne pliki i foldery. Wybrany plik video należy zatwierdzić przyciskiem Play/Pause, wówczas zostanie on odtworzony. Jeżeli tym przyciskiem zatwierdzi się dany folder, zostanie on otworzony. Za pomocą przycisku strzałki cofnij, można przejść do następnego wyższego poziomu struktury folderów, aż do powrotu do menu głównego.
Aby skasować plik, należy przejść w widoku folderów do wybranego pliku i nacisnąć przycisk M. Proces ten należy zatwierdzić przyciskiem usunąć dany plik. Play/Pause, aby ostatecznie Wskazówka: W celu uzyskania więcej możliwości konfiguracji należy w menu głównym otworzyć punkt menu Setup [konfiguracja]. e) Funkcja nagrywania (1) Nagrywanie Przejdź w menu głównym do punktu menu Record i zatwierdź swój wybór za pomocą przycisku Play/Pause.
(2) Odtwarzanie Przejdź w menu głównym do punktu menu File Explorer i zatwierdź swój wybór za pomocą przycisku Play/Pause. Wybierz teraz folder VOICE. Wyświetlą się wszystkie dotychczas wykonane nagrania chronologicznie. Najedź na wybrany plik i rozpocznij odtwarzanie za pomocą przycisku Play/Pause. Za pomocą przycisku strzałki cofnij przejdź z powrotem do menu głównego. Wskazówka: W celu uzyskania więcej możliwości konfiguracji należy w menu głównym otworzyć punkt menu Setup [konfiguracja].
g) Ustawienia W menu głównym najedź na punkt menu Setup i zatwierdź swój wybór przyciskiem Play/Pause. (1) Muzyka W punkcie menu Musik dostępne są następujące możliwości ustawień: i. Tryb odtwarzania W tym miejscu można określić wybrany tryb odtwarzania. Odtwarzanie jednorazowe utworu Powtarzanie odtwarzania utworu Odtwarzanie folderu jednorazowe Odtwarzanie folderu powtórnie Wszystkie utwory jednorazowo Powtórzenie wszystkich utworów Intro Odtwarza wybrany utwór jeden raz i zatrzymuje odtwarzanie.
(2) Nagrywanie W punkcie menu Nagrywanie można określić jakość nagrywania. Do dyspozycji jest wybór pomiędzy jakością normalną (32 KBPS) i jakością wysoką (64 KBPS). Należy pamiętać, że wysoka jakość zabiera więcej miejsca w pamięci. (3) Aparat W punkcie menu Aparat można określić czas trwania wyświetlania automatycznego pokazu zdjęć. Do dyspozycji jest wybór pomiędzy: 2 s, 4 s, 6 s, 8 s, oraz 10 s. (4) Wyświetlacz W punkcie menu Wyświetlacz znajdują się następujące możliwości ustawień: i.
(6) Język W punkcie menu język można wybrać jeden z ośmiu domyślnie zainstalowanych języków. Można wybrać spośród języków angielski, hiszpański, francuski, niemiecki, włoski, portugalski, polski i rosyjski. (7) System W punkcie menu System dostępne są następujące możliwości ustawień: i.
7. Dane techniczne Wymiary Waga LCD Połączenie z komputerem Bateria Zakres częstotliwości SNR Format utworów muzycznych Format filmów video Format nagrywania Format zdjęć Temperatura robocza System operacyjny 88 mm (wys.) x 41 mm (szer.) x 9.0mm (głęb.) ~30 gr. 4,4 cm (1.8 Zoll) wyświetlacz kolorowy, rozdzielczość: 128 x 160 Pikseli USB 2.
Содержание Содержание...................................................................................................................................................... 1 Предупреждения ......................................................................................................................................... 3 1. Обзор устройства ..................................................................................................................................... 4 2. Комплект поставки ...
e) Функция записи................................................................................................................................. 13 (1) Запись.......................................................................................................................................... 13 (2) Воспроизведение ....................................................................................................................... 14 f) Поиск файлов .............................................
Предупреждения Прочитайте и соблюдайте руководство по эксплуатации и предупреждения перед первым использованием продукта. Перед первым использованием устройства, пожалуйста, убедитесь, что батарея полностью заряжена. Не допускайте воздействия на устройство сильных ударов и падений устройства с большой высоты. Не используйте данный проигрыватель в условиях очень высоких или низких температур, повышенной запыленности или влажности. Не допускайте воздействия на устройство прямых солнечных лучей.
1. Обзор устройства 1. Кнопка Включения/Выключения 2. Кнопка возврата назад 3. Кнопка Громкость (+) 4. 5. Кнопка Назад Кнопка Воспроизведение / Пауза 6. Мини USB-порт 7. Разъём для наушников 8. Кнопка Громкость (-) 9. Кнопка Вперёд 10. Кнопка М (Меню) 11. Слот для микро SD-карты 2. Комплект поставки Пожалуйста, проверьте содержимое упаковки на полноту.
3. Подключение к компьютеру Для обмена данными плеер необходимо подключить к компьютеру. Это можно сделать при помощи прилагаемого USB-кабеля. a) Подключение устройства Для подключения плеера к компьютеру подключите порт кабеля USB 2.0 в свободный USB-порт компьютера, и подключите мини-разъём USB-кабеля к плееру. После этого плеер будет признан в качестве съёмного диска и будет готов к обмену данными с компьютером.
4. Аккумулятор Плеер имеет установленный внутри аккумулятор. Перед первым использованием устройства, пожалуйста, убедитесь, что Вы полностью зарядили батарею. Этот процесс обычно занимает до 3 часов. Полностью заряженный аккумулятор a) Зарядка аккумулятора: Аккумулятор заряжается через USB-соединение с компьютером. Чтобы зарядить аккумулятор, подключите устройство к компьютеру при помощи USB-кабеля. Процесс зарядки начинётся автоматически. На дисплее устройства появится значок соединения (Connect).
c) Использование во время зарядки: Вы можете использовать устройство во время зарядки. Просто нажмите ещё раз на кнопку Воспроизведение/Пауза, и устройство переключится из состояния зарядной индикации в основное меню. Также во время использования Вы можете видеть текущее состояние зарядки. В правом верхнем углу будет отображаться степень зарядки во время воспроизведения музыки в 3 этапа. Когда аккумулятор полностью заряжен, отображаются три палочки.
5. Основные операции Примечание: Пожалуйста, обратите внимание, что в плеере установлена микро SD-карта! a) Общие принципы работы (1) Включение и выключение плеера Переместите кнопку Включения/Выключения на левой стороне устройства в положение “ON”. После этого нажмите и удерживайте в течение 3 секунд кнопку Воспроизведение/Пауза. Чтобы перевести устройство в режим ожидания, нажмите и удерживайте кнопку Воспроизведение/Пауза нажатой в течение 3 секунд.
(3) Главное меню После включения плеера на дисплее появится главное меню. Он состоит из шести различных пунктов (музыка, видео, фото, записи , файловый менеджер и настройки). Музыка Записи Видео Фото Файловый менеджер Настройки (4) Навигация Используйте кнопки Вперёд и Назад для навигации по различным разделам меню При помощи кнопки Воспроизведение/Запись можно открыть нужный пункт меню или запустить нужную функцию. Легко нажмите на кнопку Вернуться назад, чтобы вернуться в предыдущий уровень.
b) Музыка (1) Воспроизведение музыки Перейдите в главное меню, выберите пункт музыка и подтвердите свой выбор, нажав на кнопку Воспроизведение/Пауза. Откроется экран воспроизведения, и воспроизведение начнётся автоматически. Чтобы приостановить или возобновить воспроизведение, нажмите на кнопку Воспроизведение/Пауза. Чтобы перейти к предыдущему или следующему треку нажмите кнопку Вперёд или Назад. Для перемотки трека просто удерживайте одну из данных кнопок нажатой.
(3) Цикл A-B При помощи данного плеера можно выбрать любой музыкальный трек и повторять его в цикле через определённое время. Нажмите во время воспроизведения трека кнопку M, чтобы установить начальную точку (А) повторного воспроизведения, нажмите кнопку M снова, чтобы установить конечную точку (B). Выбранный период времени будет воспроизводиться определённый трек в цикле. Примечание: Чтобы воспользоваться дополнительными возможностями конфигурации , пожалуйста, откройте главное меню, выберите Настройка .
(2) Список файлов Чтобы выйти из экрана воспроизведения в список файлов, нажмите на кнопку Вернуться назад. Нажмите на кнопку Вперёд или Назад для просмотра файлов. Нажмите на кнопку Воспроизведение/Пауза чтобы выбрать видео файл для воспроизведения. Также нажмите эту кнопку для открытия файла. Нажмите кнопку Вернуться назад, чтобы вернуться на предыдущий уровень структуры файлов и для возврата в главное меню. Чтобы удалить файл, перейдите в список файлов, выберите нужный файл и нажмите кнопку M.
Чтобы удалить файл, перейдите в список файлов, выберите нужный файл и нажмите кнопку M. Для удаления файла нажмите кнопку Воспроизведение/Пауза. Примечание: Чтобы воспользоваться дополнительными возможностями конфигурации , пожалуйста, откройте главное меню, выберите настройки. e) Функция записи (1) Запись Перейдите в главное меню при помощи навигации, выберите пункт запись. Плеер готов начать аудиозапись при помощи встроенного микрофона. Просто нажмите кнопку Воспроизведение/Пауза.
(2) Воспроизведение Перейдите в главное меню к пункту Файлы и подтвердите свой выбор, нажав на кнопку Воспроизведение/Пауза. Теперь выберите папку VOICE. Все ранее сделанные записи располагаются в хронологическом порядке. Выберите нужный файл и начните воспроизведение при помощи кнопки Воспроизведение/Пауза. При помощи кнопки Вернуться назад можно выйти в главное меню. Примечание: Чтобы воспользоваться дополнительными возможностями конфигурации , пожалуйста, откройте главное меню, выберите настройки. .
g) Настройки При помощи навигации перейдите в пункт меню настройки и подтвердите свой выбор, нажав на кнопкуr Воспроизведение/Пауза. (1) Музыка В пункте меню Музыка доступны следующие опции: i. Воспроизведение Здесь можно указать желаемый режим воспроизведения Трек Повтор Папка Повтор Все файлы в папке Повтор всех файлов Интро Воспроизведение выбранного трека, затем воспроизведение будет остановлено. Повторное воспроизведение трека.
(2) Запись В данном пункте меню можно установить качество записи. Вы можете выбрать между нормальным качеством (32 Kbps) и высоким качеством (64 Kbps). Обратите внимание, что высокое качество требует больше дискового пространства. (3) Фото В данном пункте меню можно установить длительность автоматического показа слайдов. Вы можете выбрать между: 2 с, 4 с, 6 с, 8 с и 10 с. (4) Дисплей В пункте меню Дисплей доступны следующие опции: i.
(6) Язык В пункте меню Язык можно выбрать один из восьми предустановленных языков. Вы можете выбрать между английским, испанским, французским, немецким, итальянским, португальским, польским и русским языками. (7) Система В пункте меню Система доступны следующие опции: i. Информация Здесь можно посмотреть информацию о версии прошивки плеера, общем пространсте, доступном на диске, неиспользуемом пространстве (U:) и свободном пространстве (F:) на карте памяти. ii.
7. Техническая характеристика Размеры Вес ЖК-дисплей Соединение с ПК Аккумулятор Частотный диапазон SNR Формат музыки Формат видео Формат записи Формат изображения Рабочая температура Операцияонная система 88 мм (В) x 41 мм (Ш) x 9.0 мм (T) ~30 грамм 4,4 см (1.8Zoll) цветной дисплей, разрешение: 128 x 160 пикселей USB 2.