Inter-M, Ltd. (Korea) began operations in 1983. Since then, Inter-M has grown to become one of the largest manufacturers of professional audio and commercial sound electronics equipment in the world. Inter-M has gained worldwide recognition for its own branded products, as well as private label manufacturing of electronics sold under other names (OEM).
Operation Manual Automated Remote Message ARM-911
AUTOMATED REMOTE MESSAGE Welcome A personal welcome to you from the management and employees of Inter-M All of the co-workers here at Inter-M are dedicated to providing excellent products with inherently good value, and we are delighted you have purchased one of our products. We sincerely trust this product will provide years of satisfactory service, but if anything is not to your complete satisfaction, we will endeavor to make things right.
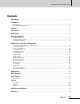
AUTOMATED REMOTE MESSAGE Contents Unpacking .......................................................................................................................................2 Installation Environment....................................................................................................................................2 Important Safety Instructions.............................................................................................................2 Features.......................
AUTOMATED REMOTE MESSAGE Unpacking Although your ARM-911 is neither complicated nor difficult to operate, we recommend you take a few minutes to read this brief manual and familiarize yourself with the important information regarding product features, setup and operation. As with most electronic devices, we strongly recommend you retain the original packaging. In the unlikely event the product must be returned for servicing, the original packaging (or reasonable equivalent) is required.
AUTOMATED REMOTE MESSAGE Features - Direct broadcasting of Emergency Message By pressing one of 10 instant play buttons, message file can be directly played. - SD Card Backup Backup SD card is installed inside so that Front SD card can be copied to the backup SD card. - MP3 Decoding MP3 file format is supported. - Remote Control by Network Using Network, ARM-911 can be controlled at remote place. - Remote Control by RS-232C Using RS-232C, ARM-911 can be controlled at remote place.
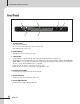
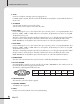
AUTOMATED REMOTE MESSAGE Front Panel 1 2 3 5 6 4 1. SD CARD COVER 2GB SD Card is installed. Be sure the direction when insert a SD card into the slot. Only 2GB memory can be used. 2. INDICATING LED The LED is lit when the button is pressed. 3. COPY BUTTON Use this button to copy the front SD card to the backup SD card which is inside the unit. The backup SD card is 2GB. When press the COPY button, the window displays ‘PRESS THE MODE KEY ONCE MORE’. Press the Display mode button to start COPY.
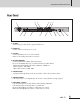
AUTOMATED REMOTE MESSAGE Rear Panel 1 12 2 3 4 11 10 5 6 8 9 7 13 14 15 16 1. AC INLET Connect the power cable which is supplied with the unit. 2. POWER SW Use this switch to turn the power on or off. . 3. DC INPUT Connect a DC24V power source to this terminal. Make sure the polarity when make a connection. 4. RM INPUT TERMINAL Connect the RM-911D or RM-911W to this terminal. Be sure for the CAT5E cable not to exceed the maximum operable distance.
AUTOMATED REMOTE MESSAGE 8. TEL IN Connect to a telephone exchange system for paging purposes. If a DTMF signal is inputted, then the unit decode the DTMF tone and play the corresponded file which is in the SD card. 9. TEL VOLUME Turn the volume clockwise to increase the volume. Turn the volume counter-clockwise to decrease the volume. 10. AUX1 INPUT Connect AUX signal source to this terminal. The input sensitivity can be set using GUI (Graphic User Interface), -50dBu, -10dBu or +4dBu.
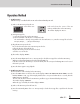
AUTOMATED REMOTE MESSAGE Operation Method 1. SD Disk Function 2GB SD memory is installed both front SD card and internal Backup SD card. (1) Take out the SD memory from the unit. Screw off the cover. Push and release the center of the SD memory and then take out the SD memory. The window displays ‘No Device’. (2) Storing message files ① Save 10 message files into the SD memory. ② The track number of the SD disc is in numerical order. The track number is directly corresponded to the front 10 buttons.
AUTOMATED REMOTE MESSAGE (4) Plug the SD memory into the slot. [NOTE] 1. When the SD memory is empted then, the indicating LED does not lit even though the Instant Play button is pressed. 2. ARM-911 can play MP3 files. MP3 : 44.1kHz sampling frequency, 16bit and 64kbps~320kbps bit rates. 3. The built-in SD memory is 2GB. [CAUTION] 1. DO NOT TURN OFF THE POWER during copying the memory disc, it causes the memory disc fault. 2. During copy the SD card, no other functions can be used. 3.
AUTOMATED REMOTE MESSAGE Web-browser Interface Configuration 1. Accessing to the ARM-911 Web-browser Connecting the TCP/IP port to your computer. Change the IP address of the computer (ex. 192.168.1.100) and change the Gateway to 192.168.1.99. Access to the web-browser by typing in the address bar of your internet browser such Explorer, Firefox or Safari the factory default IP address (192.168.1.99). If the IP address of the ARM-911 has been set to something different then use that address.
AUTOMATED REMOTE MESSAGE 1) Collect information on your network configuration. - A range of free IP addresses that can be allocated to the ARM-911 unit(s) without network conflicts. - The correct subnet mask. - The address of the Gateway and the DNS servers if you want your ARM-911 to be able to connect to the Internet. 2) Open the web interface of your ARM-911. 3) Select the Network Setting page.
AUTOMATED REMOTE MESSAGE 1) USE Activates the time signal schedule. 2) View Table Shows the current schedule. The following window will be opened when you click ‘New’. (1) Name : Indicates the title of the Schedule. (2) Files : Put your mouse over the icon and the set file name will appear. (3) Hour : Displays the set start and end time. (4) Day of the Week : Displays the day of the week. 3) ADD Press the ‘Add’ button to add a sound file. The following screen will appear.
AUTOMATED REMOTE MESSAGE 4) Delete : Press to delete a schedule and the following screen will appear: (1) Delete : Delete the selected schedule. (2) Select all : Select or clear the entire list. 5) Modify : Modify the time schedule. After modify the schedule, press the Apply button.
AUTOMATED REMOTE MESSAGE 6) Holiday Holiday schedule programming. The schedule is not broadcasted on the selected date. The following screen will appear. (1) Add : Add a holiday. (2) Enable : Select ENABLE to use the holiday setup. (3) Start/End Date : Set the start date and the end date of the holiday setup. (4) Start/End Time : set the start time and the end time of the holiday setup. Press the save button to save the holiday setup. 7) Delete (1) Delete : Delete the selected holiday schedule.
AUTOMATED REMOTE MESSAGE 8) Source File To manage add or delete source files. (1) Select : Select a file. Multiple file selection is possible by using the ‘CTRL‘ key in the keyboard. (2) Delete : Delete the selected file. (3) Preview : Play the selected file to check. (4) Stop : Stop to play. (5) Upload : Upload the desired file from the PC. Only MP3 file can be used. 4. Priority Setting Set the priority of the input sources. The value "0" is the top priority.
AUTOMATED REMOTE MESSAGE 5. AUX Input Setting Default setting is: AUX 1 – Mic level, Phantom ‘off’. AUX 2 – Line level (-10dBu), Phantom ‘off’. 6. Level Setting Set the volume of the inputs and output. Level can be set from 0 to 100. Default is 50.
AUTOMATED REMOTE MESSAGE 7. EQ Setting The EQ of every input can be set individually. Each input is set by selecting the respective channel button. Default value is 0 for each band. 20 Steps can be set from -10 to +10. High pass filter (65Hz) can be set for each input.
AUTOMATED REMOTE MESSAGE 8. RM Setting Password of RM-911D or RM-911W can be set. To use password, check the use box. Type in 4 digit (0, 1, ..., 9) of password and press the Set button. If password is set, then the password have to be entered before select the INSTANT PLAY button on RM-911D or RM-911W and select the TALK button. If the entered password is not correct or does not entered, then the IN USE LEDs which are on RM-911D/W are blinking.
AUTOMATED REMOTE MESSAGE 9. Message Control Message playback can be controlled. Choose Play button to play the message. Playback number can be set. Choose Stop button to stop the playback.
AUTOMATED REMOTE MESSAGE 10. Contact Setting Type of the contact input can be set. Momentary : The message is played during the contact input is shorted. Switch : The message is played when the contact input is shorted and stopped when the contact input is shorted again. Contact output can be set. Select the message number and press the set button, then contact is output when the message is played. Normally the contact is open. It is closed when the message is played.
AUTOMATED REMOTE MESSAGE 11. Time Setting Time zone and current time can be set. 1) Time Zone The default time zone is (GMT+09:00) Seoul. Select a correct time zone in the box according to your geographical zone. 2) Current Time Displays the current date and time. 3) Time Setup (1) Manual Setup ARM-911 uses internal clock to make time so that its time has some drift from the correct time. It is needed to adjust the time regularly.
AUTOMATED REMOTE MESSAGE 12. Log View This page displays the log information of the ARM-911 setting and history of modification with time. If time has not been set, the log information will be shown with jan/ 1/ 1970 as default date.
AUTOMATED REMOTE MESSAGE 13. Upgrade Down load the new firmware to your computer. Go to the system upgrade page. Choose the firmware from your computer using the ‘FIND FILE’ Tab. Start the firmware upgrade by clicking the ‘set’ button. Network settings will be retained after the upgrade.
AUTOMATED REMOTE MESSAGE 14. Restart To restart the ARM-911, press the 'Set' button. Reboot process takes about 30 seconds. 15. Factory Setting To reset the ARM-911 to factory default, press the ‘Set’ button. Reset process takes about 30 seconds. The network and time setting will be reset to default setting.
AUTOMATED REMOTE MESSAGE 16. Password Setting Current Password – Enter the current password. New Password – Enter the new password. Password Confirm – Confirm the new password. Press the ‘Set’ button. Default password is ‘1’. Different password can be set for admin, clock and trigger. To keep security, the password have to be changed to new one before use.
AUTOMATED REMOTE MESSAGE Applications Telephone PBX CD-6208 Switch Local #1 Speaker RM-911D ARM-911 RM-911D Local #2 Speaker RM-911W DPA-1200S(Amplifier) RM-911W ARM-911 25
AUTOMATED REMOTE MESSAGE Block Diagram 26 ARM-911
AUTOMATED REMOTE MESSAGE Specifications ARM-911 AUX 1/2 (CH IN @1kHz) Input Sensitivity -50dBu Setting -10dBu Setting +4dBu Setting Signal to Noise Ratio (S/N, 20kHz LPF, A-WTD) +10dBu Input +4dBu Input -10dBu Input -50dBu Input Total Harmonic Distortion (20kHz LPF) +4dBu Input -10dBu Input -50dBu Input Frequency Response (+1/-3dB) -10dBu Input SD CARD (Play MP3, 0dBFS 1kHz File) Input Sensitivity Signal to Noise Ratio (S/N, 20kHz LPF, A-WTD) Total Harmonic Distortion (20kHz LPF) Frequency Response (+0.
AUTOMATED REMOTE MESSAGE , , , ※ DIMENSIONS 280 440 44 482 28 ARM-911
AUTOMATED REMOTE MESSAGE Service Procedures Take steps to insure the problem is not related to operator error or other products within the system. Information provided in the troubleshooting portion of this manual may help with this process. Once it is certain that the problem is related to the product contact your warranty provider as described in the warranty section of this manual. Schematic A Schematic is available by contacting your warranty provider.