
Instructions / Assembly

Not intended for use on floors, exposed outdoor surfaces or in areas with high humidity
or contact with water.
IMPORTANT: Always check and comply with all applicable building and fie codes.
Mock-ups depicted are for illustration purposes only. Clearances required for
installations adjacent to household gas cooking appliances may vary depending upon
appliance type, heat output and jurisdiction.
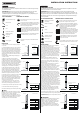
TOOLS REQUIRED
INSTALLING
PREPARING TO INSTALL
BEFORE INSTALLATION
Air-powered finish nail gun
Rubber mallet
Level
Stud
Construction adhesive
Installing vertically:
furring strips
Miter saw
Safety goggles
Store boards indoors in a clean, dry space. Do not
store on concrete.
At least 72 hours before installation, place boards in
the space where they’ll be installed to allow wood to
adjust to differences in humidity and temperature.
Remove any packaging material.
Plan how you will cut and place your boards on the
wall or ceiling.ShipLap can be installed horizontally
or vertically. For horizontal applications, start at the
bottom with the overlap pointing downward. Do not
nail through overlap.
If installing vertically, use of horizontal furring strips
is recommended every 16 inches on center.
1. Start at the base of a wall or ceiling so gravity is
on your side.
Vertical installation: Install full-length furring strips
16 inches on center.
3. Make sure the boards are level. Adjust as
needed if the wall or ceiling isn’t perfectly square.
4. Nail the first boad into a stud or rafter through the
top flange of the boad. A second nail should be placed
through the bottom face of the board, approximately 1
inch from the bottom edge where the nail will be
covered by trim. Remember to avoid nailing through
overlapping pieces, to minimize risk of splitting.
5. Butt subsequent boards at studs or rafters and
continue until you reach the opposite corner. Use a
mallet or wood block to butt boards tightly before
securing. If using adhesive, ensure a tight joint by
using small tack nails to hold the board in place while
adhesive sets. Apply tack nails every 2 or 3 feet.
6. Begin the second row by placing the overlap of the
board over the flange of the pevious row. Use a
rubber mallet or wood block to gently tap boards into
place, without damaging the flange. Nailthrough the
flange and 1 inch fom the bottom, making sure nail
does not go through two layers.
• This information is intended to assist in the proper
installation of this product. It’s not intended to replace
local building codes or industry standards.
Installation in accordance with applicable codes is
the sole responsibility of the installer and we assume
no liability for product installed improperly or not in
conformity with such codes and standards.
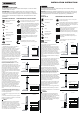
7. Check every 2-3 rows to be sure your boards
remain parallel to the first row. If needed, you can
cheat a bit by not butting tight to the previous row.
8. Continue until you reach the top of the wall or ceiling.
9. Face-nail the final board along the top edge.
10. Finish with matching trim, if desired by face-nailing.
2. Horizontal installation: Start in a corner and lay the
first boad (overlap side down) with its side edge in
the corner. Leave ¼-inch expansion gap between the
floor and firstow of boards (leave ¼-inch expansion
between wall and ceiling if covering a ceiling) and a
¼-inch gap between board and corner. This space
allows the wood to expand and contract and can be
covered by trim.
If installing over drywall, find and mark studs with
chalk line.
72
ENGLISH
WALL
FLOOR
SHIPLAP
1/4-INCH EXPANSION GAP
SIDE VIEW
FLANGE
OVERLAP
1/4-INCH EXPANSION GAP
1/4-INCH EXPANSION GAP
WALL
FLOOR
SHIPLAP
STRAIGHT-ON VIEW
FLANGE
OVERLAP
WALL
FLOOR
FACE-NAIL
CONTINUE TO OPPOSITE CORNER
FACE-NAIL
STAGGER BUTT JOINTS ON EACH ROW
WALL
FLOOR
SIDE VIEW STRAIGHT-ON VIEW
STRAIGHT-ON VIEW
WALL
FLOOR
TRIM
FACE-NAIL TRIM
SIDE VIEW STRAIGHT-ON VIEW
NOTE
Non destiné à être utilisé sur les sols, les surfaces extérieures exposées ou dans des
zones très humides ou en contact avec de l'eau.
IMPORTANT: vérifiez toujours et respectez tous les codes de bâtiments et de
bâtiments en vigueur. Les maquettes décrites sont à titre d'illustration uniquement. Les
dégagements requis pour les installations adjacentes à des appareils de cuisson à gaz
domestiques peuvent varier en fonction du type d'appareil, de la puissance thermique
et de la juridiction.
OUTILS NÉCESSAIRES
INSTALLATION
PRÉPARATION À L’INSTALLATION
VANT L'INSTALLATION
Pistolet à clous de finition
pneumatique
Maillet en caoutchouc
Niveau
Goujon
Adhésif de construction
Installation verticale:
bandes de fourrure
Scie à onglet
Lunettes de sécurité
Rangez les planches à l'intérieur dans un espace
propre et sec. Ne pas stocker sur du béton.
Au moins 72 heures avant l’installation, placez les
panneaux dans l’espace où ils seront installés pour
permettre au bois de s’adapter aux différences
d’humidité et de température. Retirez tout le
matériel d'emballage.
Planifiez la manière dont vous allez couper et
placer vos panneaux au mur ou au plafond.ShipLap
peut être installé horizontalement ou verticalement.
Pour les applications horizontales, commencez par
le bas avec le chevauchement dirigé vers le bas.
Ne clouez pas à travers le chevauchement.
En cas d'installation verticale, il est recommandé
d'utiliser des lattes de fourrure horizontales tous
les 16 pouces au centre.
1. Commencez à la base d'un mur ou d'un plafond
afin que la gravité soit de votre côté.
Installation verticale: Installez des bandes de
fourrure pleine longueur de 16 pouces au centre.
3. Assurez-vous que les planches sont de niveau.
Ajustez au besoin si le mur ou le plafond n’est pas
parfaitement carré.
4. Clouer le premier bourrelet dans un montant ou
un chevron à travers la bride supérieure du
bourrelet. Un deuxième clou doit être placé à travers
la face inférieure de la planche, à environ 1 pouce
du bord inférieur où le clou sera recouvert de
garniture. N'oubliez pas d'éviter de clouer les pièces
qui se chevauchent, afin de minimiser les risques de
fracture.
5. Butt les planches suivantes aux poteaux ou les
chevrons et continue jusqu'à ce que vous atteigniez
le coin opposé. Utilisez un maillet ou un bloc de bois
pour bien serrer les planches avant de les fixer. Si
vous utilisez un adhésif, assurez-vous que les joints
sont bien serrés à l’aide de petits clous adhésifs pour
maintenir la carte en place pendant la prise de
l’adhésif. Appliquez des ongles tous les 2 ou 3 pieds.
6. Commencez la deuxième rangée en plaçant le
chevauchement de la planche sur la bride de la rangée
précédente. Utilisez un maillet en caoutchouc ou un
bloc de bois pour enfoncer doucement les planches en
place, sans endommager la bride. Clouer à travers la
bride et 1 pouce du bas, en veillant à ce que le clou ne
traverse pas deux couches.
• Ces informations sont destinées à aider à la bonne
installation de ce produit. Il n’est pas destiné à
remplacer les codes de construction locaux ou les
normes de l’industrie. L'installation conformément
aux codes en vigueur relève de la seule
responsabilité de l'installateur. Nous n'assumons
aucune responsabilité pour les produits installés de
manière incorrecte ou non conforme à ces codes et
normes.
7. Vérifiez toutes les 2-3 lignes pour vous assurer
que vos planches restent parallèles à la première
ligne.Si nécessaire, vous pouvez tricher un peu en
ne serrant pas trop la ligne précédente.
8. Continuez jusqu'au sommet du mur ou du plafond.
9. Clouer la dernière planche le long du bord supérieur.
10. Terminer avec la garniture correspondante, si désiré
en clouant le visage.
2. Installation horizontale: Commencez par un coin et
posez le premier chargement (côté chevauchement
vers le bas) avec le bord latéral dans le coin. Laisser
un écart de dilatation de ¼ de pouce entre le sol et la
première rangée de planches (laisser une dilatation
de ¼ de pouce entre le mur et le plafond si le plafond
est recouvert) et un écart de ¼ de pouce entre la
planche et le coin. Cet espace permet au bois de se
dilater et de se contracter et peut être recouvert par
des boiseries.
Si vous installez sur des cloisons sèches, trouvez et
marquez les montants avec un cordeau à la craie.
72
FRANÇAIS
MUR
SOL
SHIPLAP
1/4-INCH EXPANSION GAP
VUE DE CÔTÉ
BRIDE
CHEVAUCHEMENT
1/4-INCH EXPANSION GAP
GAP D'EXPANSION DE 1/4 POUCE
MUR
SOL
SHIPLAP
VUE STRAIGHT-ON
BRIDE
CHEVAUCHEMENT
MUR
SOL
VISAGE-ONGLE
CONTINUER À UN COIN OPPOSÉ
VISAGE-ONGLE
STAGGER BUTT JOINTS SUR
CHAQUE ROW
MUR
SOL
VUE DE CÔTÉ VUE STRAIGHT-ON
STRAIGHT-ON VIEW
MUR
SOL
RÉDUIRE
FACE-NAIL TRIM
VUE DE CÔTÉ VUE STRAIGHT-ON
REMARQUE
INSTALLATION INSTRUCTION